Adding interactive modals to the Home tab
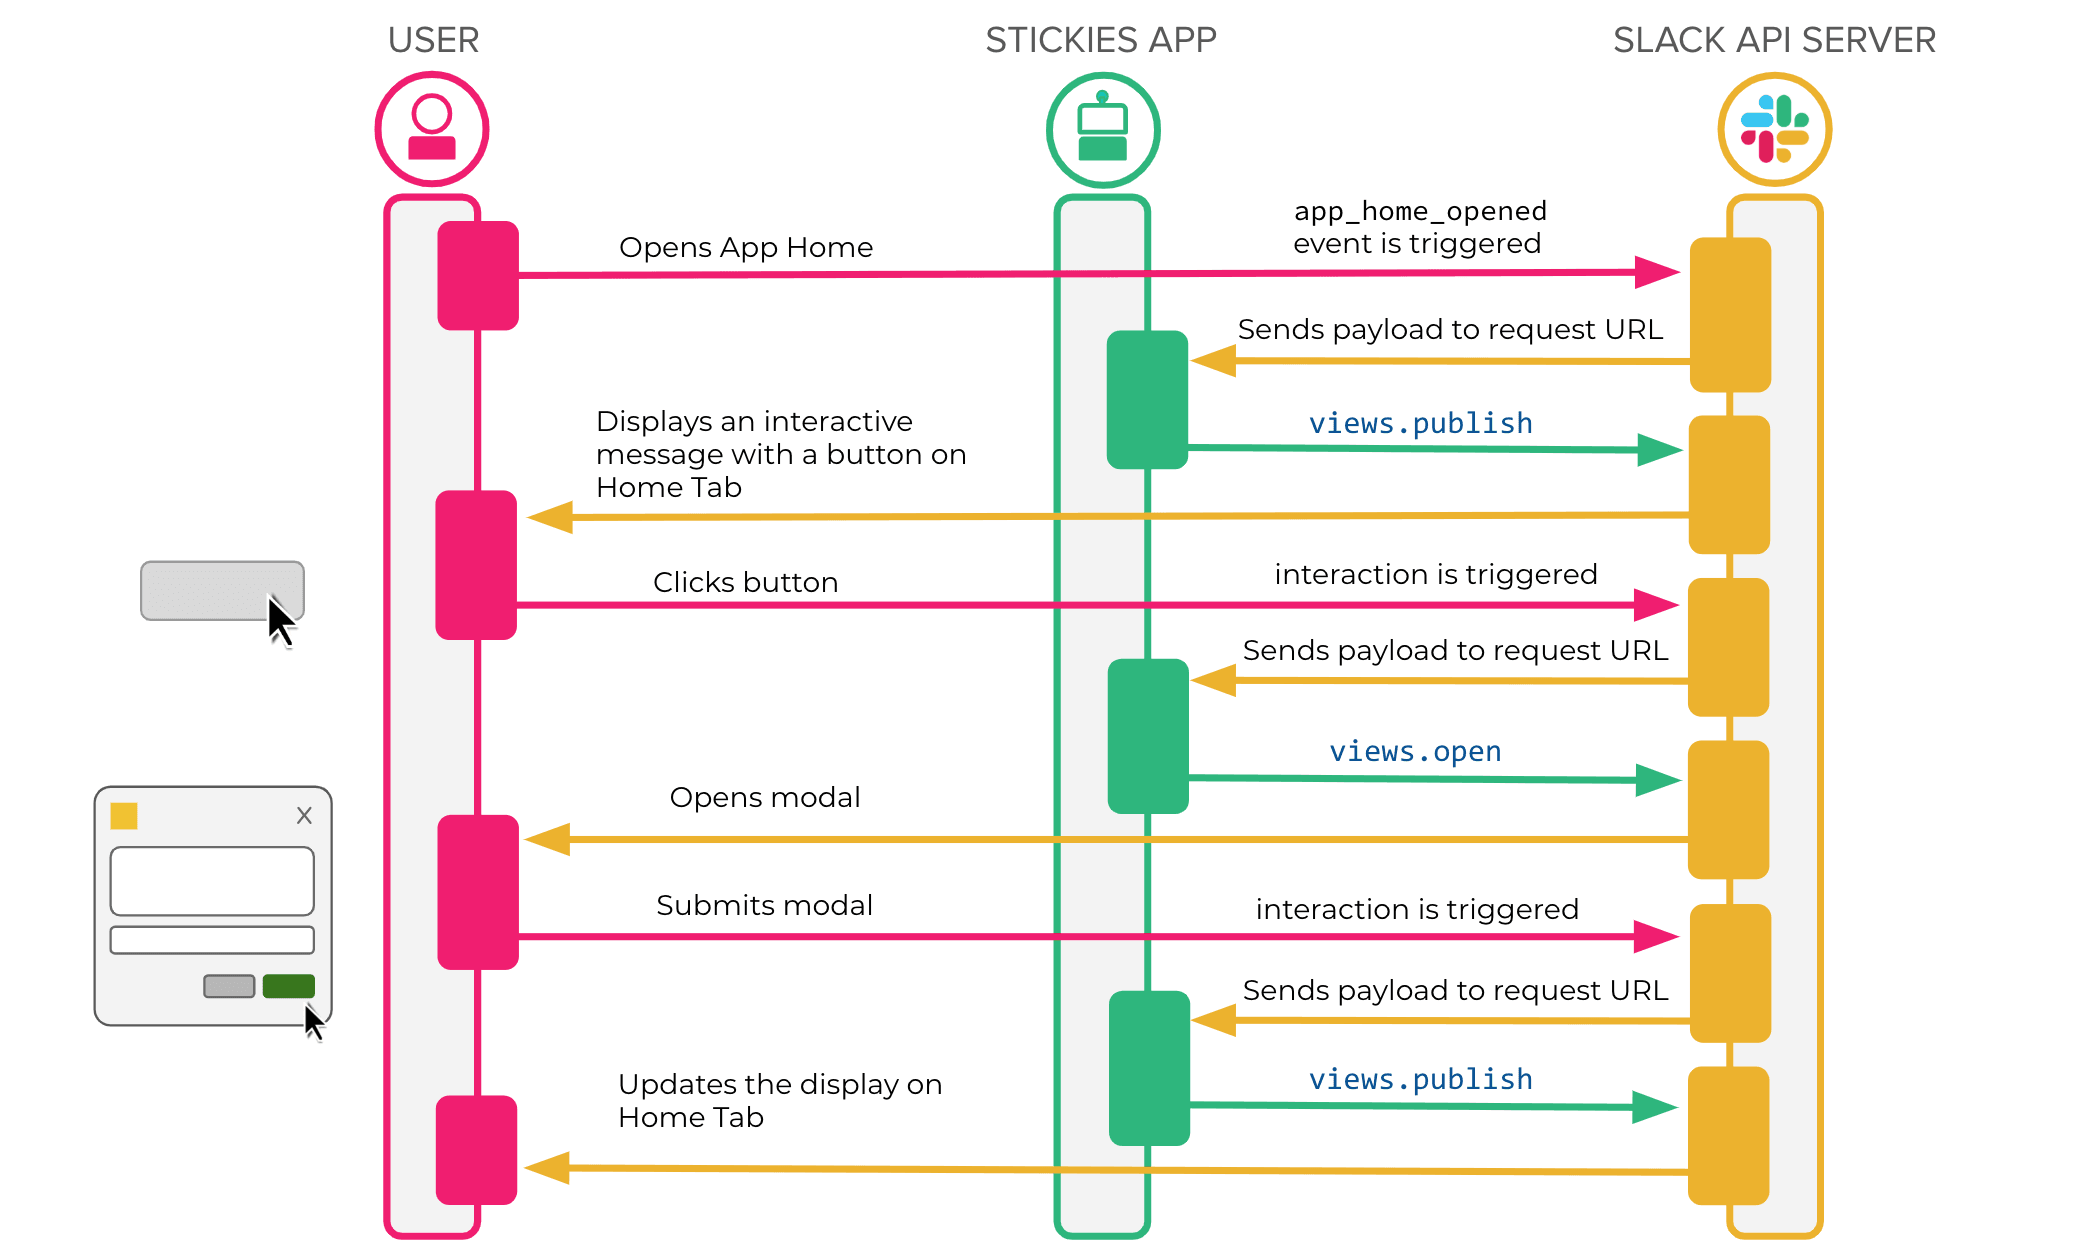
To demonstrate what you can do with App Home, we'll take a look at an app called Stickies, which allows users to store short, private notes within the App Home. The user and app flows are described below.
We've kept this page up as it maintains useful instruction and code snippets!
User flow
- A user clicks the name of the app under Apps within their Slack client (the Home tab should be opened by default).
- The user can add a new note by clicking the button in the pane.
- The user fills out the form in a modal window, then clicks Create.
- The Home tab is automatically updated with the new note entry.
App flow
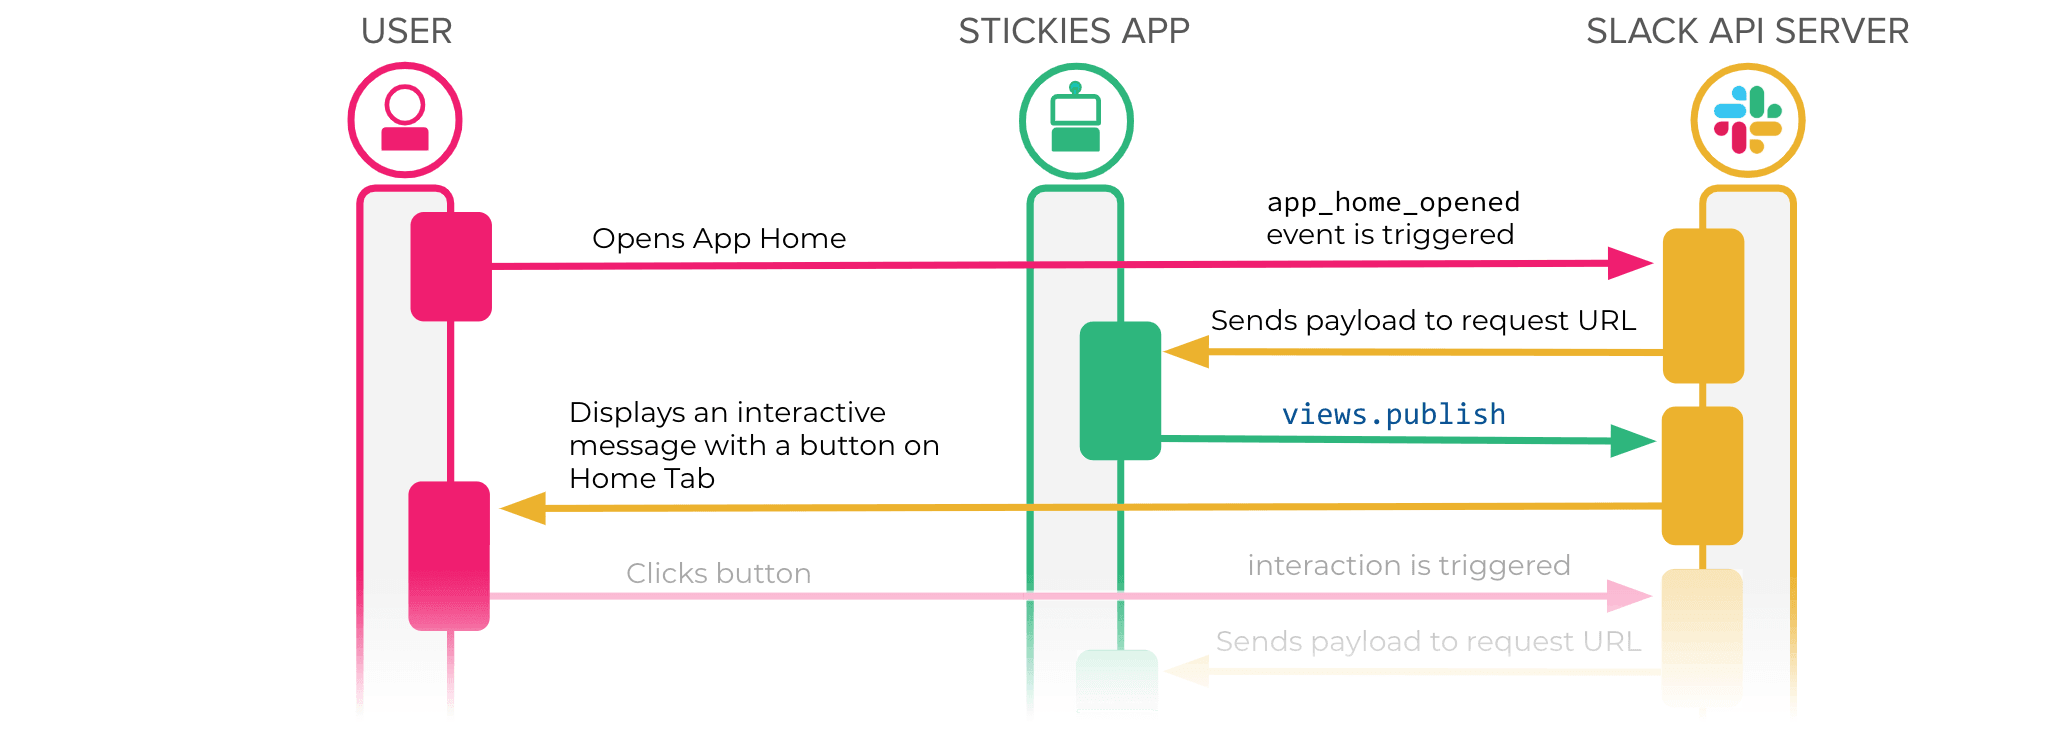
- When a user opens the App Home, the
app_home_openedevent gets triggered and sent to the app server. - The app uses the user ID from the event payload to display the initial view with a button using the
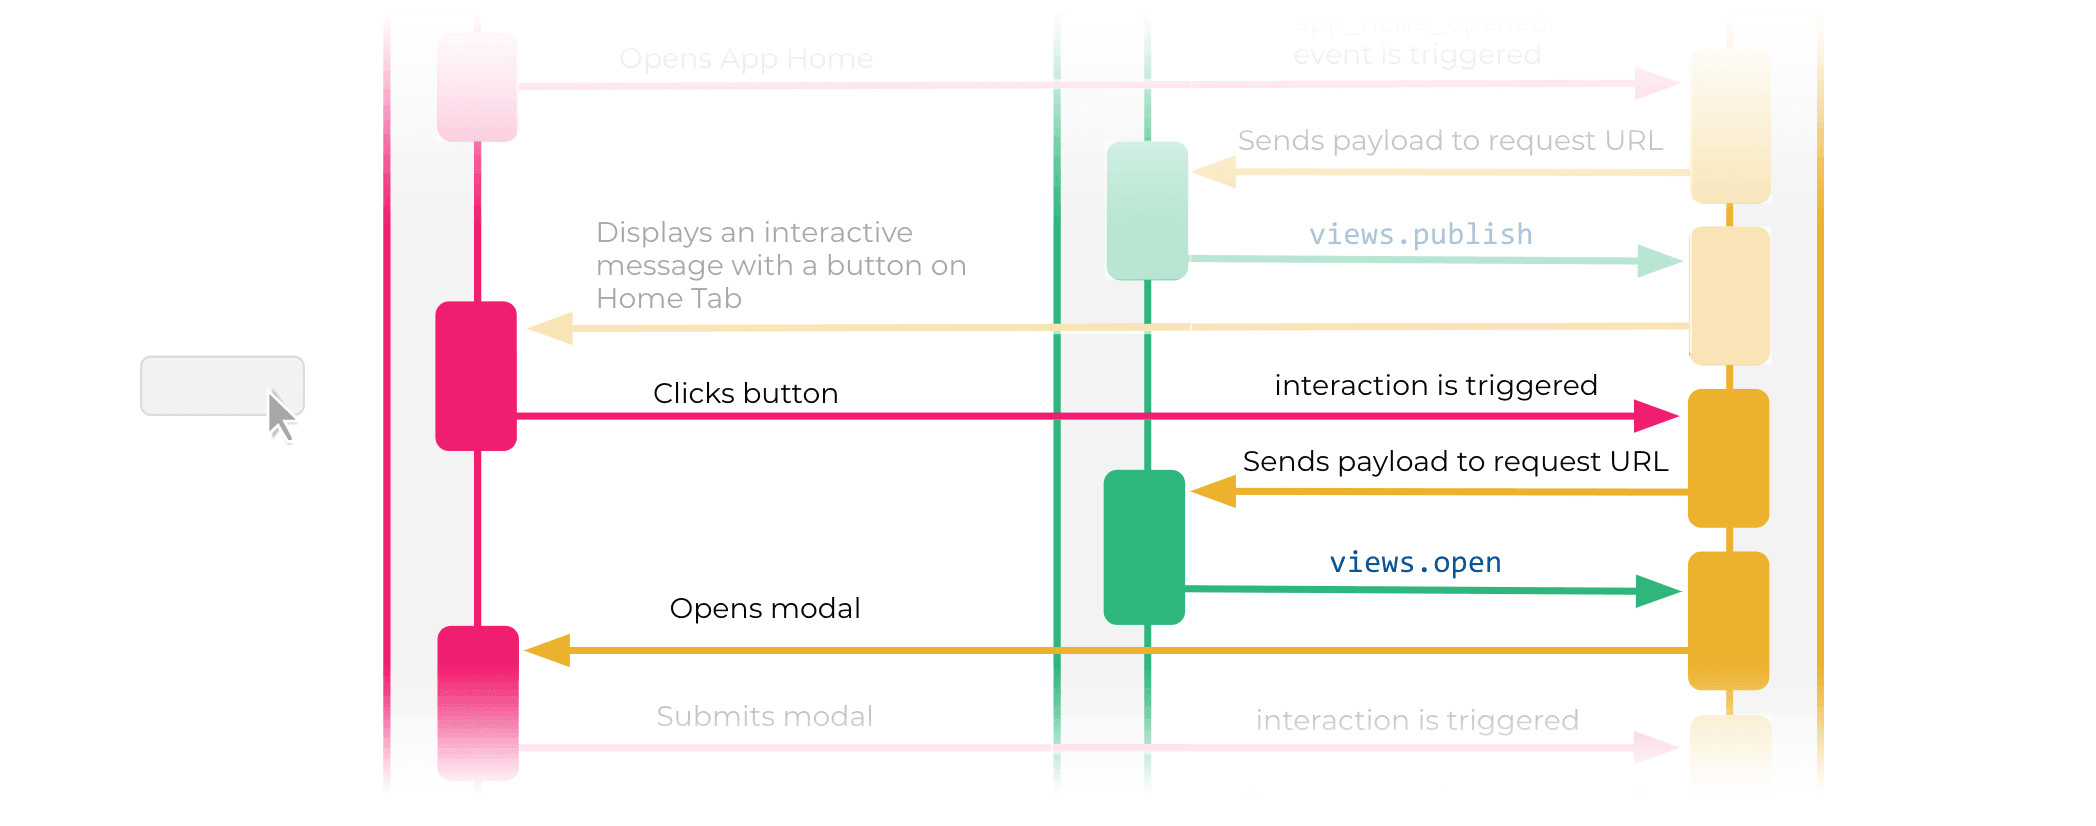
views.publishAPI method. - When the user clicks Add a Stickie, an interaction is triggered.
- The app opens a modal with form inputs using the
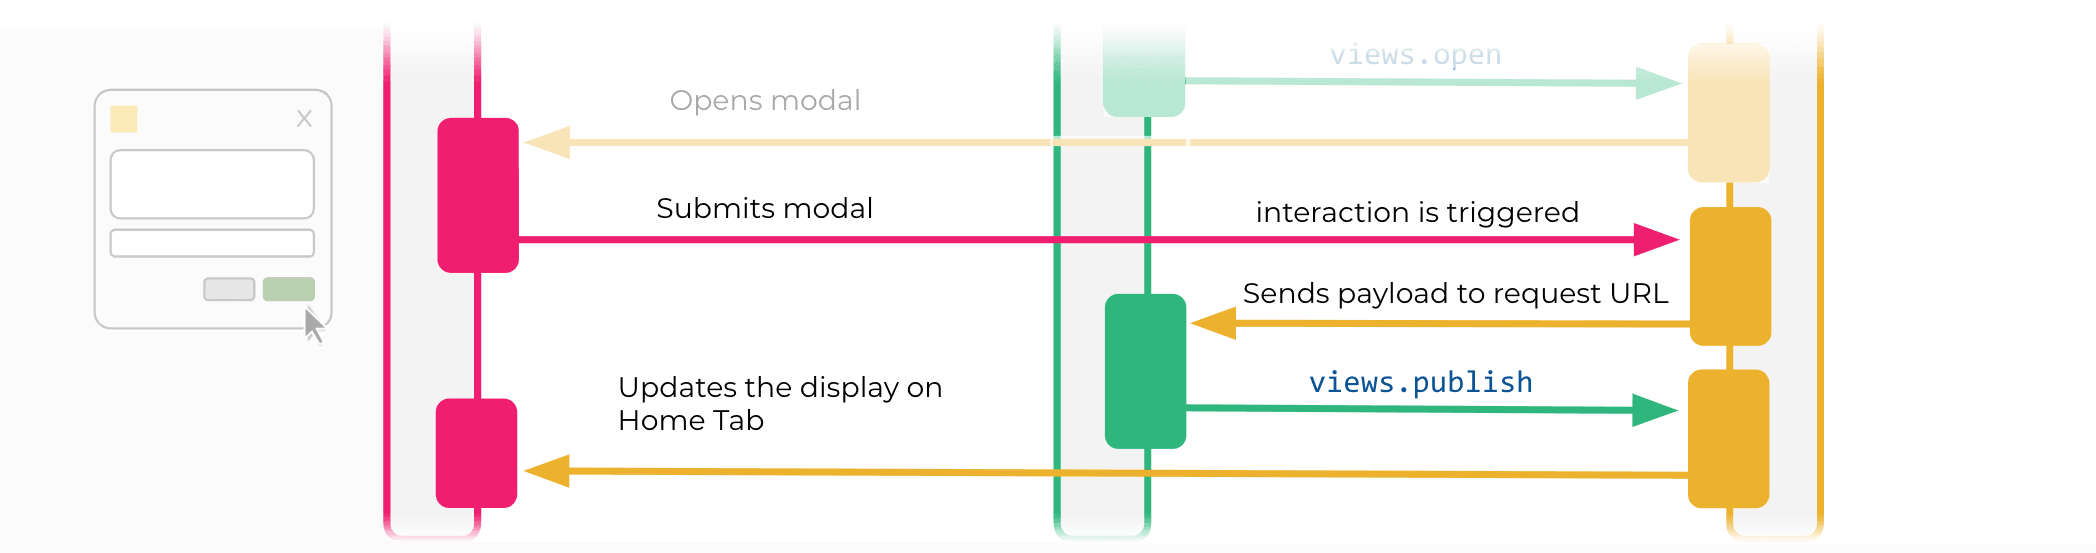
views.openAPI method. - Once the user submits the form, another interaction is triggered with a type of
view_submission. - The App Home is updated using the
views.publishAPI method.
This guide uses Node.js with Express as the web server. All API calls are made with straightforward HTTP requests and responses. Hopefully, the code is readily comprehensible for any language you use.
Triggering the app_home_opened event
Use an HTTP POST method route to create an endpoint to receive the event payload. This is where Slack API server sends you a JSON payload when an event is fired. Once you receive the data, check whether the event type is app_home_opened, then prepare to display the App Home view.
Here is the code snippet from index.js:
app.post('/slack/events', async(req, res) => {
  switch (req.body.type) {
    case 'url_verification': {
      // verify Events API endpoint by returning challenge if present
      res.send({ challenge: req.body.challenge });
      break;
    }
    case 'event_callback': {
      // Verify the signing secret
      if (!signature.isVerified(req)) {
        res.sendStatus(404);
        return;
      }
      // Request is verified --
      else {
        const {type, user, channel, tab, text, subtype} = req.body.event;
        // Triggered when the App Home is opened by a user
        if(type === 'app_home_opened') {
          // Display App Home
          appHome.displayHome(user);
        }
Let’s display a rich content in App Home view with rich message layout, Block Kit:
const displayHome = async(user, data) => {
  const args = {
    token: process.env.SLACK_BOT_TOKEN,
    user_id: user,
    view: await updateView(user)
  };
  const result = await axios.post('/views.publish', qs.stringify(args));
};
To display content in the App Home, call the view.publish API method. In this example, we'll use the axios module to handle the API calls via HTTP POST.
Constructing the view with Block Kit
We'll call another function to create JSON to construct the view to be displayed. This function can be reused when you update the view when new content is added later. This code snippet shows how to build and display the initial view:
const updateView = async(user) => {
    let blocks = [
    {
      // Section with text and a button
      type: "section",
      text: {
        type: "mrkdwn",
        text: "*Welcome!* \nThis is a home for Stickers app. You can add small notes here!"
      },
      accessory: {
        type: "button",
        action_id: "add_note",
        text: {
          type: "plain_text",
          text: "Add a Stickie"
        }
      }
    },
    // Horizontal divider line
    {
      type: "divider"
    }
  ];
  let view = {
    type: 'home',
    title: {
      type: 'plain_text',
      text: 'Keep notes!'
    },
    blocks: blocks
  }
  return JSON.stringify(view);
};
The blocks array defined in the code snippet above is prototyped with Block Kit Builder.
In the actual source code, the function is dynamic, and it takes additional content from the interactive button and modal.
Handling user interaction
Once a user clicks the button, a modal opens.
Notice that the action_id is specified in the message building block. Use the identifier to retrieve the data we need. Once a user clicks the button, the API server sends your Request URL a payload for the user action, which contains a trigger_id. You'll need this to open a modal.
app.post('/slack/actions', async(req, res) => {
  const { token, trigger_id, user, actions, type } = JSON.parse(req.body.payload);
  if(actions && actions[0].action_id.match(/add_/)) {
    openModal(trigger_id);
  }
});
Opening a modal
This is how you create form elements (input box and a drop-down menu with a submit button) in a modal view. For this example, we'll make a form with a multi-line text input and a pick-a-color dropdown.
To open the modal, call the views.open API method:
const openModal = async(trigger_id) => {
  const modal = {
    type: 'modal',
    title: {
      type: 'plain_text',
      text: 'Create a stickie note'
    },
    submit: {
      type: 'plain_text',
      text: 'Create'
    },
    blocks: [
      // Text input
      {
        "type": "input",
        "block_id": "note01",
        "label": {
          "type": "plain_text",
          "text": "Note"
        },
        "element": {
          "action_id": "content",
          "type": "plain_text_input",
          "placeholder": {
            "type": "plain_text",
            "text": "Take a note... "
          },
          "multiline": true
        }
      },
      // Drop-down menu
      {
        "type": "input",
        "block_id": "note02",
        "label": {
          "type": "plain_text",
          "text": "Color",
        },
        "element": {
          "type": "static_select",
          "action_id": "color",
          "options": [
            {
              "text": {
                "type": "plain_text",
                "text": "yellow"
              },
              "value": "yellow"
            },
            {
              "text": {
                "type": "plain_text",
                "text": "blue"
              },
              "value": "blue"
            }
          ]
        }
      }
    ]
  };

  const args = {
    token: process.env.SLACK_BOT_TOKEN,
    trigger_id: trigger_id,
    view: JSON.stringify(modal)
  };

  const result = await axios.post('https://slack.com/api/views.open', qs.stringify(args));
};
The code snippet seems long, but as you can see, it's mostly just constructing a JSON for the form UI. See how it's built on Block Kit Builder.
Handling the form submission
The submission from a user is handled in the same way the button click from the Home tab was handled.
When the form in the modal is submitted, a payload is sent to the same endpoint of the action. You can differentiate the submission by checking the type in the payload data. The full code snippet from the index.js file is below:
app.post('/slack/actions', async(req, res) => {
  //console.log(JSON.parse(req.body.payload));
  const { token, trigger_id, user, actions, type } = JSON.parse(req.body.payload);
  // Button with "add_" action_id clicked --
  if(actions && actions[0].action_id.match(/add_/)) {
    // Open a modal window with forms to be submitted by a user
    appHome.openModal(trigger_id);
  }
  // Modal forms submitted --
  else if(type === 'view_submission') {
    res.send(''); // Make sure to respond to the server to avoid an error
    const ts = new Date();
    const { user, view } = JSON.parse(req.body.payload);
    const data = {
      timestamp: ts.toLocaleString(),
      note: view.state.values.note01.content.value,
      color: view.state.values.note02.color.selected_option.value
    }
    appHome.displayHome(user.id, data);
  }
});
Updating the App Home view
Append the newly acquired data from the user to the current view block, and re-render the Home tab view using the views.publish API method.
In this example, we're using a persistent database with the node-json-db module. Each time a user adds a new note, the data is pushed to the data array. We'll create a new data block in JSON, then append it to the existing JSON, and finally display the new view by calling the views.publish API method.
You can see the source code in the appHome.js file below:
const updateView = async(user) => {
  // Intro message -
  let blocks = [
    {
      type: "section",
      text: {
        type: "mrkdwn",
        text: "Hello! Make a note of things you don't want to forget."
      },
      accessory: {
        type: "button",
        action_id: "add_note",
        text: {
          type: "plain_text",
          text: "Add sticky note",
          emoji: true
        }
      }
    },
    {
      type: "divider"
    }
  ];
  // Append new data blocks after the intro -
  let newData = [];
  try {
    const rawData = db.getData(`/${user}/data/`);
    newData = rawData.slice().reverse(); // Reverse to make the latest first
    newData = newData.slice(0, 50); // Just display 20. Block Kit display has some limit.
  } catch(error) {
    //console.error(error);
  };
  if(newData) {
    let noteBlocks = [];
    for (const o of newData) {
      const color = (o.color) ? o.color : 'yellow';
      let note = o.note;
      if (note.length > 3000) {
        note = note.substr(0, 2980) + '... _(truncated)_'
        console.log(note.length);
      }
      noteBlocks = [
        {
          type: "section",
          text: {
            type: "mrkdwn",
            text: note
          },
          accessory: {
            type: "image",
            image_url: `https://example.com/example.png`,
            alt_text: "stickie note"
          }
        },
        {
          "type": "context",
          "elements": [
            {
              "type": "mrkdwn",
              "text": o.timestamp
            }
          ]
        },
        {
          type: "divider"
        }
      ];
      blocks = blocks.concat(noteBlocks);
    }
  }
  // The final view -
  let view = {
    type: 'home',
    title: {
      type: 'plain_text',
      text: 'Keep notes!'
    },
    blocks: blocks
  }
  return JSON.stringify(view);
};

/* Display App Home */
const displayHome = async(user, data) => {
  if(data) {
    // Store in a local DB
    db.push(`/${user}/data[]`, data, true);
  }
  const args = {
    token: process.env.SLACK_BOT_TOKEN,
    user_id: user,
    view: await updateView(user)
  };
  const result = await axios.post(`${apiUrl}/views.publish`, qs.stringify(args));
  try {
    if(result.data.error) {
      console.log(result.data.error);
    }
  } catch(e) {
    console.log(e);
  }
};