# Slack Platform Documentation - JavaScript (Bolt for JavaScript + Node Slack SDK)
> Documentation for the JavaScript (Bolt for JavaScript + Node Slack SDK) stack only. Pair with llms-full-platform.txt for platform concepts, auth, and API reference.
> Generated from the built site. Each page is also available individually at its URL + `.md`.
> Page index: https://docs.slack.dev/llms-sitemap.md
Source: https://docs.slack.dev/tools/bolt-js
# Bolt for JavaScript
Bolt for JavaScript is a JavaScript framework to build Slack apps with the latest Slack platform features. Read the [Quickstart Guide](/tools/bolt-js/getting-started) to set up and run your first Bolt app.
Then, explore the rest of the pages within the Guides section. The documentation there will help you build a Bolt app for whatever use case you may have.
## Getting help {#getting-help}
These docs have lots of information on Bolt for JavaScript. There's also an in-depth Reference section. Please explore!
If you otherwise get stuck, we're here to help. The following are the best ways to get assistance working through your issue:
* [Issue Tracker](http://github.com/slackapi/bolt-js/issues) for questions, bug reports, feature requests, and general discussion related to Bolt for JavaScript. Try searching for an existing issue before creating a new one.
* [Email](mailto:support@slack.com) our developer support team: `support@slack.com`.
## Release notes {#release-notes}
Check out the [Bolt for JavaScript release notes](https://github.com/slackapi/bolt-js/releases) for all the latest happenings.
## Contributing {#contributing}
These docs live within the [Bolt-JS](https://github.com/slackapi/bolt-js/) repository and are open source.
We welcome contributions from everyone! Please check out our [Contributor's Guide](https://github.com/slackapi/bolt-js/blob/main/.github/contributing.md) for how to contribute in a helpful and collaborative way.
---
Source: https://docs.slack.dev/tools/bolt-js/concepts/acknowledge
# Acknowledging requests
Actions, commands, and options requests must **always** be acknowledged using the `ack()` function. This lets Slack know that the request was received and updates the Slack user interface accordingly. Depending on the type of request, your acknowledgement may be different. For example, when acknowledging a modal submission you will call `ack()` with validation errors if the submission contains errors, or with no parameters if the submission is valid.
We recommend calling `ack()` right away before sending a new message or fetching information from your database since you only have 3 seconds to respond.
## Example {#example}
```
// Regex to determine if this is a valid emaillet isEmail = /^[\w\-\.]+@([\w\-]+\.)+[\w\-]+$/;// This uses a constraint object to listen for modal submissions with a callback_id of ticket_submit app.view('ticket_submit', async ({ ack, view }) => { // get the email value from the input block with `email_address` as the block_id const email = view.state.values['email_address']['input_a'].value; // if it’s a valid email, accept the submission if (email && isEmail.test(email)) { await ack(); } else { // if it isn’t a valid email, acknowledge with an error await ack({ "response_action": "errors", errors: { "email_address": "Sorry, this isn’t a valid email" } }); }});
```
---
Source: https://docs.slack.dev/tools/bolt-js/concepts/actions
# Listening & responding to actions
Your app can listen and respond to user actions like button clicks, and menu selects, using the `action` method.
## Listening to actions {#listening-to-actions}
Actions can be filtered on an `action_id` of type string or RegExp object. `action_id`s act as unique identifiers for interactive components on the Slack platform.
You’ll notice in all `action()` examples, `ack()` is used. It is required to call the `ack()` function within an action listener to acknowledge that the request was received from Slack. This is discussed in the [acknowledging requests section](/tools/bolt-js/concepts/acknowledge).
View more information about the `block_actions` payload within the [relevant API documentation page](/reference/interaction-payloads). To access the full payload of a view from within a listener, reference the `body` argument within your callback function.
```
// Your listener function will be called every time an interactive component with the action_id "approve_button" is triggeredapp.action('approve_button', async ({ ack }) => { await ack(); // Update the message to reflect the action});
```
### Listening to actions using a constraint object {#listening-to-actions-using-a-constraint-object}
You can use a constraints object to listen to `callback_id`s, `block_id`s, and `action_id`s (or any combination of them). Constraints in the object can be of type string or RegExp object.
```
// Your listener function will only be called when the action_id matches 'select_user' AND the block_id matches 'assign_ticket'app.action({ action_id: 'select_user', block_id: 'assign_ticket' }, async ({ body, client, ack, logger }) => { await ack(); try { // Make sure the action isn't from a view (modal or app home) if (body.message) { const result = await client.reactions.add({ name: 'white_check_mark', timestamp: body.message.ts, channel: body.channel.id }); logger.info(result); } } catch (error) { logger.error(error); } });
```
## Responding to actions {#responding-to-actions}
There are two main ways to respond to actions. The first (and most common) way is to use the `say` function. The `say` function sends a message back to the conversation where the incoming request took place.
The second way to respond to actions is using `respond()`, which is a simple utility to use the `response_url` associated with an action.
```
// Your middleware will be called every time an interactive component with the action_id “approve_button” is triggeredapp.action('approve_button', async ({ ack, say }) => { // Acknowledge action request await ack(); await say('Request approved 👍');});
```
### Using the respond() utility {#using-the-respond-utility}
Since `respond()` is a utility for calling the `response_url`, it behaves in the same way. You can pass a JSON object with a new message payload that will be published back to the source of the original interaction with optional properties like `response_type` (which has a value of `in_channel` or `ephemeral`), `replace_original`, and `delete_original`.
```
// Listens to actions triggered with action_id of “user_select”app.action('user_select', async ({ action, ack, respond }) => { await ack(); if (action.type === 'users_select') { await respond(`You selected <@${action.selected_user}>`); }});
```
---
Source: https://docs.slack.dev/tools/bolt-js/concepts/adding-agent-features
# Adding agent features with Bolt for JavaScript
Check out the Support Agent sample app
The code snippets throughout this guide are from our [Support Agent sample app](https://github.com/slack-samples/bolt-js-support-agent), Casey, which supports integration with the Claude Agent SDK and OpenAI Agents SDK.
View our [agent quickstart](/ai/agent-quickstart) to get up and running with Casey. Otherwise, read on for exploration and explanation of agent-focused Bolt features found within Casey.
Your agent can utilize features applicable to messages throughout Slack, like [chat streaming](#text-streaming) and [feedback buttons](#adding-and-handling-feedback). They can also [utilize the `Assistant` class](/tools/bolt-js/concepts/using-the-assistant-class) for a side-panel view designed with AI in mind.
If you're unfamiliar with using these feature within Slack, you may want to read the [API docs on the subject](/ai/). Then come back here to implement them with Bolt!
* * *
## Slack MCP Server {#slack-mcp-server}
Casey can harness the [Slack MCP Server](https://docs.slack.dev/ai/slack-mcp-server/developing) when deployed via an HTTP Server with OAuth.
To enable the Slack MCP Server:
1. Install [ngrok](https://ngrok.com/download) and start a tunnel:
```
ngrok http 3000
```
2. Copy the `https://*.ngrok-free.app` URL from the ngrok output.
3. Update `manifest.json` for HTTP mode:
* Set `socket_mode_enabled` to `false`
* Replace `ngrok-free.app` with your ngrok domain (e.g. `YOUR_NGROK_SUBDOMAIN.ngrok-free.app`)
4. Create a new local dev app:
```
slack install -E local
```
5. Enable MCP for your app:
* Run `slack app settings` to open your app's settings
* Navigate to **Agents & AI Apps** in the left-side navigation
* Toggle **Model Context Protocol** on
6. Update your `.env` OAuth environment variables:
* Run `slack app settings` to open App Settings
* Copy **Client ID**, **Client Secret**, and **Signing Secret**
* Update `SLACK_REDIRECT_URI` in `.env` with your ngrok domain
```
SLACK_CLIENT_ID=YOUR_CLIENT_IDSLACK_CLIENT_SECRET=YOUR_CLIENT_SECRETSLACK_SIGNING_SECRET=YOUR_SIGNING_SECRETSLACK_REDIRECT_URI=https://YOUR_NGROK_SUBDOMAIN.ngrok-free.app/slack/oauth_redirect
```
7. Start the app:
```
slack run app-oauth.js
```
8. Click the install URL printed in the terminal to install the app to your workspace via OAuth.
Your agent can now access the Slack MCP server!
* * *
## Listening for user invocation {#listening-for-user-invocation}
Agents can be invoked throughout Slack, such as via @mentions in channels, messaging the agent, and using the assistant side panel.
* App mention
* Message
* Assistant thread
```
import { runCaseyAgent } from '../../agent/index.js';import { sessionStore } from '../../thread-context/index.js';import { buildFeedbackBlocks } from '../views/feedback-builder.js';export async function handleAppMentioned({ client, context, event, logger, say, sayStream, setStatus }) { try { const channelId = event.channel; const text = event.text || ''; const threadTs = event.thread_ts || event.ts; const userId = context.userId; // Strip the bot mention from the text const cleanedText = text.replace(/<@[A-Z0-9]+>/g, '').trim(); if (!cleanedText) { await say({ text: "Hey there! How can I help you? Describe your IT issue and I'll do my best to assist.", thread_ts: threadTs, }); return; } // Add eyes reaction only to the first message (not threaded replies) if (!event.thread_ts) { await client.reactions.add({ channel: channelId, timestamp: event.ts, name: 'eyes', }); } ...
```
```
import { runCaseyAgent } from '../../agent/index.js';import { sessionStore } from '../../thread-context/index.js';import { buildFeedbackBlocks } from '../views/feedback-builder.js';function isGenericMessageEvent(event) { return !('subtype' in event && event.subtype !== undefined);}function getIssueMetadata(event) { const metadata = event.metadata; return metadata?.event_type === 'issue_submission' ? metadata : null;}export async function handleMessage({ client, context, event, logger, say, sayStream, setStatus }) { // Skip message subtypes (edits, deletes, etc.) if (!isGenericMessageEvent(event)) return; // Issue submissions are posted by the bot with metadata so the message // handler can run the agent on behalf of the original user. const issueMetadata = getIssueMetadata(event); // Skip bot messages that are not issue submissions. if (event.bot_id && !issueMetadata) return; const isDm = event.channel_type === 'im'; const isThreadReply = !!event.thread_ts; if (isDm) { // DMs are always handled } else if (isThreadReply) { // Channel thread replies are handled only if the bot is already engaged const session = sessionStore.getSession(event.channel, event.thread_ts); if (session === null) return; } else { // Top-level channel messages are handled by app_mentioned return; } try { const channelId = event.channel; const text = event.text || ''; const threadTs = event.thread_ts || event.ts; // For issue submissions the bot posted the message, so the real // user_id comes from the metadata rather than the event context. const userId = issueMetadata ? issueMetadata.event_payload.user_id : context.userId; const existingSessionId = sessionStore.getSession(channelId, threadTs); // Add eyes reaction only to the first message (DMs only — channel // threads already have the reaction from the initial app_mention) if (isDm && !existingSessionId) { await client.reactions.add({ channel: channelId, timestamp: event.ts, name: 'eyes', }); } ...
```
```
const SUGGESTED_PROMPTS = [ { title: 'Reset Password', message: 'I need to reset my password' }, { title: 'Request Access', message: 'I need access to a system or tool' }, { title: 'Network Issues', message: "I'm having network connectivity issues" },];export async function handleAssistantThreadStarted({ client, event, logger }) { const { channel_id: channelId, thread_ts: threadTs } = event.assistant_thread; try { await client.assistant.threads.setSuggestedPrompts({ channel_id: channelId, thread_ts: threadTs, title: 'How can I help you today?', prompts: SUGGESTED_PROMPTS, }); } catch (e) { logger.error(`Failed to handle assistant thread started: ${e}`); }}
```
* * *
## Setting status {#setting-assistant-status}
Your app can show its users action is happening behind the scenes by setting its thread status.
```
export async function handleAppMentioned({ setStatus, ...args }) { await setStatus({ status: 'Thinking…', loading_messages: [ 'Teaching the hamsters to type faster…', 'Untangling the internet cables…', 'Consulting the office goldfish…', 'Polishing up the response just for you…', 'Convincing the AI to stop overthinking…', ], });}
```
* * *
## Streaming messages {#text-streaming}
You can have your app's messages stream in to replicate conventional agent behavior. Bolt for JavaScript provides a `sayStream` utility as a listener argument available for `app.event` and `app.message` listeners.
The `sayStream` utility streamlines calling the JavaScript Slack SDK's [`WebClient.chat.stream`](https://slack.dev/node-slack-sdk/web-api#streaming-messages) helper utility by sourcing parameter values from the relevant event payload.
Parameter
Value
`channel_id`
Sourced from the event payload.
`thread_ts`
Sourced from the event payload. Falls back to the `ts` value if available.
`recipient_team_id`
Sourced from the event `team_id` (`enterprise_id` if the app is installed on an org).
`recipient_user_id`
Sourced from the `user_id` of the event.
If neither a `channel_id` or `thread_ts` can be sourced, then the utility will be `null`.
```
app.message('*', async ({ sayStream }) => { const stream = sayStream(); await stream.append({ markdown_text: "Here's my response..." }); await stream.append({ markdown_text: "And here's more..." }); await stream.stop();});
```
* * *
## Adding and handling feedback {#adding-and-handling-feedback}
You can use the [feedback buttons block element](/reference/block-kit/block-elements/feedback-buttons-element/) to allow users to immediately provide feedback regarding the app's responses. Here's what the feedback buttons look like from the Support Agent sample app:
.../listeners/views/feedback-builder.js
```
export function buildFeedbackBlocks() { return [ { type: 'context_actions', elements: [ { type: 'feedback_buttons', action_id: 'feedback', positive_button: { text: { type: 'plain_text', text: 'Good Response' }, accessibility_label: 'Submit positive feedback on this response', value: 'good-feedback', }, negative_button: { text: { type: 'plain_text', text: 'Bad Response' }, accessibility_label: 'Submit negative feedback on this response', value: 'bad-feedback', }, }, ], }, ];}
```
That feedback block is then rendered at the bottom of your app's message via the `sayStream` utility.
```
// Stream response in thread with feedback buttonsconst streamer = sayStream();await streamer.append({ markdown_text: responseText });const feedbackBlocks = buildFeedbackBlocks();await streamer.stop({ blocks: feedbackBlocks });
```
You can also add a response for when the user provides feedback.
...listeners/actions/feedback-buttons.js
```
export async function handleFeedbackButton({ ack, body, client, context, logger }) { await ack(); try { const userId = context.userId; const channelId = body.channel.id; const messageTs = body.message.ts; const feedbackValue = body.actions[0].value; if (feedbackValue === 'good-feedback') { await client.chat.postEphemeral({ channel: channelId, user: userId, thread_ts: messageTs, text: 'Glad that was helpful! :tada:', }); } else { await client.chat.postEphemeral({ channel: channelId, user: userId, thread_ts: messageTs, text: "Sorry that wasn't helpful. :slightly_frowning_face: Try rephrasing your question or I can create a support ticket for you.", }); } logger.debug(`Feedback received: value=${feedbackValue}, message_ts=${messageTs}`); } catch (e) { logger.error(`Failed to handle feedback: ${e}`); }}
```
* * *
## Full example {#full-example}
Putting all those concepts together results in a dynamic agent ready to helpfully respond.
Full example
* Claude Agent SDK
* OpenAI Agents SDK
listeners/events/app-mentioned.js
```
import { runCaseyAgent } from '../../agent/index.js';import { sessionStore } from '../../thread-context/index.js';import { buildFeedbackBlocks } from '../views/feedback-builder.js';export async function handleAppMentioned({ client, context, event, logger, say, sayStream, setStatus }) { try { const channelId = event.channel; const text = event.text || ''; const threadTs = event.thread_ts || event.ts; const userId = context.userId; // Strip the bot mention from the text const cleanedText = text.replace(/<@[A-Z0-9]+>/g, '').trim(); if (!cleanedText) { await say({ text: "Hey there! How can I help you? Describe your IT issue and I'll do my best to assist.", thread_ts: threadTs, }); return; } // Add eyes reaction only to the first message (not threaded replies) if (!event.thread_ts) { await client.reactions.add({ channel: channelId, timestamp: event.ts, name: 'eyes', }); } // Set assistant thread status with loading messages await setStatus({ status: 'Thinking…', loading_messages: [ 'Teaching the hamsters to type faster…', 'Untangling the internet cables…', 'Consulting the office goldfish…', 'Polishing up the response just for you…', 'Convincing the AI to stop overthinking…', ], }); // Get conversation session const existingSessionId = sessionStore.getSession(channelId, threadTs); // Run the agent with deps for tool access const deps = { client, userId, channelId, threadTs, messageTs: event.ts }; const { responseText, sessionId: newSessionId } = await runCaseyAgent(cleanedText, existingSessionId, deps); // Stream response in thread with feedback buttons const streamer = sayStream(); await streamer.append({ markdown_text: responseText }); const feedbackBlocks = buildFeedbackBlocks(); await streamer.stop({ blocks: feedbackBlocks }); // Store conversation session if (newSessionId) { sessionStore.setSession(channelId, threadTs, newSessionId); } } catch (e) { logger.error(`Failed to handle app mention: ${e}`); await say({ text: `:warning: Something went wrong! (${e})`, thread_ts: event.thread_ts || event.ts, }); }}
```
listeners/events/app-mentioned.js
```
import { run } from '@openai/agents';import { CaseyDeps, caseyAgent } from '../../agent/index.js';import { conversationStore } from '../../thread-context/index.js';import { buildFeedbackBlocks } from '../views/feedback-builder.js';export async function handleAppMentioned({ client, context, event, logger, say, sayStream, setStatus }) { try { const channelId = event.channel; const text = event.text || ''; const threadTs = event.thread_ts || event.ts; const userId = context.userId; // Strip the bot mention from the text const cleanedText = text.replace(/<@[A-Z0-9]+>/g, '').trim(); if (!cleanedText) { await say({ text: "Hey there! How can I help you? Describe your IT issue and I'll do my best to assist.", thread_ts: threadTs, }); return; } // Add eyes reaction only to the first message (not threaded replies) if (!event.thread_ts) { await client.reactions.add({ channel: channelId, timestamp: event.ts, name: 'eyes', }); } // Set assistant thread status with loading messages await setStatus({ status: 'Thinking…', loading_messages: [ 'Teaching the hamsters to type faster…', 'Untangling the internet cables…', 'Consulting the office goldfish…', 'Polishing up the response just for you…', 'Convincing the AI to stop overthinking…', ], }); // Get conversation history const history = conversationStore.getHistory(channelId, threadTs); const inputItems = history ? [...history, { role: 'user', content: cleanedText }] : cleanedText; // Run the agent const deps = new CaseyDeps(client, userId, channelId, threadTs, event.ts); const result = await run(caseyAgent, inputItems, { context: deps }); // Stream response in thread with feedback buttons const streamer = sayStream(); await streamer.append({ markdown_text: result.finalOutput }); const feedbackBlocks = buildFeedbackBlocks(); await streamer.stop({ blocks: feedbackBlocks }); // Store conversation history conversationStore.setHistory(channelId, threadTs, result.history); } catch (e) { logger.error(`Failed to handle app mention: ${e}`); await say({ text: `:warning: Something went wrong! (${e})`, thread_ts: event.thread_ts || event.ts, }); }}
```
* * *
## Onward: adding custom tools {#onward-adding-custom-tools}
Casey comes with test tools and simulated systems. You can extend it with custom tools to make it a fully functioning Slack agent.
In this example, we'll add a tool that makes live calls to check the GitHub status.
1. Create `agent/tools/{tool-name}.js` and define the tool with the `tool()` function:
agent/tools/check-github-status.js
```
import { tool } from '@anthropic-ai/claude-agent-sdk';export const checkGitHubStatusTool = tool( 'check_github_status', 'Check GitHub\'s current operational status', {}, async () => { const response = await fetch('https://www.githubstatus.com/api/v2/status.json'); const data = await response.json(); const status = data.status.indicator; const description = data.status.description; return { content: [ { type: 'text', text: `**GitHub Status** — ${status}\n${description}`, } ] }; });
```
2. Import the tool in `agent/casey.js`:
agent/casey.js
```
import { checkGitHubStatusTool } from './tools/check-github-status.js';
```
3. Add to the tools array in `caseyToolsServer`:
agent/casey.js
```
const caseyToolsServer = createSdkMcpServer({ name: 'casey-tools', version: '1.0.0', tools: [ checkGitHubStatusTool, // Add here // ... other tools ],});
```
4. Add to `CASEY_TOOLS`:
agent/casey.js
```
const CASEY_TOOLS = [ 'check_github_status', // Add here // ... other tools];
```
Use this example as a jumping off point for building out an agent with the capabilities you need!
---
Source: https://docs.slack.dev/tools/bolt-js/concepts/authenticating-oauth
# Authenticating with OAuth
OAuth allows installation of your app to any workspace and is an important step in distributing your app. This is because each app installation issues unique [access tokens with related installation information](#the-installation-object) that can be retrieved for incoming events and used to make scoped API requests.
All of the additional underlying details around authentications can be found within [the Slack API documentation](/authentication/installing-with-oauth)!
## Configuring the application {#configuring-the-application}
To set your Slack app up for distribution, you will need to enable Bolt OAuth and store installation information securely. Bolt supports OAuth by using the [`@slack/oauth`](/tools/node-slack-sdk/oauth) package to handle most of the work; this includes setting up OAuth routes, verifying state, and passing your app an installation object which you must store.
### App options {#app-options}
The following `App` options are required for OAuth installations:
* `clientId`: `string`. An application credential found on the **Basic Information** page of your [app settings](https://api.slack.com/apps).
* `clientSecret`: `string`. A secret value also found on the **Basic Information** page of your [app settings](https://api.slack.com/apps).
* `stateSecret`: `string`. A secret value used to [generate and verify state](/tools/node-slack-sdk/oauth#state-verification) parameters of authorization requests.
* `scopes`: `string[]`. Permissions requested for the `bot` user during installation. [Explore scopes](/reference/scopes).
* `installationStore`: [`InstallationStore`](/tools/node-slack-sdk/reference/oauth/interfaces/InstallationStore). Handlers that store, fetch, and delete installation information to and from your database. Optional, but strongly recommended in production.
### Example OAuth Bolt Apps {#example-oauth-bolt-apps}
Check out the following examples in the bolt-js project for code samples:
* [Bolt OAuth app using the classic HTTP Receiver](https://github.com/slackapi/bolt-js/tree/main/examples/oauth)
* [Bolt OAuth app using the Express Receiver](https://github.com/slackapi/bolt-js/tree/main/examples/oauth-express-receiver)
#### Development and testing {#development-and-testing}
Here we've provided a default implementation of the `installationStore` with [`FileInstallationStore`](https://github.com/slackapi/node-slack-sdk/blob/main/packages/oauth/src/installation-stores/file-store.ts) which can be useful when developing and testing your app:
```
const { App } = require("@slack/bolt");const { FileInstallationStore } = require("@slack/oauth");const app = new App({ signingSecret: process.env.SLACK_SIGNING_SECRET, clientId: process.env.SLACK_CLIENT_ID, clientSecret: process.env.SLACK_CLIENT_SECRET, stateSecret: process.env.SLACK_STATE_SECRET, scopes: ["channels:history", "chat:write", "commands"], installationStore: new FileInstallationStore(),});
```
warning
This is **not** recommended for use in production - you should [implement your own installation store](#installation-store). Please continue reading or inspect [our OAuth example apps](https://github.com/slackapi/bolt-js/tree/main/examples/oauth).
### Installer options {#installer-options}
We provide several options for customizing default OAuth using the `installerOptions` object, which can be passed in during the initialization of `App`. You can override these common options and [find others here](https://github.com/slackapi/node-slack-sdk/blob/main/packages/oauth/src/install-provider-options.ts):
* `authVersion`: `string`. Settings for either new Slack apps (`v2`) or "classic" Slack apps (`v1`). Most apps use `v2` since `v1` was available for a Slack app model that can no longer be created. Default: `v2`.
* `directInstall`: `boolean`. Skip rendering the [installation page](#add-to-slack-button) at `installPath` and redirect to the authorization URL instead. Default: `false`.
* `installPath`: `string`. Path of the URL for starting an installation. Default: `/slack/install`.
* `metadata`: `string`. Static information shared between requests as install URL options. Optional.
* `redirectUriPath`: `string`. Path of the installation callback URL. Default: `/slack/oauth_redirect`.
* `stateVerification`: `boolean`. Option to customize the state verification logic. When set to `false`, the app does not verify the state parameter. While not recommended for general OAuth security, some apps might want to skip this for internal installations within an enterprise grid org. Default: `true`.
* `userScopes`: `string[]`. User scopes to request during installation. Default: `[]`.
* `callbackOptions`: [`CallbackOptions`](/tools/node-slack-sdk/reference/oauth/interfaces/CallbackOptions). Customized [responses to send](/tools/node-slack-sdk/reference/oauth/interfaces/CallbackOptions) during OAuth. [Default callbacks](https://github.com/slackapi/node-slack-sdk/blob/e5a4f3fbbd4f6aad9fdd415976f80668b01fd442/packages/oauth/src/callback-options.ts#L81-L162).
* `stateStore`: [`StateStore`](/tools/node-slack-sdk/reference/oauth/interfaces/StateStore). Customized generator and validator for [OAuth state parameters](/tools/node-slack-sdk/oauth#using-a-custom-state-store); the default `ClearStateStore` should work well for most scenarios. However, if you need even better security, storing state parameter data with a server-side database would be a good approach. Default: [`ClearStateStore`](https://github.com/slackapi/node-slack-sdk/blob/main/packages/oauth/src/state-stores/clear-state-store.ts).
```
const app = new App({ signingSecret: process.env.SLACK_SIGNING_SECRET, clientId: process.env.SLACK_CLIENT_ID, clientSecret: process.env.SLACK_CLIENT_SECRET, scopes: [ "channels:manage", "channels:read", "chat:write", "groups:read", "incoming-webhook", ], installerOptions: { authVersion: "v2", directInstall: false, installPath: "/slack/install", metadata: "", redirectUriPath: "/slack/oauth_redirect", stateVerification: "true", /** * Example user scopes to request during installation. */ userScopes: ["chat:write"], /** * Example pages to navigate to on certain callbacks. */ callbackOptions: { success: (installation, installUrlOptions, req, res) => { res.send("The installation succeeded!"); }, failure: (error, installUrlOptions, req, res) => { res.send("Something strange happened..."); }, }, /** * Example validation of installation options using a random state and an * expiration time between requests. */ stateStore: { generateStateParam: async (installUrlOptions, now) => { const state = randomStringGenerator(); const value = { options: installUrlOptions, now: now.toJSON() }; await database.set(state, value); return state; }, verifyStateParam: async (now, state) => { const value = await database.get(state); const generated = new Date(value.now); const seconds = Math.floor( (now.getTime() - generated.getTime()) / 1000, ); if (seconds > 600) { throw new Error("The state expired after 10 minutes!"); } return value.options; }, }, },});
```
Example database object
For quick testing purposes, the following might be interesting:
```
const database = { store: {}, async get(key) { return this.store[key]; }, async set(key, value) { this.store[key] = value; },};
```
* * *
## Completing authentication {#completing-authentication}
The complete authentication handshake involves requesting scopes using a generated installation URL and processing approved installations. Bolt handles this with a default installation and callback route, but some configurations to the app settings are needed and changes to these routes might be desired.
info
Bolt for JavaScript does not support OAuth for [custom receivers](/tools/bolt-js/concepts/receiver). If you're implementing a custom receiver, you can instead use our [`@slack/oauth`](/tools/node-slack-sdk/oauth) package, which is what Bolt for JavaScript uses under the hood.
### Installing your App {#installing-your-app}
Bolt for JavaScript provides an **Install Path** at the `/slack/install` URL out-of-the-box. This endpoint returns a simple static page that includes an `Add to Slack` button that links to a generated authorization URL for your app. This has the right scopes, a valid `state`, the works.
For example, an app hosted at _[www.example.com](http://www.example.com)_ will serve the install page at _[www.example.com/slack/install](http://www.example.com/slack/install)_ but this path can be changed with `installerOptions.installPath`. Rendering a webpage before the authorization URL is also optional and can be skipped using `installerOptions.directInstall`.
Inspect this [example app](https://github.com/slackapi/bolt-js/blob/5b4d9ceb65e6bf5cf29dfa58268ea248e5466bfb/examples/oauth/app.js#L58-L64) and snippet below:
```
const app = new App({ signingSecret: process.env.SLACK_SIGNING_SECRET, // ... installerOptions: { directInstall: true, installPath: "/slack/installations", // www.example.com/slack/installations },});
```
#### Add to Slack button {#add-to-slack-button}
The [default](https://github.com/slackapi/node-slack-sdk/blob/main/packages/oauth/src/default-render-html-for-install-path.ts) `Add to Slack` button initiates the OAuth process with Slack using a generated installation URL. If customizations are wanted to this page, changes can be made using [`installerOptions.renderHtmlForInstallPath`](/tools/node-slack-sdk/oauth/#showing-an-installation-page) and the generated installation URL:
```
const app = new App({ signingSecret: process.env.SLACK_SIGNING_SECRET, // ... installerOptions: { renderHtmlForInstallPath: (addToSlackUrl) => { return `Add to Slack`; }, },});
```
We do recommend using the provided [button generator](/authentication/installing-with-oauth) when formatting links to the authorization page!
note
Authorization requests with changed or additional scopes require [generating a unique authorization URL](#extra-authorizations).
### Redirect URL {#redirect-url}
Bolt for JavaScript provides the **Redirect URL** path `/slack/oauth_redirect` out-of-the-box for Slack to use when redirecting users that complete the OAuth installation flow.
You will need to add the full **Redirect URL** including your app domain in [app settings](https://api.slack.com/apps) under **OAuth and Permissions**, e.g. `https://example.com/slack/oauth_redirect`.
To supply a custom Redirect URL, you can set `redirectUri` in the App options and `installerOptions.redirectUriPath`. Both must be supplied and be consistent with the full URL if a custom Redirect URL is provided:
```
const app = new App({ signingSecret: process.env.SLACK_SIGNING_SECRET, clientId: process.env.SLACK_CLIENT_ID, clientSecret: process.env.SLACK_CLIENT_SECRET, stateSecret: process.env.SLACK_STATE_SECRET, scopes: ["chat:write"], redirectUri: "https://example.com/slack/redirect", installerOptions: { redirectUriPath: "/slack/redirect", },});
```
#### Custom callbacks {#custom-callbacks}
The page shown after OAuth is complete can be changed with `installerOptions.callbackOptions` to display different details:
```
const app = new App({ signingSecret: process.env.SLACK_SIGNING_SECRET, // ... installerOptions: { callbackOptions: { success: (installation, installOptions, req, res) => { res.send("The installation succeeded!"); }, failure: (error, installOptions, req, res) => { res.send("Something strange happened..."); }, }, },});
```
Full reference reveals [these additional options](/tools/node-slack-sdk/reference/oauth/interfaces/CallbackOptions) but if no options are provided, the [`defaultCallbackSuccess`](https://github.com/slackapi/node-slack-sdk/blob/e5a4f3fbbd4f6aad9fdd415976f80668b01fd442/packages/oauth/src/callback-options.ts#L81-L125) and [`defaultCallbackFailure`](https://github.com/slackapi/node-slack-sdk/blob/e5a4f3fbbd4f6aad9fdd415976f80668b01fd442/packages/oauth/src/callback-options.ts#L127-L162) callbacks are used.
### Workspace installations {#workspace-installations}
Incoming installations are received after a successful OAuth process and must be stored for later lookup. This happens in the terms of installation objects and an installation store.
The following outlines installations to individual workspaces with more [information on org-wide installations](#org-wide-installations) below.
#### Installation objects {#installation-objects}
##### The installation object {#the-installation-object}
Bolt passes an `installation` object to the `storeInstallation` method of your `installationStore` after each installation. When installing the app to a single workspace team, the `installation` object has the following shape:
```
{ team: { id: "T012345678", name: "example-team-name" }, enterprise: undefined, user: { token: undefined, scopes: undefined, id: "U012345678" }, tokenType: "bot", isEnterpriseInstall: false, appId: "A01234567", authVersion: "v2", bot: { scopes: [ "chat:write", ], token: "xoxb-244493-28*********-********************", userId: "U001111000", id: "B01234567" }}
```
##### The installQuery object {#the-installquery-object}
Bolt also passes an `installQuery` object to your `fetchInstallation` and `deleteInstallation` handlers:
```
{ userId: "U012345678", isEnterpriseInstall: false, teamId: "T012345678", enterpriseId: undefined, conversationId: "D02345678"}
```
#### Installation store {#installation-store}
The `installation` object received above must be stored after installations for retrieval during lookup or removal during deletion using values from the `installQuery` object.
An [installation store](/tools/node-slack-sdk/oauth#storing-installations-in-a-database) implements the handlers `storeInstallation`, `fetchInstallation`, and `deleteInstallation` for each part of this process. The following implements a simple installation store in memory, but persistent storage is strongly recommended for production:
```
const app = new App({ signingSecret: process.env.SLACK_SIGNING_SECRET, clientId: process.env.SLACK_CLIENT_ID, clientSecret: process.env.SLACK_CLIENT_SECRET, stateSecret: process.env.SLACK_STATE_SECRET, scopes: ["chat:write", "commands"], installationStore: { storeInstallation: async (installation) => { if (installation.team !== undefined) { return await database.set(installation.team.id, installation); } throw new Error("Failed to save installation data to installationStore"); }, fetchInstallation: async (installQuery) => { if (installQuery.teamId !== undefined) { return await database.get(installQuery.teamId); } throw new Error("Failed to fetch installation"); }, deleteInstallation: async (installQuery) => { if (installQuery.teamId !== undefined) { return await database.delete(installQuery.teamId); } throw new Error("Failed to delete installation"); }, },});
```
Lookups for the `fetchInstallation` handler happen as part of the built-in [`authorization`](/tools/bolt-js/concepts/authorization) of incoming events and provides app listeners with the `context.botToken` object for convenient use.
Example database object
For quick testing purposes, the following might be interesting:
```
const database = { store: {}, async delete(key) { delete this.store[key]; }, async get(key) { return this.store[key]; }, async set(key, value) { this.store[key] = value; },};
```
* * *
## Additional cases {#additional-cases}
The above sections set your app up for collecting a bot token on workspace installations with handfuls of configuration, but other cases might still be explored.
### User tokens {#user-tokens}
User tokens represent workspace members and can be used to [take action on behalf of users](/authentication/tokens#user). Requesting user scopes during installation is required for these tokens to be issued:
```
const app = new App({ signingSecret: process.env.SLACK_SIGNING_SECRET, clientId: process.env.SLACK_CLIENT_ID, clientSecret: process.env.SLACK_CLIENT_SECRET, scopes: ["chat:write", "channels:history"], installerOptions: { userScopes: ["chat:write"], },});
```
Most OAuth processes remain the same, but the [`installation`](#the-installation-object) object received in `storeInstallation` has a `user` attribute that should be stored too:
```
{ team: { id: "T012345678", name: "example-team-name" }, user: { token: "xoxp-314159-26*********-********************", scopes: ["chat:write"], id: "U012345678" }, tokenType: "bot", appId: "A01234567", // ...}
```
Successful `fetchInstallation` lookups will also include the `context.userToken` object associated with the received event in the app listener arguments.
note
The `tokenType` value remains `"bot"` while `scopes` are requested, even with the included `userScopes`. This suggests `bot` details exist, and is `undefined` along with the `bot` if no bot `scopes` are requested.
### Org-wide installations {#org-wide-installations}
To add support for [org-wide installations](/enterprise/developing-for-enterprise-orgs#opt), you will need Bolt for JavaScript version `3.0.0` or later. Make sure you have enabled org-wide installation in your app configuration settings under **Org Level Apps**.
#### Admin installation state verficiation {#admin-installation-state-verficiation}
Installing an [org-wide](/enterprise/) app from admin pages requires additional configuration to work with Bolt. In that scenario, the recommended `state` parameter is not supplied. Bolt will try to verify `state` and stop the installation from progressing.
You may disable state verification in Bolt by setting the `stateVerification` option to false. See the example setup below:
```
const app = new App({ signingSecret: process.env.SLACK_SIGNING_SECRET, clientId: process.env.SLACK_CLIENT_ID, clientSecret: process.env.SLACK_CLIENT_SECRET, scopes: ["chat:write"], installerOptions: { stateVerification: false, },});
```
To learn more about the OAuth installation flow with org-wide apps, [read the API documentation](/enterprise/developing-for-enterprise-orgs#oauth).
#### Org-wide installation objects {#org-wide-installation-objects}
Being installed to an organization can grant your app access to multiple workspaces and the associated events.
##### The org-wide installation object {#the-org-wide-installation-object}
The `installation` object from installations to a team in an organization have an additional `enterprise` object and `isEnterpriseInstall` set to either `true` or `false`:
```
{ team: undefined, enterprise: { id: "E0000000001", name: "laboratories" }, user: { token: undefined, scopes: undefined, id: "U0000000001" }, tokenType: "bot", isEnterpriseInstall: true, appId: "A0000000001", authVersion: "v2", bot: { scopes: [ "chat:write", ], token: "xoxb-000001-00*********-********************", userId: "U0000000002", id: "B0000000001" }}
```
Apps installed org-wide will receive the `isEnterpriseInstall` parameter as `true`, but apps could also still be installed to individual workspaces in organizations. These apps receive installation information for both the `team` and `enterprise` parameters:
```
{ team: { id: "T0000000001", name: "experimental-sandbox" }, enterprise: { id: "E0000000001", name: "laboratories" }, // ... isEnterpriseInstall: false, // ...}
```
##### The org-wide installQuery object {#the-org-wide-installquery-object}
This `installQuery` object provided to the `fetchInstallation` and `deleteInstallation` handlers is the same as ever, but now with an additional value, `enterpriseId`, defined and another possible `true` or `false` value for `isEnterpriseInstall`:
```
{ userId: "U0000000001", isEnterpriseInstall: true, teamId: "T0000000001", enterpriseId: "E0000000001", conversationId: "D0000000001"}
```
#### Org-wide installation store {#org-wide-installation-store}
Storing and retrieving installations from an installation store requires similar handling as before, but with additional checks for org-wide installations of org-ready apps:
```
const app = new App({ signingSecret: process.env.SLACK_SIGNING_SECRET, clientId: process.env.SLACK_CLIENT_ID, clientSecret: process.env.SLACK_CLIENT_SECRET, stateSecret: process.env.SLACK_STATE_SECRET, scopes: ["chat:write", "commands"], installationStore: { storeInstallation: async (installation) => { if ( installation.isEnterpriseInstall && installation.enterprise !== undefined ) { return await database.set(installation.enterprise.id, installation); } if (installation.team !== undefined) { return await database.set(installation.team.id, installation); } throw new Error("Failed to save installation data to installationStore"); }, fetchInstallation: async (installQuery) => { if ( installQuery.isEnterpriseInstall && installQuery.enterpriseId !== undefined ) { return await database.get(installQuery.enterpriseId); } if (installQuery.teamId !== undefined) { return await database.get(installQuery.teamId); } throw new Error("Failed to fetch installation"); }, deleteInstallation: async (installQuery) => { if ( installQuery.isEnterpriseInstall && installQuery.enterpriseId !== undefined ) { return await database.delete(installQuery.enterpriseId); } if (installQuery.teamId !== undefined) { return await database.delete(installQuery.teamId); } throw new Error("Failed to delete installation"); }, },});
```
Example database object
For quick testing purposes, the following might be interesting:
```
const database = { store: {}, async get(key) { return this.store[key]; }, async delete(key) { delete this.store[key]; }, async set(key, value) { this.store[key] = value; },};
```
### Sign in with Slack {#sign-in-with-slack}
Right now Bolt does not support [Sign in with Slack](/authentication/sign-in-with-slack/) out-of-the-box. This still continues to remain an option using APIs from the [`@slack/web-api`](/tools/node-slack-sdk/web-api) package, which aim to make implementing OpenID Connect (OIDC) connections simple. Alternative [routes](/tools/bolt-js/concepts/custom-routes) might be required.
Explore [this relevant package documentation](/tools/node-slack-sdk/web-api#sign-in-with-slack-via-openid-connect) for reference and example.
### Extra authorizations {#extra-authorizations}
If you need additional authorizations or permissions, such as user scopes for user tokens from users of a team where your app is already installed, or have a reason to dynamically generate an install URL, an additional installation is required.
Generating a new installation URL requires a few steps:
1. Manually instantiate an `ExpressReceiver` instance.
2. Assign the instance to a variable named `receiver`.
3. Call the `receiver.installer.generateInstallUrl()` function.
Read more about `generateInstallUrl()` in the ["Manually generating installation page URL"](/tools/node-slack-sdk/oauth/#using-handleinstallpath) section of the `@slack/oauth` docs.
### Common errors {#common-errors}
Occasional mishaps in various places throughout the OAuth process can cause errors, but these often have meaning! Explore [the API documentation](/authentication/installing-with-oauth#errors) for additional details for common error codes.
---
Source: https://docs.slack.dev/tools/bolt-js/concepts/authorization
# Authorization
Authorization is the process of deciding which Slack credentials (such as a bot token) should be available while processing a specific incoming request.
Custom apps installed on a single workspace can simply use the `token` option at the time of `App` initialization. However, when your app needs to handle several tokens, such as cases where it will be installed on multiple workspaces or needs access to more than one user token, the `authorize` option should be used instead.
If you're using the [built-in OAuth support](/tools/bolt-js/concepts/authenticating-oauth) authorization is handled by default, so you do not need to pass in an `authorize` option.
The `authorize` option can be set to a function that takes an event source as its input, and should return a Promise for an object containing the authorized credentials. The source contains information about who and where the request is coming from by using properties like `teamId` (always available), `userId`, `conversationId`, and `enterpriseId`.
The authorized credentials should also have a few specific properties: `botToken`, `userToken`, `botId` (required for an app to ignore messages from itself), and `botUserId`. You can also include any other properties you'd like to make available on the [`context`](/tools/bolt-js/concepts/context) object.
You should always provide either one or both of the `botToken` and `userToken` properties. At least one of them is necessary to make helpers like `say()` work. If they are both given, then `botToken` will take precedence.
## Example {#example}
```
const app = new App({ authorize: authorizeFn, signingSecret: process.env.SLACK_SIGNING_SECRET });// NOTE: This is for demonstration purposes only.// All sensitive data should be stored in a secure database// Assuming this app only uses bot tokens, the following object represents a model for storing the credentials as the app is installed into multiple workspaces.const installations = [ { enterpriseId: 'E1234A12AB', teamId: 'T12345', botToken: 'xoxb-123abc', botId: 'B1251', botUserId: 'U12385', }, { teamId: 'T77712', botToken: 'xoxb-102anc', botId: 'B5910', botUserId: 'U1239', },];const authorizeFn = async ({ teamId, enterpriseId }) => { // Fetch team info from database for (const team of installations) { // Check for matching teamId and enterpriseId in the installations array if ((team.teamId === teamId) && (team.enterpriseId === enterpriseId)) { // This is a match. Use these installation credentials. return { // You could also set userToken instead botToken: team.botToken, botId: team.botId, botUserId: team.botUserId }; } } throw new Error('No matching authorizations');}
```
---
Source: https://docs.slack.dev/tools/bolt-js/concepts/commands
# Listening & responding to commands
Your app can use the `command()` method to listen to incoming slash command requests. The method requires a `commandName` of type string or RegExp.
warning
If you use `command()` multiple times with overlapping RegExp matches, _all_ matching listeners will run. Design your regular expressions to avoid this possibility.
Commands must be acknowledged with `ack()` to inform Slack your app has received the request.
There are two ways to respond to slash commands. The first way is to use `say()`, which accepts a string or JSON payload. The second is `respond()` which is a utility for the `response_url`. These are explained in more depth in the [responding to actions](/tools/bolt-js/concepts/actions) section.
When configuring commands within your app configuration, you'll continue to append `/slack/events` to your request URL.
## Example {#example}
```
// The echo command simply echoes on commandapp.command('/echo', async ({ command, ack, respond }) => { // Acknowledge command request await ack(); await respond(`${command.text}`);});
```
---
Source: https://docs.slack.dev/tools/bolt-js/concepts/context
# Adding context
All listeners have access to a `context` object, which can be used to enrich requests with additional information. For example, perhaps you want to add user information from a third party system or add temporary state for the next middleware in the chain.
`context` is just an object, so you can add to it by setting it to a modified version of itself.
## Example {#example}
```
async function addTimezoneContext({ payload, client, context, next }) { const user = await client.users.info({ user: payload.user_id, include_locale: true }); // Add user's timezone context context.tz_offset = user.tz_offset; // Pass control to the next middleware function await next();}app.command('/request', addTimezoneContext, async ({ command, ack, client, context, logger }) => { // Acknowledge command request await ack(); // Get local hour of request const localHour = (Date.UTC(2020, 3, 31) + context.tz_offset).getHours(); // Request channel ID const requestChannel = 'C12345'; const requestText = `:large_blue_circle: *New request from <@${command.user_id}>*: ${command.text}`; // If request not in between 9AM and 5PM, send request tomorrow if (localHour > 17 || localHour < 9) { // Assume function exists to get local tomorrow 9AM from offset const localTomorrow = getLocalTomorrow(context.tz_offset); try { // Schedule message const result = await client.chat.scheduleMessage({ channel: requestChannel, text: requestText, post_at: localTomorrow }); } catch (error) { logger.error(error); } } else { try { // Post now const result = await client.chat.postMessage({ channel: requestChannel, text: requestText }); } catch (error) { logger.error(error); } }});
```
---
Source: https://docs.slack.dev/tools/bolt-js/concepts/creating-modals
# Opening modals
[Modals](/surfaces/modals) are focused surfaces that allow you to collect user data and display dynamic information. You can open a modal by passing a valid `trigger_id` and a [view payload](/reference/views/modal-views) to the built-in client's [`views.open`](/reference/methods/views.open/) method.
Your app receives `trigger_id` parameters in payloads sent to your Request URL triggered user invocation like a slash command, button press, or interaction with a select menu.
Read more about modal composition in the [API documentation](/surfaces/modals#composing_views)
### Example {#example}
```
// Listen for a slash command invocationapp.command('/ticket', async ({ ack, body, client, logger }) => { // Acknowledge the command request await ack(); try { // Call views.open with the built-in client const result = await client.views.open({ // Pass a valid trigger_id within 3 seconds of receiving it trigger_id: body.trigger_id, // View payload view: { type: 'modal', // View identifier callback_id: 'view_1', title: { type: 'plain_text', text: 'Modal title' }, blocks: [ { type: 'section', text: { type: 'mrkdwn', text: 'Welcome to a modal with _blocks_' }, accessory: { type: 'button', text: { type: 'plain_text', text: 'Click me!' }, action_id: 'button_abc' } }, { type: 'input', block_id: 'input_c', label: { type: 'plain_text', text: 'What are your hopes and dreams?' }, element: { type: 'plain_text_input', action_id: 'dreamy_input', multiline: true } } ], submit: { type: 'plain_text', text: 'Submit' } } }); logger.info(result); } catch (error) { logger.error(error); }});
```
---
Source: https://docs.slack.dev/tools/bolt-js/concepts/custom-routes
# Adding custom HTTP routes
As of `v3.7.0`, custom HTTP routes can be easily added by passing in an array of routes as `customRoutes` when initializing `App`.
Each `CustomRoute` object must contain three properties: `path`, `method`, and `handler`. `method`, which corresponds to the HTTP verb, can be either a string or an array of strings.
Since `v3.13.0`, the default built-in receivers (`HTTPReceiver` and `SocketModeReceiver`) support dynamic route parameters like [Express.js does](https://expressjs.com/en/guide/routing.html#route-parameters). With this, you can capture positional values in the URL for use in your route's handler via `req.params`.
To determine what port the custom HTTP route will be available on locally, you can specify an `installerOptions.port` property in the `App` constructor. Otherwise, it will default to port `3000`.
```
const { App } = require('@slack/bolt');// Initialize Bolt app, using the default HTTPReceiverconst app = new App({ token: process.env.SLACK_BOT_TOKEN, signingSecret: process.env.SLACK_SIGNING_SECRET, customRoutes: [ { path: '/health-check', method: ['GET'], handler: (req, res) => { res.writeHead(200); res.end(`Things are going just fine at ${req.headers.host}!`); }, }, { path: '/music/:genre', method: ['GET'], handler: (req, res) => { res.writeHead(200); res.end(`Oh? ${req.params.genre}? That slaps!`); }, }, ], installerOptions: { port: 3001, },});(async () => { await app.start(); app.logger.info('⚡️ Bolt app started');})();
```
## Custom ExpressReceiver routes {#custom-expressreceiver-routes}
Adding custom HTTP routes is quite straightforward when using Bolt’s built-in ExpressReceiver. Since `v2.1.0`, `ExpressReceiver` added a `router` property, which exposes the Express [Router](http://expressjs.com/en/4x/api.html#router) on which additional routes and middleware can be added.
```
const { App, ExpressReceiver } = require('@slack/bolt');// Create a Bolt Receiverconst receiver = new ExpressReceiver({ signingSecret: process.env.SLACK_SIGNING_SECRET });// Create the Bolt App, using the receiverconst app = new App({ token: process.env.SLACK_BOT_TOKEN, receiver});// Slack interactions are methods on appapp.event('message', async ({ event, client }) => { // Do some slack-specific stuff here await client.chat.postMessage(...);});// Middleware methods execute on every web requestreceiver.router.use((req, res, next) => { app.logger.info(`Request time: ${Date.now()}`); next();});// Other web requests are methods on receiver.routerreceiver.router.post('/secret-page', (req, res) => { // You're working with an express req and res now. res.send('yay!');});(async () => { await app.start(); app.logger.info('⚡️ Bolt app started');})();
```
---
Source: https://docs.slack.dev/tools/bolt-js/concepts/custom-steps-dynamic-options
# Custom Steps dynamic options for Workflow Builder
## Background {#background}
[Legacy steps from apps](/changelog/2023-08-workflow-steps-from-apps-step-back) previously enabled Slack apps to create and process custom workflow steps, which could then be shared and used by anyone in Workflow Builder. To support your transition away from them, custom steps used as dynamic options are available. These allow you to use data defined when referencing the step in Workflow Builder as inputs to the step.
## Example use case {#use-case}
Let's say a builder wants to add a custom step in Workflow Builder that creates an issue in an external issue-tracking system. First, they'll need to specify a project. Once a project is selected, a project-specific list of fields can be presented to them to choose from when creating the issue.
As a developer, dynamic options allow you to supply data to input parameters of custom steps so that you can provide builders with varying sets of fields based on the builders' selections.
In this example, the primary step would invoke a separate project selection step that retrieves the list of available projects. The builder-selected item from the retrieved list would then be used as the input to the secondary issue creation step.
There are two parts necessary for Slack apps to support dynamic options: custom step definitions, and handling custom step dynamic options. We'll take a look at both in the following sections.
## Custom step definitions {#custom-step-definitions}
When defining an input to a custom step intended to be dynamic (rather than explicitly defining a set of input parameters up front), you'll define a `dynamic_options` property that points to another custom step designed to return the set of dynamic elements once this step is added to a workflow from Workflow Builder.
An input parameter for a custom step can reference a different custom step that defines what data is available for it to return. One Slack app could even use another Slack app’s custom step to define dynamic options for one of its inputs.
The following code snippet from our issue creation example discussed above shows a `create-issue` custom step that will be used as a workflow step. Another custom step, the `get-projects` step, will dynamically populate the project input parameter to be configured by a builder. This `get-projects` step provides an `array` containing projects fetched dynamically from the external issue-tracking system.
```
"functions": { "create-issue": { "title": "Create Issue", "description": "", "input_parameters": { "support_channel": { "type": "slack#/types/channel_id", "title": "Support Channel", "description": "", "name": "support_channel" }, "project": { "type": "string", "title": "Project", "description": "A project from the issue tracking system", "is_required": true, "dynamic_options": { "function": "#/functions/get-projects", "inputs": {} } }, }, "output_parameters": {} }, "get-projects": { "title": "Get Projects", "description": "Get the available project from the issue tracking system", "input_parameters": {}, "output_parameters": { "options": { "type": "slack#/types/options_select", "title": "Project Options", } } } },
```
### Defining the function and inputs attributes {#define-attributes}
Defining the `function` and `inputs` attributes of the `dynamic_options` property would look as follows:
```
"dynamic_options": { "function": "#/functions/get-projects", "inputs": {}}
```
The `function` attribute specifies the step reference used to resolve the options of the input parameter. For example: `"#/functions/get-projects"`.
The `inputs` attribute defines the parameters to be passed as inputs to the step referenced by the `function` attribute. For example:
```
"inputs": { "selected_user_id": { "value": "{{input_parameters.user_id}}" }, "query": { "value": "{{client.query}}" }}
```
The following format can be used to reference any input parameter defined by the step: `{{input_parameters.}}`.
In addition, the `{{client.query}}` parameter can be used as a placeholder for an input value. The `{{client.builder_context}}` parameter will inject the [`slack#/types/user_context`](/tools/deno-slack-sdk/reference/slack-types/#usercontext) of the user building the workflow as the value to the input parameter.
### Types of dynamic options UIs {#dynamic-option-UIs}
The above example demonstrates one possible UI to be rendered for builders: a single-select drop-down menu of dynamic options. However, dynamic options in Workflow Builder can be rendered in one of two ways: as a drop-down menu (single-select or multi-select), or as a set of fields.
The type is dictated by the output parameter of the custom step used as a dynamic option. In order to use a custom step in a dynamic option context, its output must adhere to a defined interface, that is, it must have an `options` parameter of type [`options_select`](/tools/deno-slack-sdk/reference/slack-types#options_select) or [`options_field`](/tools/deno-slack-sdk/reference/slack-types#options_field), as shown in the following code snippet.
```
"output_parameters": { "options": { "type": "slack#/types/options_select" or "slack#/types/options_field", "title": "Custom Options", "description": "Options to be used in a dynamic context", } ...}
```
#### Drop-down menus {#drop-down}
Your dynamic input parameter can be rendered as a drop-down menu, which will use the options obtained from a custom step with an `options` output parameter of the type [`options_select`](/tools/deno-slack-sdk/reference/slack-types#options_select).
The drop-down menu UI component can be rendered in two ways: single-select, or multi-select. To render the dynamic input as a single-select menu, the input parameter defining the dynamic option must be of the type [`string`](/tools/deno-slack-sdk/reference/slack-types#string).
```
"step-with-dynamic-input": { "title": "Step that uses a dynamic input", "description": "This step uses a dynamic input rendered as a single-select menu", "input_parameters": { "dynamic_single_select": { "type": "string", // this must be of type string for single-select "title": "dynamic single select drop-down menu", "description": "A dynamically-populated single-select drop-down menu", "is_required": true, "dynamic_options": { "function": "#/functions/get-options", "inputs": {}, }, } }, "output_parameters": {}}
```
To render the dynamic input as a multi-select menu, the input parameter defining the dynamic option must be of the type [`array`](/tools/deno-slack-sdk/reference/slack-types#array), and its `items` must be of type [`string`](/tools/deno-slack-sdk/reference/slack-types#string).
```
"step-with-dynamic-input": { "title": "Step that uses a dynamic input", "description": "This step uses a dynamic input rendered as a multi-select menu", "input_parameters": { "dynamic_multi_select": { "type": "array", // this must be of type array for multi-select "items": { "type": "string" }, "title": "dynamic single select drop-down menu", "description": "A dynamically-populated multi-select drop-down menu", "dynamic_options": { "function": "#/functions/get-options", "inputs": {}, }, } }, "output_parameters": {}}
```
#### Fields {#fields}
In the code snippet below, the input parameter is rendered as a set of fields with keys and values. The option fields are obtained from a custom step with an `options` output parameter of type [`options_field`](/tools/deno-slack-sdk/reference/slack-types#options_field).
The input parameter that defines the dynamic option must be of type [`object`](/tools/deno-slack-sdk/reference/slack-types#object), as the completed set of fields in Workflow Builder will be passed to the custom step as an [untyped object](/tools/deno-slack-sdk/reference/slack-types#untyped-object) during workflow execution.
```
"test-field-dynamic-options": { "title": "Test dynamic field options", "description": "", "input_parameters": { "dynamic_fields": { "type": "object", "title": "Dynamic custom field options", "description": "A dynamically-populated section of input fields", "dynamic_options": { "function": "#/functions/get-field-options", "inputs": {} "selection_type": "key-value", } } }, "output_parameters": {}}
```
### Dynamic option types {#dynamic-option-types}
As mentioned earlier, in order to use a custom step as a dynamic option, its output must adhere to a defined interface: it must have an `options` output parameter of the type either [`options_select`](/tools/deno-slack-sdk/reference/slack-types#options_select) or [`options_field`](/tools/deno-slack-sdk/reference/slack-types#options_field).
To take a look at these in more detail, refer to our [Options Slack type](/tools/deno-slack-sdk/reference/slack-types#options) documentation.
## Dynamic options handler {#dynamic-option-handler}
Each custom step defined in the manifest needs a corresponding handler in your Slack app. Although implemented similarly to existing function execution event handlers, there are two key differences between regular custom step invocations and those used for dynamic options:
* The custom step must have an `options` output parameter that is of type [`options_select`](/tools/deno-slack-sdk/reference/slack-types#options_select) or [`options_field`](/tools/deno-slack-sdk/reference/slack-types#options_field).
* The [`function_executed`](/reference/events/function_executed) event must be handled synchronously. This optimizes the response time of returned dynamic options and provides a crisp builder experience.
### Asynchronous event handling {#async}
By default, the [Bolt family of frameworks](/tools) handles `function_executed` events asynchronously.
For example, the various modal-related API methods provide two ways to update a view: synchronously using a `response_action` HTTP response, or asynchronously using a separate HTTP API call. Using the asynchronous approach allows developers to handle events free of timeouts, but this isn't desired for dynamic options as it introduces delays and violates our stated goal of providing a crisp builder experience.
### Synchronous event handling {#sync}
Dynamic options support synchronous handling of `function_executed` events. By ensuring that the function execution’s state is complete with output parameters provided before responding to the `function_executed` event, Slack can quickly provide Workflow Builder with the requisite dynamic options.
### Implementation {#implementation}
To optimize the response time of dynamic options, you must acknowledge the incoming event after calling the [`function.completeSuccess`](/reference/methods/functions.completeSuccess) or [`function.completeError`](/reference/methods/functions.completeError) API methods, minimizing asynchronous latency. The `function.completeSuccess` and `function.completeError` API methods are invoked in the complete and fail helper functions.
A new `auto_acknowledge` flag allows you more granular control over whether specific event handlers should operate in synchronous or asynchronous response modes in order to enable a smooth dynamic options experience.
#### Example {#bolt-js}
In [Bolt for JavaScript](/tools/bolt-js/), you can pass an `{ autoAcknowledge: false }` options object to a function listener. This allows you to manually control when the `await ack()` helper function is executed and implement synchronous `function_executed` event handling.
```
app.function('get-projects', { autoAcknowledge: false }, async ({ ack, complete }) => { try { complete({ outputs: { options: [ { text: { type: 'plain_text', text: 'Secret Squirrel Project', }, value: 'p1', }, { text: { type: 'plain_text', text: 'Public Kangaroo Project', }, value: 'p2', }, ], }, }); } finally { await ack(); }});
```
✨ **To learn more about the Bolt family of frameworks and tools**, check out our [Slack Developer Tools](/tools).
---
Source: https://docs.slack.dev/tools/bolt-js/concepts/custom-steps
# Custom Steps
Your app can use the `function()` method to listen to incoming [custom step requests](/workflows/workflow-steps). Custom steps are used in Workflow Builder to build workflows. The method requires a step `callback_id` of type string. This `callback_id` must also be defined in your [Function](/reference/app-manifest#functions) definition. Custom steps must be finalized using the `complete()` or `fail()` listener arguments to notify Slack that your app has processed the request.
* `complete()` requires one argument: an `outputs` object. It ends your custom step **successfully** and provides an object containing the outputs of your custom step as per its definition.
* `fail()` requires **one** argument: `error` of type string. It ends your custom step **unsuccessfully** and provides a message containing information regarding why your custom step failed.
You can reference your custom step's inputs using the `inputs` listener argument.
```
// This sample custom step formats an input and outputs itapp.function('sample_custom_step', async ({ inputs, complete, fail, logger }) => { try { const { message } = inputs; await complete({ outputs: { message: `:wave: You submitted the following message: \n\n>${message}` } }); } catch (error) { logger.error(error); await fail({ error: `Failed to handle a function request: ${error}` }); }});
```
### Example app manifest definition {#example-app-manifest-definition}
```
..."functions": { "sample_custom_step": { "title": "Sample custom step", "description": "Run a sample custom step", "input_parameters": { "message": { "type": "string", "title": "Message", "description": "A message to be formatted by a custom step", "is_required": true, } }, "output_parameters": { "message": { "type": "string", "title": "Messge", "description": "A formatted message", "is_required": true, } } }}
```
* * *
## Listening to custom step interactivity events {#listening-to-custom-step-interactivity-events}
Your app's custom steps may create interactivity points for users, for example: Post a message with a button
If such interaction points originate from a custom step execution, the events sent to your app representing the end-user interaction with these points are considered to be _function-scoped interactivity events_. These interactivity events can be handled by your app using the same concepts we covered earlier, such as [Listening to actions](/tools/bolt-js/concepts/actions).
_function-scoped interactivity events_ will contain data related to the custom step (`function_executed` event) they were spawned from, such as custom step `inputs` and access to `complete()` and `fail()` listener arguments.
Your app can skip calling `complete()` or `fail()` in the `function()` handler method if the custom step creates an interaction point that requires user interaction before the step can end. However, in the relevant interactivity handler method, your app must invoke `complete()` or `fail()` to notify Slack that the custom step has been processed.
You’ll notice in all interactivity handler examples, `ack()` is used. It is required to call the `ack()` function within an interactivity listener to acknowledge that the request was received from Slack. This is discussed in the [acknowledging requests section](/tools/bolt-js/concepts/acknowledge).
```
/** This sample custom step posts a message with a button */app.function('custom_step_button', async ({ client, inputs, fail, logger }) => { try { const { user_id } = inputs; await client.chat.postMessage({ channel: user_id, text: 'Click the button to signal the function has completed', blocks: [ { type: 'section', text: { type: 'mrkdwn', text: 'Click the button to signal the function has completed', }, accessory: { type: 'button', text: { type: 'plain_text', text: 'Complete function', }, action_id: 'sample_button', }, }, ], }); } catch (error) { logger.error(error); await fail({ error: `Failed to handle a function request: ${error}` }); }});/** Your listener will be called every time a block element with the action_id "sample_button" is triggered */app.action('sample_button', async ({ ack, body, client, complete, fail, logger }) => { try { await ack(); const { channel, message, user } = body; // Functions should be marked as successfully completed using `complete` or // as having failed using `fail`, else they'll remain in an 'In progress' state. await complete({ outputs: { user_id: user.id } }); await client.chat.update({ channel: channel.id, ts: message.ts, text: 'Function completed successfully!', }); } catch (error) { logger.error(error); await fail({ error: `Failed to handle a function request: ${error}` }); }});
```
### Example app manifest definition {#example-app-manifest-definition-1}
```
..."functions": { "custom_step_button": { "title": "Custom step with a button", "description": "Custom step that waits for a button click", "input_parameters": { "user_id": { "type": "slack#/types/user_id", "title": "User", "description": "The recipient of a message with a button", "is_required": true, } }, "output_parameters": { "user_id": { "type": "slack#/types/user_id", "title": "User", "description": "The user that completed the function", "is_required": true } } }}
```
Learn more about responding to interactivity, see the [Slack API documentation](/tools/bolt-js/concepts/custom-steps#listening-to-custom-step-interactivity-events).
---
Source: https://docs.slack.dev/tools/bolt-js/concepts/deferring-initialization
# Deferring app initialization
Bolt offers a way to defer full initialization via the `deferInitialization` option and to call the equivalent `App#init()` in your code, putting more control over asynchronous execution required for initialization into your hands as the developer.
info
If you call `start()` before `init()`, Bolt will raise an exception.
## Example {#example}
```
const { App } = require('@slack/bolt');// deferInitialization is one of the options you can set in the constructorconst app = new App({ token, signingSecret, deferInitialization: true,});(async () => { try { // Must call init() before start() within an async function await app.init(); // Now safe to call start() await app.start(process.env.PORT || 3000); } catch (e) { app.logger.error(e); process.exit(1); }})()
```
---
Source: https://docs.slack.dev/tools/bolt-js/concepts/error-handling
# Handling errors
info
Since v2, error handling has improved! View the [migration guide for V2](/tools/bolt-js/migration/migration-v2) to learn about the changes.
If an error occurs in a listener, it’s recommended you handle it directly with a `try`/`catch`. However, there still may be cases where errors slip through the cracks. By default, these errors will be logged to the console. To handle them yourself, you can attach a global error handler to your app with the `app.error(fn)` method.
You can also define more focussed and specific error handlers for a variety of error paths directly on the `HTTPReceiver`:
* `dispatchErrorHandler`: triggered if an incoming request is to an unexpected path.
* `processEventErrorHandler`: triggered when processing a request (i.e. middleware, authorization) throws an exception.
* `unhandledRequestHandler`: triggered when a request from Slack goes unacknowledged.
* `unhandledRequestTimeoutMillis`: the amount of time in milliseconds to wait for request acknowledgement from the application before triggering the `unhandledRequestHandler`. Default is `3001`.
info
It is imperative that any custom Error Handlers defined in your app respond to the underlying Slack request that led to the error, using `response.writeHead()` to set the HTTP status code of the response and `response.end()` to dispatch the response back to Slack. See the example for details.
```
import { App, HTTPReceiver } from '@slack/bolt';const app = new App({ receiver: new HTTPReceiver({ signingSecret: process.env.SLACK_SIGNING_SECRET, // more specific, focussed error handlers dispatchErrorHandler: async ({ error, logger, response }) => { logger.error(`dispatch error: ${error}`); response.writeHead(404); response.write("Something is wrong!"); response.end(); }, processEventErrorHandler: async ({ error, logger, response }) => { logger.error(`processEvent error: ${error}`); // acknowledge it anyway! response.writeHead(200); response.end(); return true; }, unhandledRequestHandler: async ({ logger, response }) => { logger.info('Acknowledging this incoming request because 2 seconds already passed...'); // acknowledge it anyway! response.writeHead(200); response.end(); }, unhandledRequestTimeoutMillis: 2000, // the default is 3001 }),});// A more generic, global error handlerapp.error(async (error) => { // Check the details of the error to handle cases where you should retry sending a message or stop the app app.logger.error(error);});
```
## Accessing more data in the error handler {#accessing-more-data-in-the-error-handler}
There may be cases where you need to log additional data from a request in the global error handler. Or you may simply wish to have access to the `logger` you've passed into Bolt.
Starting with version 3.8.0, when passing `extendedErrorHandler: true` to the constructor, the error handler will receive an object with `error`, `logger`, `context`, and the `body` of the request.
It is recommended to check whether a property exists on the `context` or `body` objects before accessing its value, as the data available in the `body` object differs from event to event, and because errors can happen at any point in a request's lifecycle (i.e. before a certain property of `context` has been set).
```
const { App } = require('@slack/bolt');const app = new App({ signingSecret: process.env.SLACK_SIGNING_SECRET, token: process.env.SLACK_BOT_TOKEN, extendedErrorHandler: true,});app.error(async ({ error, logger, context, body }) => { // Log the error using the logger passed into Bolt logger.error(error); if (context.teamId) { // Do something with the team's ID for debugging purposes }});
```
---
Source: https://docs.slack.dev/tools/bolt-js/concepts/event-listening
# Listening to events
You can listen to any [Events API event](/reference/events) using the `event()` method after subscribing to it in your app configuration. This allows your app to take action when something happens in Slack, like a user reacting to a message or joining a channel.
The `event()` method requires an `eventType` of type string.
Please note that when configuring your request URL on the Event Subscriptions page of your Slack app configuration, the path of the URL must be `/slack/events`. For example, if your app is hosted at `https://example.com`, the request URL should be `https://example.com/slack/events`.
## Example {#example}
```
const welcomeChannelId = 'C12345';// When a user joins the team, send a message in a predefined channel asking them to introduce themselvesapp.event('team_join', async ({ event, client, logger }) => { try { // Call chat.postMessage with the built-in client const result = await client.chat.postMessage({ channel: welcomeChannelId, text: `Welcome to the team, <@${event.user.id}>! 🎉 You can introduce yourself in this channel.` }); logger.info(result); } catch (error) { logger.error(error); }});
```
---
Source: https://docs.slack.dev/tools/bolt-js/concepts/global-middleware
# Global middleware
Global middleware is run for all incoming requests before any [listener middleware](/tools/bolt-js/concepts/listener-middleware). You can add any number of global middleware to your app by utilizing `app.use(fn)`. The middleware function `fn` is called with the same arguments as listeners and an additional `next` function.
Both global and [listener middleware](/tools/bolt-js/concepts/listener-middleware) must call `await next()` to pass control of the execution chain to the next middleware, or call `throw` to pass an error back up the previously-executed middleware chain.
## Example {#example}
Let's say your app should only respond to users identified with a corresponding internal authentication service (an SSO provider or LDAP, for example). You may define a global middleware that looks up a user record in the authentication service and errors if the user is not found.
```
// Authentication middleware that associates incoming request with user in Acme identity providerasync function authWithAcme({ payload, client, context, next }) { const slackUserId = payload.user; const helpChannelId = 'C12345'; // Assume we have a function that accepts a Slack user ID to find user details from Acme try { // Assume we have a function that can take a Slack user ID as input to find user details from the provider const user = await acme.lookupBySlackId(slackUserId); // When the user lookup is successful, add the user details to the context context.user = user; } catch (error) { // This user wasn't found in Acme. Send them an error and don't continue processing request if (error.message === 'Not Found') { await client.chat.postEphemeral({ channel: payload.channel, user: slackUserId, text: `Sorry <@${slackUserId}>, you aren't registered in Acme. Please post in <#${helpChannelId}> for assistance.`, }); return; } // Pass control to previous middleware (if any) or the global error handler throw error; } // Pass control to the next middleware (if there are any) and the listener functions // Note: You probably don't want to call this inside a `try` block, or any middleware // after this one that throws will be caught by it. await next();}app.use(authWithAcme);
```
---
Source: https://docs.slack.dev/tools/bolt-js/concepts/listener-middleware
# Listener middleware
Listener middleware is used for logic across many listener functions (but usually not all of them). They are added as arguments before the listener function in one of the built-in methods. You can add any number of listener middleware before the listener function.
There’s a collection of [built-in listener middleware](/tools/bolt-js/reference#built-in-listener-middleware-functions) that you can use like `directMention` which filters out any message that doesn’t directly @-mention your bot at the start of a message.
But of course, you can write your own middleware for more custom functionality. While writing your own middleware, your function must call `await next()` to pass control to the next middleware, or `throw` to pass an error back up the previously-executed middleware chain.
## Example {#example}
Let’s say your listener should only deal with messages from humans. You can write a listener middleware that excludes any bot messages.
```
// Listener middleware that filters out messages from a botasync function noBotMessages({ message, next }) { if (!message.bot_id) { await next(); }}// The listener only receives messages from humansapp.message(noBotMessages, async ({ message, logger }) => { // Handle only newly posted messages if ( message.subtype === undefined || message.subtype === 'file_share' || message.subtype === 'thread_broadcast' ) { logger.info(`(MSG) User: ${message.user} Message: ${message.text}`); }});
```
---
Source: https://docs.slack.dev/tools/bolt-js/concepts/logging
# Logging
By default, Bolt for JavaScript will log information from your app to the console. You can customize how much logging occurs by passing a `logLevel` in the constructor. The available log levels in order of most to least logs are `DEBUG`, `INFO`, `WARN`, and `ERROR`.
```
// Import LogLevel from the packageconst { App, LogLevel } = require('@slack/bolt');// Log level is one of the options you can set in the constructorconst app = new App({ token, signingSecret, logLevel: LogLevel.DEBUG,});
```
## Writing logs {#writing-logs}
The logger included with the constructed `App` can be used to log writings throughout your application code:
```
(async () => { app.logger.debug("Starting the app now!"); await app.start(); app.logger.info("⚡️ Bolt app started");})();
```
Different app listeners can use the same `logger` that's provided as an argument to output additional details:
```
app.event("team_join", async ({ client, event, logger }) => { logger.info("Someone new just joined the team."); try { const result = await client.chat.postMessage({ channel: "C0123456789", text: `Welcome to the team, <@${event.user.id}>!`, }); logger.debug(result); } catch (error) { logger.error(error); }});
```
## Redirecting outputs {#redirecting-outputs}
If you want to send logs to somewhere besides the console or want more control over the logger, you can implement a custom logger. A custom logger must implement specific methods (known as the `Logger` interface):
Method
Parameters
Return type
`setLevel()`
`level: LogLevel`
`void`
`getLevel()`
None
`string` with value `error`, `warn`, `info`, or `debug`
`setName()`
`name: string`
`void`
`debug()`
`...msgs: any[]`
`void`
`info()`
`...msgs: any[]`
`void`
`warn()`
`...msgs: any[]`
`void`
`error()`
`...msgs: any[]`
`void`
A very simple custom logger might ignore the name and level, and write all messages to a file.
```
const { App } = require('@slack/bolt');const { createWriteStream } = require('fs');const logWritable = createWriteStream('/var/my_log_file'); // Not shown: close this streamconst app = new App({ token, signingSecret, // Creating a logger as a literal object. It's more likely that you'd create a class. logger: { debug: (...msgs) => { logWritable.write('debug: ' + JSON.stringify(msgs)); }, info: (...msgs) => { logWritable.write('info: ' + JSON.stringify(msgs)); }, warn: (...msgs) => { logWritable.write('warn: ' + JSON.stringify(msgs)); }, error: (...msgs) => { logWritable.write('error: ' + JSON.stringify(msgs)); }, setLevel: (level) => { }, getLevel: () => { }, setName: (name) => { }, },});
```
---
Source: https://docs.slack.dev/tools/bolt-js/concepts/message-listening
# Listening to messages
To listen to messages that [your app has access to receive](/messaging/retrieving-messages/#permissions), you can use the `message()` method which filters out events that aren’t of type `message`. A `message()` listener is equivalent to `event('message')`.
The `message()` listener accepts an optional `pattern` parameter of type `string` or `RegExp` object which filters out any messages that don’t match the pattern.
```
// This will match any message that contains 👋app.message(':wave:', async ({ message, say }) => { // Handle only newly posted messages here if (message.subtype === undefined || message.subtype === 'bot_message' || message.subtype === 'file_share' || message.subtype === 'thread_broadcast') { await say(`Hello, <@${message.user}>`); }});
```
## Using a RegExp pattern {#using-regexp}
A RegExp pattern can be used instead of a string for more granular matching.
All of the results of the RegExp match will be in `context.matches`.
```
app.message(/^(hi|hello|hey).*/, async ({ context, say }) => { // RegExp matches are inside of context.matches const greeting = context.matches[0]; await say(`${greeting}, how are you?`);});
```
## Filtering on event subtypes {#filtering-event-subtypes}
You can filter on subtypes of events by using the built-in `subtype()` middleware. Common message subtypes like `message_changed` and `message_replied` can be found [on the message event page](/reference/events/message#subtypes).
```
// Import subtype from the packageconst { App, subtype } = require('@slack/bolt');// Matches all message changes from usersapp.message(subtype('message_changed'), ({ event, logger }) => { // This if statement is required in TypeScript code if (event.subtype === 'message_changed' && !event.message.subtype && !event.previous_message.subtype) { logger.info(`The user ${event.message.user} changed their message from ${event.previous_message.text} to ${event.message.text}`); }});
```
---
Source: https://docs.slack.dev/tools/bolt-js/concepts/message-sending
# Sending messages
Within your listener function, `say()` is available whenever there is an associated conversation (for example, a conversation where the event or action which triggered the listener occurred). `say()` accepts a string to post simple messages and JSON payloads to send more complex messages. The message payload you pass in will be sent to the associated conversation.
In the case that you'd like to send a message outside of a listener or you want to do something more advanced (like handle specific errors), you can call `chat.postMessage` [using the client attached to your Bolt instance](/tools/bolt-js/concepts/web-api).
```
// Listens for messages containing "knock knock" and responds with an italicized "who's there?"app.message('knock knock', async ({ message, say }) => { await say(`_Who's there?_`);});
```
## Sending a message with blocks {#sending-a-message-with-blocks}
`say()` accepts more complex message payloads to make it easy to add functionality and structure to your messages.
To explore adding rich message layouts to your app, read through [the guide on our API site](/messaging/#structure) and look through templates of common app flows [in the Block Kit Builder](https://api.slack.com/tools/block-kit-builder?template=1).
```
// Sends a section block with datepicker when someone reacts with a 📅 emojiapp.event('reaction_added', async ({ event, say }) => { if (event.reaction === 'calendar') { await say({ blocks: [ { type: 'section', text: { type: 'mrkdwn', text: 'Pick a date for me to remind you', }, accessory: { type: 'datepicker', action_id: 'datepicker_remind', initial_date: '2019-04-28', placeholder: { type: 'plain_text', text: 'Select a date', }, }, }, ], }); }});
```
## Streaming messages {#streaming-messages}
You can have your app's messages stream in to replicate conventional agent behavior. Bolt for JavaScript provides a `sayStream` utility as a listener argument available for `app.event` and `app.message` listeners.
The `sayStream` utility streamlines calling the Node Slack SDK's [`WebClient.chatStream()`](/tools/node-slack-sdk/reference/web-api/classes/WebClient#chatstream) helper utility by sourcing parameter values from the relevant event payload.
Parameter
Value
`channel_id`
Sourced from the event payload.
`thread_ts`
Sourced from the event payload. Falls back to the `ts` value if available.
`recipient_team_id`
Sourced from the event `team_id` (`enterprise_id` if the app is installed on an org).
`recipient_user_id`
Sourced from the `user_id` of the event.
## If neither a channel_id or thread_ts can be sourced, then the utility will be None. {#if-neither-a-channel_id-or-thread_ts-can-be-sourced-then-the-utility-will-be-none}
```
import { App, LogLevel } from '@slack/bolt';import 'dotenv/config';const app = new App({token: process.env.SLACK_BOT_TOKEN,socketMode: true,appToken: process.env.SLACK_APP_TOKEN,logLevel: LogLevel.DEBUG,});app.event('app_mention', async ({ sayStream, setStatus }) => { setStatus({ status: 'Thinking...', loading_messages: ['Waking up...', 'Loading a witty response...'], }); const stream = sayStream({ buffer_size: 100 }); await stream.append({ markdown_text: 'Thinking... :thinking_face:\n\n' }); await stream.append({ markdown_text: 'Here is my response!' }); await stream.stop({ blocks: [feedbackBlock] });});(async () => {try { await app.start(process.env.PORT || 3000); app.logger.info('Bolt app is running!');} catch (error) { app.logger.error('Unable to start App', error);}})();
```
#### Adding feedback buttons after a stream {#adding-feedback-buttons-after-a-stream}
You can pass a [feedback buttons](/reference/block-kit/block-elements/feedback-buttons-element) block element to `stream.stop` to provide feedback buttons to the user at the bottom of the message. Interaction with these buttons will send a block action event to your app to receive the feedback.
```
const feedbackBlock = { type: 'context_actions', elements: [ { type: 'feedback_buttons', action_id: 'feedback', positive_button: { text: { type: 'plain_text', text: 'Good Response' }, accessibility_label: 'Submit positive feedback on this response', value: 'good-feedback', }, negative_button: { text: { type: 'plain_text', text: 'Bad Response' }, accessibility_label: 'Submit negative feedback on this response', value: 'bad-feedback', }, }, ],};
```
Read more about streaming messages in the [_Adding agent features_](/tools/bolt-js/concepts/adding-agent-features) guide.
---
Source: https://docs.slack.dev/tools/bolt-js/concepts/publishing-views
# Publishing views to App Home
[Home tabs](/surfaces/app-home) are customizable surfaces accessible via the sidebar and search that allow apps to display views on a per-user basis. After enabling App Home within your app configuration, home tabs can be published and updated by passing a `user_id` and [view payload](/reference/views/home-tab-views) to the [`views.publish`](/reference/methods/views.publish/) method.
You can subscribe to the [`app_home_opened`](/reference/events/app_home_opened) event to listen for when users open your App Home.
## Example {#example}
```
// Listen for users opening your App Homeapp.event('app_home_opened', async ({ event, client, logger }) => { try { // Call views.publish with the built-in client const result = await client.views.publish({ // Use the user ID associated with the event user_id: event.user, view: { // Home tabs must be enabled in your app configuration page under "App Home" type: "home", blocks: [ { type: "section", text: { type: "mrkdwn", text: "*Welcome home, <@" + event.user + "> :house:*" } }, { type: "section", text: { type: "mrkdwn", text: "Learn how home tabs can be more useful and interactive ." } } ] } }); logger.info(result); } catch (error) { logger.error(error); }});
```
---
Source: https://docs.slack.dev/tools/bolt-js/concepts/receiver
# Customizing a receiver
## Writing a custom receiver {#writing-a-custom-receiver}
A receiver is responsible for handling and parsing any incoming requests from Slack then sending it to the app, so that the app can add context and pass the request to your listeners. Receivers must conform to the [Receiver interface](https://github.com/slackapi/bolt-js/blob/%40slack/bolt%403.13.1/src/types/receiver.ts#L27-L31):
Method
Parameters
Return type
`init()`
`app: App`
`unknown`
`start()`
None
`Promise`
`stop()`
None
`Promise`
`init()` is called after Bolt for JavaScript app is created. This method gives the receiver a reference to an `App` to store so that it can call:
* `await app.processEvent(event)` whenever your app receives a request from Slack. It will throw if there is an unhandled error.
To use a custom receiver, you can pass it into the constructor when initializing your Bolt for JavaScript app. Here is what a basic custom receiver might look like.
For a more in-depth look at a receiver, [read the source code for the built-in `ExpressReceiver`](https://github.com/slackapi/bolt-js/blob/master/src/receivers/ExpressReceiver.ts)
* * *
## Customizing built-in receivers {#customizing-built-in-receivers}
The built-in `HTTPReceiver`, `ExpressReceiver`, `AwsLambdaReceiver` and `SocketModeReceiver` accept several configuration options. For a full list of options, see the [Receiver options reference](/tools/bolt-js/reference#receiver-options).
### Extracting custom properties {#extracting-custom-properties}
Use the `customPropertiesExtractor` option to extract custom properties from incoming events. The event type depends on the type of receiver you are using, e.g. HTTP requests for `HTTPReceiver`s, websocket messages for `SocketModeReceiver`s.
This is particularly useful for extracting HTTP headers that you want to propagate to other services, for example, if you need to propagate a header for distributed tracing.
```
const { App, HTTPReceiver } = require('@slack/bolt');const app = new App({ token: process.env.SLACK_BOT_TOKEN, receiver: new HTTPReceiver({ signingSecret: process.env.SLACK_SIGNING_SECRET, customPropertiesExtractor: (req) => { return { "headers": req.headers, "foo": "bar", }; } }),});app.use(async ({ logger, context, next }) => { logger.info(context); await next();});(async () => { // Start your app await app.start(process.env.PORT || 3000); app.logger.info('⚡️ Bolt app is running!');})();
```
You can find [more examples of extracting custom properties](https://github.com/slackapi/bolt-js/tree/%40slack/bolt%403.13.1/examples/custom-properties) from different types of receivers here.
```
import { createServer } from 'http';import express from 'express';class SimpleReceiver { constructor(signingSecret, endpoints) { this.app = express(); this.server = createServer(this.app); for (const endpoint of endpoints) { this.app.post(endpoint, this.requestHandler.bind(this)); } } init(app) { this.bolt = app; } start(port) { return new Promise((resolve, reject) => { try { this.server.listen(port, () => { resolve(this.server); }); } catch (error) { reject(error); } }); } stop() { return new Promise((resolve, reject) => { this.server.close((error) => { if (error) { reject(error); return; } resolve(); }) }) } // This is a simple implementation. Look at the ExpressReceiver source for more detail async requestHandler(req, res) { let ackCalled = false; // Assume parseBody function exists to parse incoming requests const parsedReq = parseBody(req); const event = { body: parsedReq.body, // Receivers are responsible for handling acknowledgements // `ack` should be prepared to be called multiple times and // possibly with `response` as an error ack: (response) => { if (ackCalled) { return; } if (response instanceof Error) { res.status(500).send(); } else if (!response) { res.send('') } else { res.send(response); } ackCalled = true; } }; await this.bolt.processEvent(event); }}
```
---
Source: https://docs.slack.dev/tools/bolt-js/concepts/select-menu-options
# Listening & responding to select menu options
The `options()` method listens for incoming option request payloads from Slack. Similar to the [`action()`](/tools/bolt-js/concepts/actions) method, an `action_id` or constraints object is required.
While it's recommended to use `action_id` for `external_select` menus, dialogs do not yet support Block Kit so you'll have to use the constraints object to filter on a `callback_id`.
To respond to options requests, you'll need to `ack()` with valid options. Find [external select response examples](/reference/block-kit/block-elements/multi-select-menu-element#external_multi_select) on our API site.
## Example {#example}
```
// Example of responding to an external_select options requestapp.options('external_action', async ({ options, ack }) => { // Get information specific to a team or channel const results = await db.get(options.team.id); if (results) { let options = []; // Collect information in options array to send in Slack ack response for (const result of results) { options.push({ text: { type: "plain_text", text: result.label }, value: result.value }); } await ack({ options: options }); } else { await ack(); }});
```
---
Source: https://docs.slack.dev/tools/bolt-js/concepts/shortcuts
# Listening & responding to shortcuts
The `shortcut()` method supports both [global shortcuts](/interactivity/implementing-shortcuts#shortcut-types) and [message shortcuts](/interactivity/implementing-shortcuts#messages).
Shortcuts are invocable entry points to apps. Global shortcuts are available from within search in Slack. Message shortcuts are available in the context menus of messages. Your app can use the `shortcut()` method to listen to incoming shortcut requests. The method requires a `callback_id` parameter of type `string` or `RegExp`.
warning
If you use `shortcut()` multiple times with overlapping RegExp matches, _all_ matching listeners will run. Design your regular expressions to avoid this possibility.
Shortcuts must be acknowledged with `ack()` to inform Slack that your app has received the request.
Shortcuts include a `trigger_id` which an app can use to [open a modal](/tools/bolt-js/concepts/creating-modals) that confirms the action the user is taking.
When configuring shortcuts within your app configuration, you'll continue to append `/slack/events` to your request URL.
warning
Global shortcuts do **not** include a channel ID. If your app needs access to a channel ID, you may use a [`conversations_select`](/reference/block-kit/block-elements/multi-select-menu-element#conversation_multi_select) element within a modal. Message shortcuts do include channel ID.
```
// The open_modal shortcut opens a plain old modalapp.shortcut('open_modal', async ({ shortcut, ack, client, logger }) => { try { // Acknowledge shortcut request await ack(); // Call the views.open method using one of the built-in WebClients const result = await client.views.open({ trigger_id: shortcut.trigger_id, view: { type: "modal", title: { type: "plain_text", text: "My App" }, close: { type: "plain_text", text: "Close" }, blocks: [ { type: "section", text: { type: "mrkdwn", text: "About the simplest modal you could conceive of :smile:\n\nMaybe or ." } }, { type: "context", elements: [ { type: "mrkdwn", text: "Psssst this modal was designed using " } ] } ] } }); logger.info(result); } catch (error) { logger.error(error); }});
```
## Listening to shortcuts using a constraint object {#listening-to-shortcuts-using-a-constraint-object}
You can use a constraints object to listen to `callback_id` and `type` values. Constraints in the object can be of type string or RegExp object.
```
// Your middleware will only be called when the callback_id matches 'open_modal' AND the type matches 'message_action'app.shortcut({ callback_id: 'open_modal', type: 'message_action' }, async ({ shortcut, ack, client, logger }) => { try { // Acknowledge shortcut request await ack(); // Call the views.open method using one of the built-in WebClients const result = await client.views.open({ trigger_id: shortcut.trigger_id, view: { type: "modal", title: { type: "plain_text", text: "My App" }, close: { type: "plain_text", text: "Close" }, blocks: [ { type: "section", text: { type: "mrkdwn", text: "About the simplest modal you could conceive of :smile:\n\nMaybe or ." } }, { type: "context", elements: [ { type: "mrkdwn", text: "Psssst this modal was designed using " } ] } ] } }); logger.info(result); } catch (error) { logger.error(error); }});
```
---
Source: https://docs.slack.dev/tools/bolt-js/concepts/socket-mode
# Using Socket Mode
[Socket Mode](/apis/events-api/using-socket-mode) allows your app to connect and receive data from Slack via a WebSocket connection. To handle the connection, Bolt for JavaScript includes a `SocketModeReceiver` (in `@slack/bolt@3.0.0` and higher). Before using Socket Mode, be sure to enable it within your app configuration.
To use the `SocketModeReceiver`, just pass in `socketMode:true` and `appToken:YOUR_APP_TOKEN` when initializing `App`. You can get your App Level Token in your app configuration under the **Basic Information** section.
```
const { App } = require('@slack/bolt');const app = new App({ token: process.env.BOT_TOKEN, socketMode: true, appToken: process.env.APP_TOKEN,});(async () => { await app.start(); app.logger.info('⚡️ Bolt app started');})();
```
## Custom SocketMode Receiver {#custom-socketmode-receiver}
You can define a custom `SocketModeReceiver` by importing it from `@slack/bolt`.
```
const { App, SocketModeReceiver } = require('@slack/bolt');const socketModeReceiver = new SocketModeReceiver({ appToken: process.env.APP_TOKEN, // enable the following if you want to use OAuth // clientId: process.env.CLIENT_ID, // clientSecret: process.env.CLIENT_SECRET, // stateSecret: process.env.STATE_SECRET, // scopes: ['channels:read', 'chat:write', 'app_mentions:read', 'channels:manage', 'commands'],});const app = new App({ receiver: socketModeReceiver, // disable token line below if using OAuth token: process.env.BOT_TOKEN});(async () => { await app.start(); app.logger.info('⚡️ Bolt app started');})();
```
---
Source: https://docs.slack.dev/tools/bolt-js/concepts/token-rotation
# Token rotation
Supported in Bolt for JavaScript as of v3.5.0, token rotation provides an extra layer of security for your access tokens and is defined by the [OAuth V2 RFC](https://datatracker.ietf.org/doc/html/rfc6749#section-10.4).
Instead of an access token representing an existing installation of your Slack app indefinitely, with token rotation enabled, access tokens expire. A refresh token acts as a long-lived way to refresh your access tokens.
Bolt for JavaScript will rotate tokens automatically in response to incoming events so long as the [built-in OAuth](/tools/bolt-js/concepts/authenticating-oauth) functionality is used.
## Using the InstallProvider utility {#using-the-installprovider-utility}
To rotate tokens on a separate schedule, consider implementing the `InstallProvider` from the [`@slack/oauth`](/tools/node-slack-sdk/oauth) package for use of the provided `authorize` method:
```
const { InstallProvider } = require("@slack/oauth");const installer = new InstallProvider({ clientId: process.env.SLACK_CLIENT_ID, clientSecret: process.env.SLACK_CLIENT_SECRET, stateSecret: process.env.SLACK_STATE_SECRET,});async function rotateTokenBeforeUsing(query) { return await installer.authorize({ enterpriseId: query.enterpriseId, teamId: query.teamId, // User tokens can also be rotated if needed // userId: query.userId, });}
```
The above implementation also requires an installation [store](/tools/node-slack-sdk/oauth/#storing-installations-in-a-database) to fetch and store installation information according to the incoming installation query.
For more information about token rotation, please see the [documentation](/authentication/using-token-rotation).
---
Source: https://docs.slack.dev/tools/bolt-js/concepts/updating-pushing-views
# Updating & pushing views
Modals contain a stack of views. When you call the [`views.open`](/reference/methods/views.open/) method, you add the root view to the modal. After the initial call, you can dynamically update a view by calling the [`views.update`](/reference/methods/views.update) method, or stack a new view on top of the root view by calling the [`views.push`](/reference/methods/views.push) method.
## The views.update method {#the-viewsupdate-method}
To update a view, you can use the built-in client to call the `views.update` method with the `view_id` parameter that was generated when you opened the view, and a new `view` object including the updated `blocks` array. If you're updating the view when a user interacts with an element inside of an existing view, the `view_id` parameter will be available in the `body` of the request.
## The views.push method {#the-viewspush-method}
To push a new view onto the view stack, you can use the built-in client to call the `views.push` method by passing a valid `trigger_id` parameter and a new [view payload](/reference/views). The arguments for the `views.push` method is the same as [`views.open`](/tools/bolt-js/concepts/creating-modals). After you open a modal, you may only push two additional views onto the view stack.
Learn more about updating and pushing views in our [API documentation](/surfaces/modals)
```
// Listen for a button invocation with action_id `button_abc` (assume it's inside of a modal)app.action('button_abc', async ({ ack, body, client, logger }) => { // Acknowledge the button request await ack(); try { if (body.type !== 'block_actions' || !body.view) { return; } // Call views.update with the built-in client const result = await client.views.update({ // Pass the view_id view_id: body.view.id, // Pass the current hash to avoid race conditions hash: body.view.hash, // View payload with updated blocks view: { type: 'modal', // View identifier callback_id: 'view_1', title: { type: 'plain_text', text: 'Updated modal' }, blocks: [ { type: 'section', text: { type: 'plain_text', text: 'You updated the modal!' } }, { type: 'image', image_url: 'https://media.giphy.com/media/SVZGEcYt7brkFUyU90/giphy.gif', alt_text: 'Yay! The modal was updated' } ] } }); logger.info(result); } catch (error) { logger.error(error); }});
```
---
Source: https://docs.slack.dev/tools/bolt-js/concepts/using-the-assistant-class
# Using the Assistant class
Some features within this guide require a paid plan
If you don't have a paid workspace for development, you can join the [Developer Program](https://api.slack.com/developer-program) and provision a sandbox with access to all Slack features for free.
The [`Assistant`](/tools/bolt-js/reference#the-assistantconfig-configuration-object) class can be used to handle the incoming events expected from a user interacting with an app in Slack that has the Agents & AI Apps feature enabled.
A typical flow would look like:
1. [The user starts a thread](#handling-new-thread). The `Assistant` class handles the incoming [`assistant_thread_started`](/reference/events/assistant_thread_started) event.
2. [The thread context may change at any point](#handling-thread-context-changes). The `Assistant` class can handle any incoming [`assistant_thread_context_changed`](/reference/events/assistant_thread_context_changed) events. The class also provides a default `context` store to keep track of thread context changes as the user moves through Slack.
3. [The user responds](#handling-user-response). The `Assistant` class handles the incoming [`message.im`](/reference/events/message.im) event.
```
const assistant = new Assistant({ /** * (Recommended) A custom ThreadContextStore can be provided, inclusive of methods to * get and save thread context. When provided, these methods will override the `getThreadContext` * and `saveThreadContext` utilities that are made available in other Assistant event listeners. */ // threadContextStore: { // get: async ({ context, client, payload }) => {}, // save: async ({ context, client, payload }) => {}, // }, /** * `assistant_thread_started` is sent when a user opens the Assistant container. * This can happen via DM with the app or as a side-container within a channel. */ threadStarted: async ({ event, logger, say, setSuggestedPrompts, saveThreadContext }) => {}, /** * `assistant_thread_context_changed` is sent when a user switches channels * while the Assistant container is open. If `threadContextChanged` is not * provided, context will be saved using the AssistantContextStore's `save` * method (either the DefaultAssistantContextStore or custom, if provided). */ threadContextChanged: async ({ logger, saveThreadContext }) => {}, /** * Messages sent from the user to the Assistant are handled in this listener. */ userMessage: async ({ client, context, logger, message, getThreadContext, say, setTitle, setStatus }) => {},});
```
Consider the following
You _could_ go it alone and [listen](/tools/bolt-js/concepts/event-listening) for the `assistant_thread_started`, `assistant_thread_context_changed`, and `message.im` events in order to implement the AI features in your app. That being said, using the `Assistant` class will streamline the process. And we already wrote this nice guide for you!
While the `assistant_thread_started` and `assistant_thread_context_changed` events do provide Slack-client thread context information, the `message.im` event does not. Any subsequent user message events won't contain thread context data. For that reason, Bolt not only provides a way to store thread context — the `threadContextStore` property — but it also provides a `DefaultThreadContextStore` instance that is utilized by default. This implementation relies on storing and retrieving [message metadata](/messaging/message-metadata/) as the user interacts with the app.
If you do provide your own `threadContextStore` property, it must feature `get` and `save` methods.
Be sure to give the [reference docs](/tools/bolt-js/reference#agents--assistants) a look!
### Configuring your app to support the Assistant class {#configuring-your-app-to-support-the-assistant-class}
1. Within [App Settings](https://api.slack.com/apps), enable the **Agents & AI Apps** feature.
2. Within the App Settings **OAuth & Permissions** page, add the following scopes:
* [`assistant:write`](/reference/scopes/assistant.write)
* [`chat:write`](/reference/scopes/chat.write)
* [`im:history`](/reference/scopes/im.history)
3. Within the App Settings **Event Subscriptions** page, subscribe to the following events:
* [`assistant_thread_started`](/reference/events/assistant_thread_started)
* [`assistant_thread_context_changed`](/reference/events/assistant_thread_context_changed)
* [`message.im`](/reference/events/message.im)
### Handling a new thread {#handling-new-thread}
When the user opens a new thread with your AI-enabled app, the [`assistant_thread_started`](/reference/events/assistant_thread_started) event will be sent to your app. Capture this with the `threadStarted` handler to allow your app to respond.
In the example below, the app is sending a message — containing thread context [message metadata](/messaging/message-metadata/) behind the scenes — to the user, along with a single [prompt](/reference/methods/assistant.threads.setSuggestedPrompts).
```
...threadStarted: async ({ event, logger, say, setSuggestedPrompts, saveThreadContext }) => { const { context } = event.assistant_thread; try { /** * Since context is not sent along with individual user messages, it's necessary to keep * track of the context of the conversation to better assist the user. Sending an initial * message to the user with context metadata facilitates this, and allows us to update it * whenever the user changes context (via the `assistant_thread_context_changed` event). * The `say` utility sends this metadata along automatically behind the scenes. * !! Please note: this is only intended for development and demonstrative purposes. */ await say('Hi, how can I help?'); await saveThreadContext(); /** * Provide the user up to 4 optional, preset prompts to choose from. * * The first `title` prop is an optional label above the prompts that * defaults to 'Try these prompts:' if not provided. */ if (!context.channel_id) { await setSuggestedPrompts({ title: 'Start with this suggested prompt:', prompts: [ { title: 'This is a suggested prompt', message: 'When a user clicks a prompt, the resulting prompt message text ' + 'can be passed directly to your LLM for processing.\n\n' + 'Assistant, please create some helpful prompts I can provide to ' + 'my users.', }, ], }); } /** * If the user opens the Assistant container in a channel, additional * context is available. This can be used to provide conditional prompts * that only make sense to appear in that context. */ if (context.channel_id) { await setSuggestedPrompts({ title: 'Perform an action based on the channel', prompts: [ { title: 'Summarize channel', message: 'Assistant, please summarize the activity in this channel!', }, ], }); } } catch (e) { logger.error(e); } },...
```
When a user opens an app thread while in a channel, the channel info is stored as the thread's `AssistantThreadContext` data.
You can grab that info using the `getThreadContext()` utility, as subsequent user message event payloads won't include the channel info.
### Handling thread context changes {#handling-thread-context-changes}
When the user switches channels, the [`assistant_thread_context_changed`](/reference/events/assistant_thread_context_changed) event will be sent to your app. Capture this with the `threadContextChanged` handler.
```
... threadContextChanged: async ({ saveThreadContext }) => { await saveThreadContext(); },...
```
If you use the built-in `AssistantThreadContextStore` without any custom configuration, you can skip this — the updated thread context data is automatically saved as [message metadata](/messaging/message-metadata/) on the first reply from the app.
### Handling the user response {#handling-user-response}
When the user messages your app, the [`message.im`](/reference/events/message.im) event will be sent to your app. Capture this with the `userMessage` handler.
Messages sent to the app do not contain a [subtype](/reference/events/message/#subtypes) and must be deduced based on their shape and any provided [message metadata](/messaging/message-metadata/).
There are three [utilities](/tools/bolt-js/reference#the-assistantconfig-configuration-object) that are particularly useful in curating the user experience:
* `say`
* `setTitle`
* `setStatus`
Within the `setStatus` utility, you can cycle through strings passed into a `loading_messages` array.
```
// LLM system promptconst DEFAULT_SYSTEM_CONTENT = `You're an assistant in a Slack workspace.Users in the workspace will ask you to help them write something or to think better about a specific topic.You'll respond to those questions in a professional way.When you include markdown text, convert them to Slack compatible ones.When a prompt has Slack's special syntax like <@USER_ID> or <#CHANNEL_ID>, you must keep them as-is in your response.`;...const assistant = new Assistant({ ... userMessage: async ({ client, context, logger, message, getThreadContext, say, setTitle, setStatus }) => { /** * Messages sent to the Assistant can have a specific message subtype. * * Here we check that the message has "text" and was sent to a thread to * skip unexpected message subtypes. */ if (!('text' in message) || !('thread_ts' in message) || !message.text || !message.thread_ts) { return; } const { channel, thread_ts } = message; const { userId, teamId } = context; try { /** * Set the title of the Assistant thread to capture the initial topic/question * as a way to facilitate future reference by the user. */ await setTitle(message.text); /** * Set the status of the Assistant to give the appearance of active processing. */ await setStatus({ status: 'thinking...', loading_messages: [ 'Teaching the hamsters to type faster…', 'Untangling the internet cables…', 'Consulting the office goldfish…', 'Polishing up the response just for you…', 'Convincing the AI to stop overthinking…', ], });
```
The following example uses OpenAI but you can substitute it with the LLM provider of your choice.
```
... // Retrieve the Assistant thread history for context of question being asked const thread = await client.conversations.replies({ channel, ts: thread_ts, oldest: thread_ts, }); // Prepare and tag each message for LLM processing const threadHistory = thread.messages.map((m) => { const role = m.bot_id ? 'Assistant' : 'User'; return `${role}: ${m.text || ''}`; }); // parsed threadHistory to align with openai.responses api input format const parsedThreadHistory = threadHistory.join('\n'); // Send message history and newest question to LLM const llmResponse = await openai.responses.create({ model: 'gpt-4o-mini', input: `System: ${DEFAULT_SYSTEM_CONTENT}\n\n${parsedThreadHistory}\nUser: ${message.text}` }); // Provide a response to the user await say({ markdown_text: llmResponse.choices[0].message.content }); } catch (e) { logger.error(e); // Send message to advise user and clear processing status if a failure occurs await say({ text: 'Sorry, something went wrong!' }); } },});app.assistant(assistant);...
```
See the [_Creating agents: adding and handling feedback_](/tools/bolt-js/concepts/adding-agent-features#adding-and-handling-feedback) section for adding feedback buttons with Block Kit.
Want to see the functionality described throughout this guide in action? We've created a [Assistant Template](https://github.com/slack-samples/bolt-js-assistant-template) repo for you to build from.
---
Source: https://docs.slack.dev/tools/bolt-js/concepts/view-submissions
# Listening to views
You may listen for user interactions with views using the `view` method.
Slack will send a `view_submission` request when a user submits a view. To receive the values submitted in view input blocks, you can access the `state` object. `state` contains a `values` object that uses the `block_id` and unique `action_id` to store the input values. If the `notify_on_close` field of a view has been set to `true`, Slack will also send a `view_closed` request if a user clicks the close button. See the section on **Handling views on close** for more detail. To listen to either a `view_submission` request or `view_closed` request, you can use the built-in `view()` method.
The `view()` method requires a `callback_id` of type `string` or `RegExp` or a constraint object with properties `type` and `callback_id`.
* * *
## Update views on submission {#update-views-on-submission}
To update a view in response to a `view_submission` request, you may pass a `response_action` of type `update` with a newly composed `view` to display in your acknowledgement.
```
// Update the view on submission app.view('modal-callback-id', async ({ ack, body }) => { await ack({ response_action: 'update', view: buildNewModalView(body), });});
```
Similarly, there are options for [displaying errors](/surfaces/modals#displaying_errors) in response to view submissions.
Read more about view submissions in our [API documentation](/surfaces/modals#interactions).
* * *
## Handling views on close {#handling-views-on-close}
When listening for `view_closed` requests, you must pass an object containing `type: 'view_closed'` and the view `callback_id`. See below for an example of this.
See the [API documentation](/surfaces/modals#interactions) for more information about `view_closed`.
#### Handle a view_closed request {#handle-a-view_closed-request}
```
// Handle a view_closed requestapp.view({ callback_id: 'view_b', type: 'view_closed' }, async ({ ack, body, view, client }) => { // Acknowledge the view_closed request await ack(); // react on close request});
```
#### Handle a view_submission request {#handle-a-view_submission-request}
```
// Handle a view_submission requestapp.view('view_b', async ({ ack, body, view, client, logger }) => { // Acknowledge the view_submission request await ack(); // Do whatever you want with the input data - here we're saving it to a DB then sending the user a verification of their submission // Assume there's an input block with `block_1` as the block_id and `input_a` const val = view['state']['values']['block_1']['input_a']; const user = body['user']['id']; // Message to send user let msg = ''; // Save to DB const results = await db.set(user.input, val); if (results) { // DB save was successful msg = 'Your submission was successful'; } else { msg = 'There was an error with your submission'; } // Message the user try { await client.chat.postMessage({ channel: user, text: msg }); } catch (error) { logger.error(error); }});
```
---
Source: https://docs.slack.dev/tools/bolt-js/concepts/web-api
# Using the Web API
You can call any [Web API method](/reference/methods) using the [`WebClient`](/tools/node-slack-sdk/web-api) provided to your app's listeners as `client`. This uses either the token that initialized your app **or** the token that is returned from the [`authorize`](/tools/bolt-js/concepts/authorization) function for the incoming event. The built-in [OAuth support](/tools/bolt-js/concepts/authenticating-oauth) handles the second case by default.
Your Bolt app also has a top-level `app.client` which you can manually pass the `token` parameter. If the incoming request is not authorized or you're calling a method from outside of a listener, use the top-level `app.client`.
Calling one of the [`WebClient`](/tools/node-slack-sdk/web-api) methods will return a Promise containing the response from Slack, regardless of whether you use the top-level or listener's client.
## Using the team_id with Web API calls {#using-the-team_id-with-web-api-calls}
Since the introduction of [org wide app installations](/enterprise/), [some web-api methods](/enterprise/developing-for-enterprise-orgs#using-apis) now require a `team_id` parameter to indicate which workspace to act on. Bolt for JavaScript will attempt to infer the `team_id` value based on incoming payloads and pass it along to `client`. This is handy for existing applications looking to add support for org wide installations and not spend time updating all of these web-api calls.
## Example {#example}
```
// Unix Epoch time for September 30, 2019 11:59:59 PMconst whenSeptemberEnds = 1569887999;app.message('wake me up', async ({ message, client, logger }) => { try { // Call chat.scheduleMessage with the built-in client const result = await client.chat.scheduleMessage({ channel: message.channel, post_at: whenSeptemberEnds, text: 'Summer has come and passed' }); } catch (error) { logger.error(error); }});
```
---
Source: https://docs.slack.dev/tools/bolt-js/creating-an-app
# Creating an app with Bolt for JavaScript
This guide will walk you through creating and using a Slack app built with Bolt for JavaScript.
On this journey, you'll:
* set up your local environment,
* create a new Slack app,
* and enable it to listen for and respond to messages within a Slack workspace.
When you’re finished, you’ll have created the [Getting Started app](https://github.com/slack-samples/bolt-js-getting-started-app) to run, modify, and make your own. ⚡️
Less reading, more doing
Follow the [quickstart](/tools/bolt-js/getting-started) guide to run an app as soon as possible. This guide will more thoroughly explore building your first app using Bolt for JavaScript.
## Prerequisites {#prerequisites}
A place to belong
You'll need a workspace where development can happen. We recommend using [developer sandboxes](/tools/developer-sandboxes/) to avoid disruptions where real work gets done.
We recommend using the [**Slack CLI**](/tools/slack-cli/) for the smoothest experience, but you can also choose to follow along in the terminal as long as you have Node.js.
* Slack CLI
* Terminal
Install the latest version of the Slack CLI for your operating system of choice by following the corresponding guide:
* [Slack CLI for macOS & Linux](/tools/slack-cli/guides/installing-the-slack-cli-for-mac-and-linux)
* [Slack CLI for Windows](/tools/slack-cli/guides/installing-the-slack-cli-for-windows)
Then confirm the Slack CLI is successfully installed by running the following command:
```
$ slack version
```
You'll also need to log in if this is your first time using the Slack CLI.
```
$ slack login
```
You can follow along in this guide as long as you have Node installed. We recommend the latest active release:
* [Node.js](https://nodejs.org/en/download)
Once installed, make sure the right version is being used:
```
$ node --version
```
## Initializing the project {#initializing-a-project}
With your toolchain configured, you can now set up a new Bolt project. This is where you'll write the code that handles the logic of your app.
If you don’t already have a project, let’s create a new one!
* Slack CLI
* Terminal
In this guide, we'll be scaffolding this project with the [`bolt-js-blank-template`](https://github.com/slack-samples/bolt-js-blank-template) template.
```
$ slack create first-bolt-app --template slack-samples/bolt-js-blank-template$ cd first-bolt-app
```
After your project is created you will see a `package.json` file with project details and a `.slack` directory for application use.
A few other files exist too, but we'll visit these later.
Create and move into a new directory before you initialize the project:
```
$ mkdir first-bolt-app$ cd first-bolt-app$ npm init$ npm pkg set type=module
```
You’ll be prompted with a series of questions to describe your new project (you can accept the defaults by hitting Enter on each prompt if you aren’t picky). After you’re done, you’ll have a new `package.json` file in your directory.
Next we'll install the Bolt for JavaScript package to the project's dependencies:
```
$ npm install @slack/bolt
```
Outlines of a project are taking shape, so let's move onto creating an app!
## Creating the app {#creating-an-app}
Before you can begin developing with Bolt for JavaScript, you'll want to create a Slack app.
* Slack CLI
* App Settings
The scaffolded blank template contains a `manifest.json` file with the app details for the app we are creating and installing.
Run the following command to create a new "local" app and choose a Slack team for development:
```
$ slack install
```
Your new app will have some placeholder values and a small set of [scopes](/reference/scopes) to start, but we'll explore more customizations soon.
Navigate to your list of apps within App Settings and [create a new Slack app](https://api.slack.com/apps/new) from scratch.
After you fill out an app name (this can be changed later) and pick a workspace to install it to, press the `Create App` button and you'll land on your app's **Basic Information** page.

Look around, add an app icon and description, and then let's start configuring your app. 🔩
#### Installing the app {#installing-the-app}
Slack apps [use OAuth to manage access](/authentication/installing-with-oauth) to the various Slack APIs. When an app is installed, you'll receive a token that the app can use to call API methods.
There are three main [token types](/authentication/tokens) available to a Slack app: user (`xoxp`), bot (`xoxb`), and app (`xapp`) tokens:
* [User tokens](/authentication/tokens#user) allow you to call API methods on behalf of users after they install or authenticate the app. There may be several user tokens for a single workspace.
* [Bot tokens](/authentication/tokens#bot) are associated with bot users, and are only granted once in a workspace where someone installs the app. The bot token your app uses will be the same no matter which user performed the installation. Bot tokens are the token type that _most_ apps use.
* [App-level tokens](/authentication/tokens#app-level) represent your app across organizations, including installations by all individual users on all workspaces in a given organization. App-level tokens are commonly used for creating websocket connections to your app.
We're going to use bot and app tokens for this guide.
1. Within App Settings, navigate to **OAuth & Permissions** in the left sidebar. Then scroll down to the **Bot Token Scopes** section. Click **Add an OAuth Scope**.
2. For now, we'll just add one scope: [`chat:write`](/reference/scopes/chat.write). This scope grants your app the permission to post messages in channels it's a member of.
3. Scroll up to the top of the **OAuth & Permissions** page and click **Install to Team**. You'll be led through Slack's OAuth UI, where you should allow your app to be installed to your development workspace.
4. Once you authorize the installation, you'll land on the **OAuth & Permissions** page and see a **Bot User OAuth Access Token**.

You'll need to save the generated **bot token** as an environment variable. Copy your bot token beginning with `xoxb` and insert it into the following command:
```
$ export SLACK_BOT_TOKEN=xoxb-
```
The above example works on Linux and macOS, but [similar commands are available on Windows](https://superuser.com/questions/212150/how-to-set-env-variable-in-windows-cmd-line/212153#212153).
Keep your tokens and signing secret secure
At a minimum, you should avoid checking tokens and signing secrets into public version control, and you should access them via environment variables as shown above. Check out the guide to [app security best practices](/concepts/security) for more insights.
## Preparing to receive events {#preparing-receive-events}
Let's now start your app to receive events from the [Events API](/apis/events-api). We'll listen and respond to certain events soon!
There are two paths for connecting your app to receive events:
* **Socket Mode**: For those just starting, we recommend using [Socket Mode](/apis/events-api/using-socket-mode/). Socket Mode allows your app to use the Events API and interactive features without exposing a public HTTP Request URL. This can be helpful during development, or if you're receiving requests from behind a firewall.
* **Request URL**: Alternatively, you're welcome to set up an app with public HTTP [Request URLs](/apis/events-api/using-http-request-urls). HTTP is more useful for apps being deployed to hosting environments (like [AWS](/tools/bolt-js/deployments/aws-lambda) or [Heroku](/tools/bolt-js/deployments/heroku)) to stably respond within large Slack organizations, or apps intended for distribution via the Slack Marketplace.
We've provided instructions for both ways in this guide, choose your flavor and let's carry on.
* Socket Mode
* HTTP
The Slack CLI template does not require Socket Mode configurations
The template we used to start with the Slack CLI is configured to use Socket Mode out of the box! [Skip to the _Running the app_ section](#running-the-app).
First you'll need to enable events from [app settings](https://api.slack.com/apps):
1. Click **Event Subscriptions** on the left sidebar. Toggle the switch labeled **Enable Events**.
2. Navigate to **Socket Mode** on the left side menu and toggle **Enable Socket Mode** on.
3. Go to **Basic Information** and scroll down under the App-Level Tokens section and click **Generate Token and Scopes** to generate an app token. Add the `connections:write` scope to this token and save the generated `xapp` token, we'll use that in just a moment.
When an event occurs, Slack will send your app information about the event, like the user that triggered it and the channel it occurred in. Your app will process the details and can respond accordingly.
Back in your project, store the `xapp` token you created earlier in your environment.
```
$ export SLACK_APP_TOKEN=xapp-
```
Create a new entrypoint file called `app.js` in your project directory and add the following code:
app.js
```
import { App } from "@slack/bolt";// Initializes your app with your Slack app and bot tokenconst app = new App({ token: process.env.SLACK_BOT_TOKEN, socketMode: true, appToken: process.env.SLACK_APP_TOKEN,});(async () => { // Start your app await app.start(); app.logger.info("⚡️ Bolt app is running!");})();
```
For local development, you can use a proxy service like [ngrok](https://ngrok.com/) to create a public URL and tunnel requests to your development environment.
Refer to [ngrok's getting started guide](https://ngrok.com/docs/getting-started/) on how to create this tunnel.
First you'll need a signing secret to verify that the requests sent to your app are from Slack.
1. Go to the **Basic Information** page on [app settings](https://api.slack.com/apps) and copy your Signing Secret to store in a new environment variable:
```
$ export SLACK_SIGNING_SECRET=
```
2. Create a new entrypoint file called `app.js` in your project directory and add the following code:
app.js
```
import { App } from "@slack/bolt";// Initializes your app with your bot token and signing secretconst app = new App({ token: process.env.SLACK_BOT_TOKEN, signingSecret: process.env.SLACK_SIGNING_SECRET,});(async () => { // Start your app await app.start(process.env.PORT || 3000); app.logger.info("⚡️ Bolt app is running!");})();
```
3. Next let's start your app to receive events. Run the following command in the terminal:
```
$ node app.js
```
Then enable events from app settings:
4. Click **Event Subscriptions** on the left sidebar. Toggle the switch labeled **Enable Events**.
5. Add your [Request URL](/apis/events-api/#subscribing) and click **Save Changes**. Slack will send HTTP POST requests corresponding to events to this Request URL endpoint.
You can now stop the app by pressing `CTRL+C` in the terminal.
Can you hear me now?
Bolt uses the `/slack/events` path to listen to all incoming requests (whether shortcuts, events, or interactivity payloads).
When configuring your Request URL within your app configuration, you'll append `/slack/events`:
```
https://example.ngrok.io/slack/events
```
With the app constructed, save your `app.js` file.
## Running the app {#running-the-app}
Now let's actually run your app! From the command line run the following:
* Slack CLI
* Terminal
```
$ slack run
```
```
$ node app.js
```
Your app should let you know that it's up and running. It's not actually listening for anything though. Let's change that.
Stop your app by pressing `CTRL+C` in the terminal then read on.
## Subscribing to events {#subscribing-to-events}
Your app behaves similarly to people on your team — it can post messages, add emoji reactions, and listen and respond to events.
To listen for events happening in a Slack workspace (like when a message is posted or when a reaction is added to a message) you'll use the [Events API](/apis/events-api/) to subscribe to event types.
Open [app settings](https://api.slack.com/apps) for your app and find the **Event Subscriptions** tab, toggle "Enable Events" on, then scroll down to **Subscribe to Bot Events**. There are four events related to messages:
* [`message.channels`](/reference/events/message.channels) listens for messages in public channels that your app is added to
* [`message.groups`](/reference/events/message.groups) listens for messages in 🔒 private channels that your app is added to
* [`message.im`](/reference/events/message.im) listens for messages in your app's DMs with users
* [`message.mpim`](/reference/events/message.mpim) listens for messages in multi-person DMs that your app is added to
If you want your bot to listen to messages from every conversation it's added to, choose all four message events. After you’ve selected the events you want your bot to listen to, click the green **Save Changes** button.
You will also have to reinstall the app since new scopes are added for these events. Return to the **Install App** page to reinstall the app to your team.
## Listening and responding to messages {#listening-and-responding-to-messages}
Your app is now ready for some logic. Let's start by using the [`message`](/tools/bolt-js/concepts/message-listening) method to attach a listener for messages.
The following example listens and responds to all messages in channels/DMs where your app has been added that contain the word "hello". Insert the highlighted lines into `app.js`.
* Socket Mode
* HTTP
app.js
```
import { App } from "@slack/bolt";// Initializes your app with your Slack app and bot tokenconst app = new App({ token: process.env.SLACK_BOT_TOKEN, socketMode: true, appToken: process.env.SLACK_APP_TOKEN,});// Listens to incoming messages that contain "hello"app.message("hello", async ({ message, say }) => { // say() sends a message to the channel where the event was triggered await say(`Hey there <@${message.user}>!`);});(async () => { // Start your app await app.start(); app.logger.info("⚡️ Bolt app is running!");})();
```
app.js
```
import { App } from "@slack/bolt";// Initializes your app with your bot token and signing secretconst app = new App({ token: process.env.SLACK_BOT_TOKEN, signingSecret: process.env.SLACK_SIGNING_SECRET,});// Listens to incoming messages that contain "hello"app.message("hello", async ({ message, say }) => { // say() sends a message to the channel where the event was triggered await say(`Hey there <@${message.user}>!`);});(async () => { // Start your app await app.start(process.env.PORT || 3000); app.logger.info("⚡️ Bolt app is running!");})();
```
Then restart your app. So long as your bot user has been added to the conversation, it will respond when you send any message that contains "hello".
This is a basic example, but it gives you a place to start customizing your app based on your own goals. Let's try something a little more interactive by sending a button rather than plain text.
## Sending and responding to actions {#sending-and-responding-to-actions}
To use features like buttons, select menus, datepickers, modals, and shortcuts, you’ll need to enable interactivity.
* Socket Mode
* HTTP
With Socket Mode on, basic interactivity is enabled for us by default, so no further action here is needed.
Similar to events, you'll need to specify a Request URL for Slack to send the action (such as _user clicked a button_).
Head over to **Interactivity & Shortcuts** in app settings.
By default, Bolt uses the same endpoint for interactive components that it uses for events, so use the same request URL as above (in the example, it was `https://example.ngrok.io/slack/events`). Press the **Save Changes** button in the lower right hand corner, and that's it. Your app is set up to handle interactivity!
When interactivity is enabled, interactions with shortcuts, modals, or interactive components (such as buttons, select menus, and datepickers) will be sent to your app as events.
Now, let’s go back to your app’s code and add logic to handle those events:
* First, we'll send a message that contains an interactive component (in this case a button).
* Next, we'll listen for the action of a user clicking the button before responding.
Below, the `app.js` file from the last section is modified to send a message containing a button rather than just a string. Update the highlighted lines as shown:
* Socket Mode
* HTTP
app.js
```
import { App } from "@slack/bolt";// Initializes your app with your Slack app and bot tokenconst app = new App({ token: process.env.SLACK_BOT_TOKEN, socketMode: true, appToken: process.env.SLACK_APP_TOKEN,});// Listens to incoming messages that contain "hello"app.message("hello", async ({ message, say }) => { // say() sends a message to the channel where the event was triggered await say({ blocks: [ { type: "section", text: { type: "mrkdwn", text: `Hey there <@${message.user}>!`, }, accessory: { type: "button", text: { type: "plain_text", text: "Click Me", }, action_id: "button_click", }, }, ], text: `Hey there <@${message.user}>!`, });});(async () => { // Start your app await app.start(); app.logger.info("⚡️ Bolt app is running!");})();
```
app.js
```
import { App } from "@slack/bolt";// Initializes your app with your bot token and signing secretconst app = new App({ token: process.env.SLACK_BOT_TOKEN, signingSecret: process.env.SLACK_SIGNING_SECRET,});// Listens to incoming messages that contain "hello"app.message("hello", async ({ message, say }) => { // say() sends a message to the channel where the event was triggered await say({ blocks: [ { type: "section", text: { type: "mrkdwn", text: `Hey there <@${message.user}>!`, }, accessory: { type: "button", text: { type: "plain_text", text: "Click Me", }, action_id: "button_click", }, }, ], text: `Hey there <@${message.user}>!`, });});(async () => { // Start your app await app.start(process.env.PORT || 3000); app.logger.info("⚡️ Bolt app is running!");})();
```
The value inside of `say()` is now an object that contains an array of `blocks`. [Blocks](/block-kit) are the building components of a Slack message and can range from text to images to datepickers. In this case, your app will respond with a section block that includes a button as an accessory. Since we're using `blocks`, the `text` is a fallback for notifications and accessibility.
You'll notice in the button `accessory` object, there is an `action_id`. This will act as a unique identifier for the button so your app can specify what action it wants to respond to.
Use [Block Kit Builder](https://app.slack.com/block-kit-builder) to prototype your interactive messages.
Block Kit Builder lets you (or anyone on your team) mock up messages and generates the corresponding JSON that you can paste directly in your app.
Now, if you restart your app and say "hello" in a channel your app is in, you'll see a message with a button. But if you click the button, nothing happens (_yet!_).
Let's add a handler to send a follow-up message when someone clicks the button. Add the following highlighted lines to `app.js`:
* Socket Mode
* HTTP
```javascript
import { App } from '@slack/bolt';
/**
* This sample Slack application uses Socket Mode.
* For the companion getting started setup guide, see:
* https://docs.slack.dev/tools/bolt-js/getting-started/
*/
// Initializes your app with your bot token and app token
const app = new App({
token: process.env.SLACK_BOT_TOKEN,
socketMode: true,
appToken: process.env.SLACK_APP_TOKEN
});
// Listens to incoming messages that contain "hello"
app.message('hello', async ({ message, say }) => {
// say() sends a message to the channel where the event was triggered
await say({
blocks: [
{
"type": "section",
"text": {
"type": "mrkdwn",
"text": `Hey there <@${message.user}>!`
},
"accessory": {
"type": "button",
"text": {
"type": "plain_text",
"text": "Click Me"
},
"action_id": "button_click"
}
}
],
text: `Hey there <@${message.user}>!`
});
});
app.action('button_click', async ({ body, ack, say }) => {
// Acknowledge the action
await ack();
await say(`<@${body.user.id}> clicked the button`);
});
(async () => {
// Start your app
await app.start(process.env.PORT || 3000);
app.logger.info('⚡️ Bolt app is running!');
})();
```
app.js
```
import { App } from "@slack/bolt";// Initializes your app with your bot token and signing secretconst app = new App({ token: process.env.SLACK_BOT_TOKEN, signingSecret: process.env.SLACK_SIGNING_SECRET,});// Listens to incoming messages that contain "hello"app.message("hello", async ({ message, say }) => { // say() sends a message to the channel where the event was triggered await say({ blocks: [ { type: "section", text: { type: "mrkdwn", text: `Hey there <@${message.user}>!`, }, accessory: { type: "button", text: { type: "plain_text", text: "Click Me", }, action_id: "button_click", }, }, ], text: `Hey there <@${message.user}>!`, });});app.action("button_click", async ({ body, ack, say }) => { // Acknowledge the action await ack(); await say(`<@${body.user.id}> clicked the button`);});(async () => { // Start your app await app.start(process.env.PORT || 3000); app.logger.info("⚡️ Bolt app is running!");})();
```
We used `app.action()` to listen for the `action_id` that we named `button_click`. Restart your app, and then click the button; you'll see a new message from your app that says you clicked the button.
## Next steps {#next-steps}
You just built a [Bolt for JavaScript app](https://github.com/slack-samples/bolt-js-getting-started-app)! 🎉
Now that you have an app up and running, you can start exploring how to make your Bolt app truly yours. Here are some ideas about what to explore next:
* Read through the various concepts pages to learn about the different methods and features accessible to your Bolt app.
* Explore the different events your bot can listen to with the [`event`](/tools/bolt-js/concepts/event-listening) method. View the full events reference docs [here](/reference/events).
* The Bolt framework allows you to [call Web API methods](/tools/bolt-js/concepts/web-api) with the client attached to your app. View the over 200 methods [here](/reference/methods).
* Check out how to use AI in your app with the [Using AI in apps](/tools/bolt-js/concepts/ai-apps) guide.
---
Source: https://docs.slack.dev/tools/bolt-js/deployments/aws-lambda
# Deploying to AWS Lambda
This guide walks you through preparing and deploying a Slack app using Bolt for JavaScript, the [Serverless Framework](https://serverless.com/), and [AWS Lambda](https://aws.amazon.com/lambda/).
When you’re finished, you’ll have this ⚡️[Deploying to AWS Lambda app](https://github.com/slackapi/bolt-js/tree/main/examples/deploy-aws-lambda) to run, modify, and make your own.
* * *
## Set up AWS Lambda {#set-up-aws-lambda}
[AWS Lambda](https://aws.amazon.com/lambda/) is a serverless, Function-as-a-Service (FaaS) platform that allows you to run code without managing servers. In this section, we'll configure your local machine to access AWS Lambda.
Skip this section if you have already [configured a profile](https://docs.aws.amazon.com/cli/latest/userguide/cli-configure-quickstart.html#cli-configure-quickstart-profiles) on your local machine to access AWS Lambda.
### 1. Sign up for an AWS account {#1-sign-up-for-an-aws-account}
If you don't already have an account, you should [sign up for AWS](https://aws.amazon.com/) and follow the on-screen instructions.
info
You may be asked for payment information during the sign up. Don't worry, this guide only uses the [free tier](https://aws.amazon.com/lambda/pricing/).
### 2. Create an AWS access key {#2-create-an-aws-access-key}
Next, you'll need programmatic access to your AWS account to deploy onto Lambda. In the world of AWS, this requires an **Access Key ID** and **Secret Access Key**.
We recommend watching this short, step-by-step video to 🍿 [create an IAM user and download the access keys](https://www.youtube.com/watch?v=KngM5bfpttA).
Do you already have an IAM user?
Follow the official AWS guide to [create access keys for existing IAM users](https://docs.aws.amazon.com/cli/latest/userguide/cli-configure-quickstart.html#cli-configure-quickstart-creds).
### 3. Install the AWS CLI {#3-install-the-aws-cli}
The AWS tools are available as a Command Line Interface (CLI) and can be [installed on macOS, Windows, or Linux](https://docs.aws.amazon.com/cli/latest/userguide/install-cliv2.html).
On macOS, you can install the AWS CLI by [downloading the latest package installer](https://awscli.amazonaws.com/AWSCLIV2.pkg).
### 4. Configure an AWS profile {#4-configure-an-aws-profile}
You can use the AWS CLI to configure a profile that stores your access key pair on your local machine. This profile is used by the CLI and other tools to access AWS.
The quickest way to [configure your profile](https://docs.aws.amazon.com/cli/latest/userguide/cli-configure-quickstart.html#cli-configure-quickstart-config) is to run this command and follow the prompts:
```
aws configure# AWS Access Key ID [None]: # AWS Secret Access Key [None]: # Default region name [None]: us-east-1# Default output format [None]: json
```
Customize the [region](https://docs.aws.amazon.com/cli/latest/userguide/cli-configure-quickstart.html#cli-configure-quickstart-region) and [output format](https://docs.aws.amazon.com/cli/latest/userguide/cli-configure-quickstart.html#cli-configure-quickstart-format) best for you.
That wraps up configuring your local machine to access AWS. 👏 Next, let's do the same with the Serverless Framework.
* * *
## Set up Serverless Framework {#set-up-serverless-framework}
The [Serverless Framework](https://serverless.com/) includes tools that let you easily configure, debug, and deploy your app to AWS Lambda.
The Serverless tools are available as a Command Line Interface (CLI) and can be installed on macOS, Windows, or Linux. Check out the [Serverless Getting Started documentation](https://www.serverless.com/framework/docs/getting-started/) for instructions on how to install.
Once the installation is complete, test the Serverless CLI by displaying the commands available to you:
```
serverless help
```
You're now set up with the Serverless tools! Let's move on to preparing your Bolt app to run as an AWS Lambda function.
* * *
## Get a Bolt Slack app {#get-a-bolt-slack-app}
If you haven't already built your own Bolt app, you can use our [Quickstart guide](/tools/bolt-js/getting-started) or clone the template app below:
```
git clone https://github.com/slack-samples/bolt-js-getting-started-app.git
```
After you have a Bolt app, navigate to its directory:
```
cd bolt-js-getting-started-app/
```
Now that you have an app, let's prepare it for AWS Lambda and the Serverless Framework.
* * *
## Prepare the app {#prepare-the-app}
### 1. Prepare the app for AWS Lambda {#1-prepare-the-app-for-aws-lambda}
By default, our Bolt Getting Started app sample is configured to use SocketMode. Let's update the setup in `app.js` to have our app listen for HTTP requests instead.
```
// Initializes your app with your bot tokenconst app = new App({ token: process.env.SLACK_BOT_TOKEN, socketMode: true, // delete this line appToken: process.env.SLACK_APP_TOKEN, // delete this line});
```
Next, we'll customize your Bolt app's [`receiver`](/tools/bolt-js/concepts/receiver) to respond to Lambda function events.
Update the [source code that imports your modules](https://github.com/slack-samples/bolt-js-getting-started-app/blob/4c29a21438b40f0cbca71ece0d39b356dfcf88d5/app.js#L1) in `app.js` to require Bolt's AwsLambdaReceiver:
```
const { App, AwsLambdaReceiver } = require('@slack/bolt');
```
warning
If implementing authentication with OAuth, you must use the [`ExpressReceiver`](https://github.com/slackapi/bolt-js/blob/main/src/receivers/ExpressReceiver.ts). Please note that when using `ExpressReceiver`, the `processBeforeResponse: true` property is required during initialization to avoid latency issues.
Then update the [source code that initializes your Bolt app](https://github.com/slack-samples/bolt-js-getting-started-app/blob/4c29a21438b40f0cbca71ece0d39b356dfcf88d5/app.js#L10-L14) to create a custom receiver using AwsLambdaReceiver:
```
// Initialize your custom receiverconst awsLambdaReceiver = new AwsLambdaReceiver({ signingSecret: process.env.SLACK_SIGNING_SECRET,});// Initializes your app with your bot token and the AWS Lambda ready receiverconst app = new App({ token: process.env.SLACK_BOT_TOKEN, receiver: awsLambdaReceiver, // When using the AwsLambdaReceiver, processBeforeResponse can be omitted. // If you use other Receivers, such as ExpressReceiver for OAuth flow support // then processBeforeResponse: true is required. This option will defer sending back // the acknowledgement until after your handler has run to ensure your handler // isn't terminated early by responding to the HTTP request that triggered it. // receiver.processBeforeResponse: true});
```
Finally, at the bottom of your app, update the [source code that starts the HTTP server](https://github.com/slack-samples/bolt-js-getting-started-app/blob/main/app.js#L47-L52) to now respond to an AWS Lambda function event:
```
// Handle the Lambda function eventmodule.exports.handler = async (event, context, callback) => { const handler = await awsLambdaReceiver.start(); return handler(event, context, callback);}
```
When you're done, your app should look similar to the ⚡️[Deploying to AWS Lambda app](https://github.com/slackapi/bolt-js/tree/main/examples/deploy-aws-lambda/app.js).
### 2. Add a serverless.yml {#2-add-a-serverlessyml}
Serverless Framework projects use a `serverless.yml` file to configure and deploy apps.
Create a new file called `serverless.yml` in your app's root directory and paste the following:
```
service: serverless-bolt-jsframeworkVersion: "4"provider: name: aws runtime: nodejs22.x environment: SLACK_SIGNING_SECRET: ${env:SLACK_SIGNING_SECRET} SLACK_BOT_TOKEN: ${env:SLACK_BOT_TOKEN}functions: slack: handler: app.handler events: - http: path: slack/events method: postplugins: - serverless-offline
```
info
`SLACK_SIGNING_SECRET` and `SLACK_BOT_TOKEN` must be environment variables on your local machine.
You can [learn how to export Slack environment variables](/tools/bolt-js/getting-started#creating-a-project) in our Quickstart guide.
### 3. Install Serverless Offline {#3-install-serverless-offline}
To make local development a breeze, we'll use the `serverless-offline` module to emulate a deployed function.
Run the following command to install it as a development dependency:
```
npm install --save-dev serverless-offline
```
Congratulations, you've just prepared your Bolt app for AWS Lambda and Serverless! Now let's run and deploy your app.
* * *
## Run the app locally {#run-the-app-locally}
Now that your app is configured to respond to an AWS Lambda function, we'll set up your environment to run the app locally.
### 1. Start your local servers {#1-start-your-local-servers}
First, use the `serverless offline` command to start your app and listen to AWS Lambda function events:
```
serverless offline --noPrependStageInUrl
```
You can make code changes to your app in one terminal while running the above command in another terminal, and as you save code changes your app will reload automatically.
Next, use ngrok to forward Slack events to your local machine:
```
ngrok http 3000
```
info
[Learn how to use ngrok](/tools/bolt-js/creating-an-app/#preparing-receive-events) to create a public URL and forward requests to your local machine.
### 2. Update your Request URL {#2-update-your-request-url}
Next, visit your [Slack app's settings](https://api.slack.com/apps) to update your **Request URL** to use the ngrok web address.
Your **Request URL** ends with `/slack/events`, such as `https://abc123.ngrok.io/slack/events`.
First, select **Interactivity & Shortcuts** from the side and update the **Request URL**:

Second, select **Event Subscriptions** from the side and update the **Request URL**:

### 3. Test your Slack app {#3-test-your-slack-app}
Now you can test your Slack app by inviting your app to a channel then saying “hello” (lower-case). Just like in the [Quickstart guide](/tools/bolt-js/getting-started#running-the-app), your app should respond back:
```
> 👩💻 hello
```
```
> 🤖 Hey there @Jane!
```
If you don’t receive a response, check your **Request URL** and try again.
How does this work?
The ngrok and Serverless commands are configured on the same port (default: 3000). When a Slack event is sent to your **Request URL**, it's received on your local machine by ngrok. The request is then forwarded to Serverless Offline, which emulates an AWS Lambda function event and triggers your Bolt app's receiver. 🛫🛬 Phew, what a trip!
* * *
## Deploy the app {#deploy-the-app}
In the previous section of this tutorial, you ran your app locally and tested it in a live Slack workspace. Now that you have a working app, let's deploy it!
You can use the Serverless Framework tools to provision, package, and deploy your app onto AWS Lambda. After your app is deployed, you'll need to update your app's request URL to say "hello" to your app. ✨
### 1. Deploy the app to AWS Lambda {#1-deploy-the-app-to-aws-lambda}
Now, deploy your app to AWS Lambda with the following command:
```
serverless deploy# Serverless: Packaging service...# ...# endpoints:# POST - https://atuzelnkvd.execute-api.us-east-1.amazonaws.com/dev/slack/events# ...
```
After your app is deployed, you'll be given an **endpoint** which you'll use as your app's **Request URL**. The **endpoint** should end in `/slack/events`. Go ahead and copy this **endpoint** to use in the next section.
### 2. Update your Slack app's settings {#2-update-your-slack-apps-settings}
Now we need to use your AWS Lambda **endpoint** as your **Request URL**, which is where Slack will send events and actions. With your endpoint copied, navigate to your [Slack app's configuration](https://api.slack.com/apps) to update your app's **Request URLs**.
First, select **Interactivity & Shortcuts** from the side and update the **Request URL**:

Second, select **Event Subscriptions** from the side and update the **Request URL**:

### 3. Test your Slack app {#3-test-your-slack-app-1}
Your app is now deployed and Slack is updated, so let's try it out!
Just like the [running the app locally](#run-the-app-locally) section, open a Slack channel that your app is in and say "hello". You app should once again respond with a greeting:
```
> 👩💻 hello
```
```
> 🤖 Hey there @Jane!
```
### 4. Deploy an update {#4-deploy-an-update}
As you continue to build your Slack app, you'll need to deploy the updates. Let's get a feel for this by updating your app to respond to a "goodbye" message.
Add the following code to `app.js` ([source code on GitHub](https://github.com/slackapi/bolt-js/tree/main/examples/deploy-aws-lambda/app.js)):
```
// Listens to incoming messages that contain "goodbye"app.message('goodbye', async ({ message, say }) => { // say() sends a message to the channel where the event was triggered await say(`See ya later, <@${message.user}> :wave:`);});
```
Deploy the update using the same command as before:
```
serverless deploy
```
When the deploy is complete, you can open a Slack channel that your app has joined and say "goodbye" (lower-case). You should see a friendly farewell from your Slack app.
If you are making small changes to single functions, you can deploy only a single function using `serverless deploy function -f my-function` which is much faster. Run `serverless help deploy function` for more detailed help.
* * *
## Next steps {#next-steps}
You just deployed your first ⚡️[Bolt for JavaScript app to AWS Lambda](https://github.com/slackapi/bolt-js/tree/main/examples/deploy-aws-lambda)! 🚀
Now that you've built and deployed a basic app, here are some ideas you can explore to extend, customize, and monitor it:
* Brush up on [AWS Lambda](https://docs.aws.amazon.com/lambda/latest/dg/welcome.html) and the [Serverless Framework](https://www.serverless.com/framework/docs/providers/aws/guide/intro/).
* Extend your app with other Bolt capabilities and [Serverless plugins](https://www.serverless.com/framework/docs/providers/aws/guide/plugins/).
* Learn about [logging](/tools/bolt-js/concepts/logging) and how to [view log messages with Serverless](https://www.serverless.com/framework/docs/providers/aws/cli-reference/logs/).
* Get ready for primetime with AWS Lambda [testing](https://www.serverless.com/framework/docs/providers/aws/guide/testing/) and [deployment environments](https://www.serverless.com/framework/docs/providers/aws/guide/deploying/).
---
Source: https://docs.slack.dev/tools/bolt-js/deployments/heroku
# Deploying to Heroku
This guide will walk you through preparing and deploying a Slack app using Bolt for JavaScript and the [Heroku platform](https://heroku.com/). Along the way, we’ll download a Bolt Slack app, prepare it for Heroku, and deploy it.
When you’re finished, you’ll have this ⚡️[Deploying to Heroku app](https://github.com/slackapi/bolt-js/tree/main/examples/deploy-heroku) to run, modify, and make your own.
warning
Using Heroku dynos to complete this tutorial counts towards your usage. [Delete your app](https://devcenter.heroku.com/articles/heroku-cli-commands#heroku-apps-destroy) as soon as you are done to control costs.
* * *
## Get a Bolt Slack app {#get-a-bolt-slack-app}
If you haven't already built your own Bolt app, you can use our [Quickstart guide](/tools/bolt-js/getting-started) or clone the template app below:
```
git clone https://github.com/slack-samples/bolt-js-getting-started-app.git
```
After you have a Bolt app, navigate to its directory:
```
cd bolt-js-getting-started-app/
```
Now that you have an app, let's prepare it for Heroku.
* * *
## Prepare the app for Heroku {#prepare-the-app-for-heroku}
Heroku is a flexible platform that requires some configuration to host your app. In this section, we'll update your Bolt app to support Heroku.
### 1. Use a Git repository {#1-use-a-git-repository}
info
Skip this step if you used `git clone` in the previous section because you already have a Git repository.
Before you can deploy your app to Heroku, you'll need a Git repository. If you aren't already using Git, you'll need to [install Git](https://git-scm.com/book/en/v2/Getting-Started-Installing-Git) and [create a Git repository](https://git-scm.com/book/en/v2/Git-Basics-Getting-a-Git-Repository).
### Add a Procfile {#add-a-procfile}
Every Heroku app uses a special file called `Procfile` that tells Heroku how to start your app. The contents of the file will depend on whether or not you are using Socket Mode.
Create a new file called `Procfile` (without any extension) in your app's root directory and paste in one of the following, depending on how you're running your app.
By default, a Bolt Slack app will be started as a web server with a public web address:
```
web: node app.js
```
Apps using Socket Mode are started as workers that do not listen to a port:
```
worker: node app.js
```
Once you've saved the file, let's commit it to your Git repository:
```
git add Procfilegit commit -m "Add Procfile"
```
info
Are you following this guide with an existing Bolt app? If so, please review the guide on [preparing a codebase for Heroku](https://devcenter.heroku.com/articles/preparing-a-codebase-for-heroku-deployment#4-listen-on-the-correct-port) to listen on the correct port.
* * *
## Set up the Heroku tools {#set-up-the-heroku-tools}
Now we can set up the Heroku tools on your local machine. These tools will help you manage, deploy, and debug your app on Heroku's platform.
### 1. Install the Heroku CLI {#1-install-the-heroku-cli}
The Heroku tools are available as a Command Line Interface (CLI). Go ahead and [install the Heroku CLI for macOS, Windows, or Linux](https://devcenter.heroku.com/articles/getting-started-with-nodejs#set-up). On macOS, you can run the command:
```
brew install heroku/brew/heroku
```
Once the install is complete, we can test the Heroku CLI by displaying all of the wonderful commands available to you:
```
heroku help
```
If the `heroku` command is not found, refresh your path by opening a new terminal session/tab.
### 2. Log into the Heroku CLI {#2-log-into-the-heroku-cli}
The Heroku CLI connects your local machine with your Heroku account. [Sign up for a free Heroku account](https://heroku.com) and then log into the Heroku CLI with the following command:
```
heroku login
```
warning
If you're behind a firewall, you may need to [set the proxy environment variables](https://devcenter.heroku.com/articles/using-the-cli#using-an-http-proxy) for the Heroku CLI.
### 3. Confirm you're logged into the Heroku CLI {#3-confirm-youre-logged-into-the-heroku-cli}
Check that you're logged in by displaying the account currently connected to your Heroku CLI:
```
heroku auth:whoami
```
You should now be set up with the Heroku tools! Let's move on to the exciting step of creating an app on Heroku.
* * *
## Create an app on Heroku {#create-an-app-on-heroku}
It’s time to [create a Heroku app](https://devcenter.heroku.com/articles/creating-apps) using the tools that you just installed. When you create an app, you can choose a unique name or have it randomly generated.
Creating new Heroku apps will use your existing Heroku plan subscription. When getting started or deploying many small apps, we recommend starting with [Heroku's low-cost Eco Dyno plan](https://blog.heroku.com/new-low-cost-plans).
Eligible students can apply for platform credits through the [Heroku for GitHub Student program](https://blog.heroku.com/github-student-developer-program).
### 1. Create an app on Heroku {#1-create-an-app-on-heroku}
Create an app on Heroku with a unique name:
```
heroku create my-unique-bolt-app-name
```
or, have some fun with a random name:
```
heroku create# Creating sharp-rain-871... done, stack is heroku-24# https://sharp-rain-871.herokuapp.com/ | https://git.heroku.com/sharp-rain-871.git
```
info
You can [rename a Heroku app](https://devcenter.heroku.com/articles/renaming-apps) at any time, but you may change your Git remote and public web address.
After your app is created, you'll be given some information that we'll use in the upcoming sections. In the example above:
* App name is `sharp-rain-871`
* Web address is `https://sharp-rain-871.herokuapp.com/`
* Empty Git remote is `https://git.heroku.com/sharp-rain-871.git`
### 2. Confirm Heroku Git remote {#2-confirm-heroku-git-remote}
The Heroku CLI automatically adds a Git remote called `heroku` to your local repository. You can list your Git remotes to confirm `heroku` exists:
```
git remote -v# heroku https://git.heroku.com/sharp-rain-871.git (fetch)# heroku https://git.heroku.com/sharp-rain-871.git (push)
```
### 3. Set environment variables on Heroku {#3-set-environment-variables-on-heroku}
Now you'll need to add your Slack app credentials to your Heroku app:
```
heroku config:set SLACK_SIGNING_SECRET=heroku config:set SLACK_BOT_TOKEN=xoxb-
```
info
If you don't know where to find your credentials, please read about [exporting your signing secret and token](/tools/bolt-js/creating-an-app/#preparing-receive-events) in the Building an app guide.
Now that we have prepared your local app and created a Heroku app, the next step is to deploy it!
* * *
## Deploy the app {#deploy-the-app}
To deploy the app, we're going to push your local code to Heroku, update your Slack app's settings, and say "hello" to your Heroku app. ✨
### 1. Deploy the app to Heroku {#1-deploy-the-app-to-heroku}
When deploying an app to Heroku, you'll typically use the `git push` command. This will push your code from your local repository to your `heroku` remote repository.
You can now deploy your app with the command:
```
git push heroku main
```
info
Heroku deploys code that's pushed to the [master or main branches](https://devcenter.heroku.com/articles/git-branches). Pushing to other branches will not trigger a deployment.
Finally, we need to start a web server instance using the Heroku CLI:
```
heroku ps:scale web=1
```
### 2. Update your Slack app's settings {#2-update-your-slack-apps-settings}
Now we need to use your Heroku web address as your **Request URL**, which is where Slack will send events and actions.
Get your Heroku web address with the following command:
```
heroku info# ...# Web URL: https://sharp-rain-871.herokuapp.com/
```
In our example, the web address is `https://sharp-rain-871.herokuapp.com/`.
Head over to the [Slack App page](https://api.slack.com/apps) and select your app name. Next, we'll update your **Request URL** in two locations to be your web address.
Your **Request URL** ends with `/slack/events`, such as `https://sharp-rain-871.herokuapp.com/slack/events`.
First, select **Interactivity & Shortcuts** from the side and update the **Request URL**:

Second, select **Event Subscriptions** from the side and update the **Request URL**:

Heroku Eco Dyno apps sleep when inactive. 💤 If your verification fails, please try it again immediately.
### 3. Test your Slack app {#3-test-your-slack-app}
Your app is now deployed and Slack is updated, so let's try it out!
Open a Slack channel that your app has joined and say "hello" (lower-case). Just like in the [Quickstart guide](/tools/bolt-js/getting-started#running-the-app), your app should respond back. If you don't receive a response, check your **Request URL** and try again.
* * *
## Deploy an update {#deploy-an-update}
As you continue building your Slack app, you'll need to deploy updates. A common flow is to make a change, commit it, and then push it to Heroku.
Let's get a feel for this by updating your app to respond to a "goodbye" message. Add the following code to `app.js` ([source code on GitHub](https://github.com/slackapi/bolt-js/blob/main/examples/deploy-heroku/app.js)):
```
// Listens to incoming messages that contain "goodbye"app.message('goodbye', async ({ message, say }) => { // say() sends a message to the channel where the event was triggered await say(`See ya later, <@${message.user}> :wave:`);});
```
Commit the changes to your local Git repository:
```
git commit -am "Say 'goodbye' to a person"
```
Deploy the update by pushing to your `heroku` remote:
```
git push heroku main
```
When the deploy is complete, you can open a Slack channel that your app has joined and say "goodbye" (lower-case). You should see a friendly farewell from your Slack app.
* * *
## Next steps {#next-steps}
You just deployed your first ⚡️[Bolt for JavaScript app to Heroku](https://github.com/slackapi/bolt-js/tree/main/examples/deploy-heroku)! 🚀
Now that you've deployed a basic app, you can start exploring how to customize and monitor it. Here are some ideas of what to explore next:
* Brush up on [how Heroku works](https://devcenter.heroku.com/articles/how-heroku-works) and understand the [limitations of a Heroku Eco Dyno app](https://devcenter.heroku.com/articles/eco-dyno-hours).
* Extend your app with with other Bolt capabilities and and [Heroku's Add-ons](https://elements.heroku.com/addons).
* Learn about [logging](/tools/bolt-js/concepts/logging) and how to [view log messages in Heroku](https://devcenter.heroku.com/articles/getting-started-with-nodejs#view-logs).
* Get ready for primetime with [how to scale your Heroku app](https://devcenter.heroku.com/articles/getting-started-with-nodejs#scale-the-app).
---
Source: https://docs.slack.dev/tools/bolt-js/deployments/vercel
# Deploying to Vercel
This guide walks you through preparing and deploying a Slack app using Bolt for JavaScript, [Workflow DevKit's](https://useworkflow.dev/) `DurableAgent`, [AI SDK](https://ai-sdk.dev/) tools, the [Nitro](https://nitro.build/) server framework, and [Vercel](https://vercel.com/home).
When you’re finished, you’ll have this ⚡️[Slack agent template](https://github.com/vercel-partner-solutions/slack-agent-template) to run, modify, and make your own.
* * *
## Prerequisites {#prerequisites}
First things first, take a few moments to set up the following:
* Make sure you have a development environment where you have permission to install apps. You can get a free sandbox with the [Slack Developer Program](https://api.slack.com/developer-program).
* Ensure you have an account with a Git provider (GitHub, GitLab, or Bitbucket).
## Create a new Vercel project {#create-a-new-vercel-project}
Create a new Vercel project based on a Bolt for JavaScript template by clicking the button below.
[Deploy with Vercel](https://vercel.com/new/clone?demo-description=This+is+a+Slack+Agent+template+built+with+Bolt+for+JavaScript+%28TypeScript%29+and+the+Nitro+server+framework.&demo-image=%2F%2Fimages.ctfassets.net%2Fe5382hct74si%2FSs9t7RkKlPtProrbDhZFM%2F0d11b9095ecf84c87a68fbdef6f12ad1%2FFrame__1_.png&demo-title=Slack+Agent+Template&demo-url=https%3A%2F%2Fgithub.com%2Fvercel-partner-solutions%2Fslack-agent-template&env=SLACK_SIGNING_SECRET%2CSLACK_BOT_TOKEN&envDescription=These+environment+variables+are+required+to+deploy+your+Slack+app+to+Vercel&envLink=https%3A%2F%2Fapi.slack.com%2Fapps&from=templates&project-name=Slack+Agent+Template&project-names=Comma+separated+list+of+project+names%2Cto+match+the+root-directories&repository-name=slack-agent-template&repository-url=https%3A%2F%2Fgithub.com%2Fvercel-partner-solutions%2Fslack-agent-template&root-directories=List+of+directory+paths+for+the+directories+to+clone+into+projects&skippable-integrations=1&teamSlug=vercel-partner-demo)
You will then be prompted to select a Git provider. Select your preferred provider and log in.
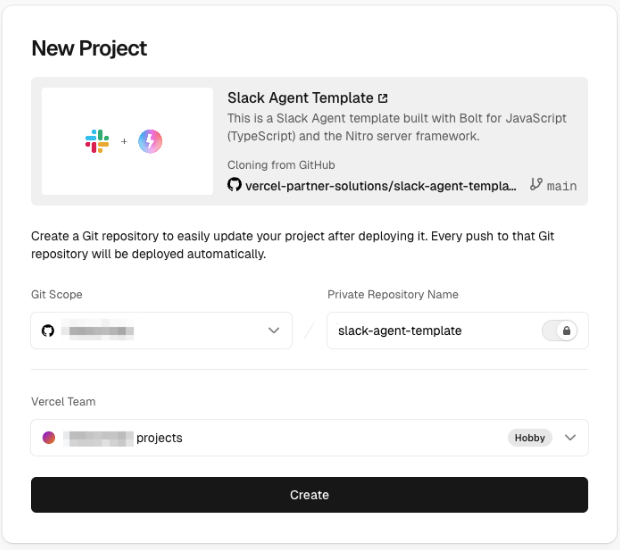
Select your provider as the Git Scope and rename the repo if you'd like. Click **Create**.
Keep this browser tab open; we'll be back to it soon. Next, we'll need to add a couple of variables for our app. To obtain these, direct your attention to the Slack app settings page.
## Create a Slack app {#create-a-slack-app}
Create a new Slack app through [this link](https://api.slack.com/apps?new_app=1), then select **from a manifest**. Next, choose a workspace you have permission to install apps in. Click **Next**, then copy and paste the project manifest code here, replacing the placeholder text in the **JSON** tab.
```json
{
"display_information": {
"name": "Slack Agent",
"background_color": "#000000"
},
"features": {
"app_home": {
"home_tab_enabled": true,
"messages_tab_enabled": true,
"messages_tab_read_only_enabled": false
},
"bot_user": {
"display_name": "Slack Agent",
"always_online": true
},
"shortcuts": [
{
"name": "Run sample shortcut",
"type": "global",
"callback_id": "sample_shortcut_id",
"description": "Runs a sample shortcut"
}
],
"slash_commands": [
{
"command": "/sample-command",
"url": "https://your-app-domain.com/api/slack/events",
"description": "Runs a sample command",
"should_escape": false
}
],
"assistant_view": {
"assistant_description": "Slack agent description"
}
},
"oauth_config": {
"scopes": {
"bot": [
"channels:history",
"channels:read",
"chat:write",
"commands",
"app_mentions:read",
"groups:history",
"im:history",
"mpim:history",
"assistant:write",
"reactions:write",
"channels:join"
]
}
},
"settings": {
"event_subscriptions": {
"request_url": "https://your-app-domain.com/api/slack/events",
"bot_events": [
"app_home_opened",
"app_mention",
"assistant_thread_context_changed",
"assistant_thread_started",
"message.channels",
"message.groups",
"message.im",
"message.mpim"
]
},
"interactivity": {
"is_enabled": true,
"request_url": "https://your-app-domain.com/api/slack/events"
},
"org_deploy_enabled": false,
"socket_mode_enabled": false,
"token_rotation_enabled": false
}
}
```
Click **Next** and then **Create**.
## Install app {#install-app}
Still in the app settings, navigate to the **Install App** section and click the button to install your app to the workspace. After installing the app, a bot token will be available. Copy this token and paste it in the Vercel setup where it says `SLACK_BOT_TOKEN`.
Back in the Slack app settings, navigate to the **Basic Information** section and find the **Signing Secret**. Copy this token and paste it in the Vercel setup where it says `SLACK_SIGNING_SECRET`, then click **Deploy**.
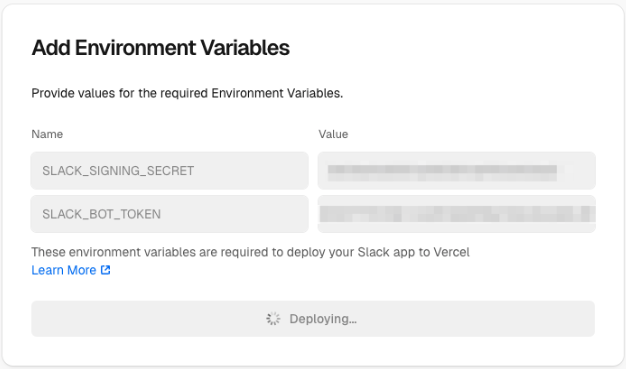
The deployment process will kick off, and you'll receive progress updates. Be patient. Deployment is hard work! Once it's finished, you'll see a confirmation screen with a button to **Continue to Dashboard**. Click that button. Here you can see that your app has been deployed! Use this dashboard to keep tabs on build logs, deployment checks, and more.
## Set AI Gateway token {#set-ai-gateway-token}
Follow these steps to create an AI Gateway API token from the Vercel dashboard.
Token only needed locally
You will only need the AI Gateway token if you are running the app locally. All deployments on Vercel have access to the gateway via OpenID Connect (OIDC).
1. From the Vercel dashboard, click on the **AI Gateway** tab in the top nav bar.
2. On the left sidebar, select **API Keys**.
3. Click **Create Key**, give it a name, and copy the value (it won't be shown again).
Once you have the key, you need to add it to your project so your code can use it. There are two primary ways to do this: through the dashboard and for local development.
Through the dashboard:
1. Go to your project in Vercel.
2. Click the **Settings** tab in the top nav bar.
3. Select **Environment Variables** from the left-hand menu.
4. Select **Add Environment Variable** to add a variable with the `Key` set to `AI_GATEWAY_API_KEY` and the `Value` set to the key value you just copied.
5. Click **Save**. Redeploy your app for these changes to take effect.
For local development, open your terminal and set the environment variable `AI_GATEWAY_API_KEY` to the value of the key you copied.
```
export AI_GATEWAY_API_KEY=
```
## Update URLs {#update-urls}
Once the deployment has completed, navigate back to the Slack [app settings](https://api.slack.com/apps) and open the **App Manifest** from the sidebar.
Update the manifest so that all of the `reference_url` and `url` fields use your domain. Here are some examples:
* **Slash commands URL**: `https://slack-agent-template-example.vercel.app/api/slack/events`
* **Event subscriptions**: `https://slack-agent-template-example.vercel.app/api/slack/events`
* **Interactivity request URL**: `https://slack-agent-template-example.vercel.app/api/slack/events`
Click **Save** and verify the URL.
## Run the app {#run-the-app}
Open your Slack workspace and add your new app to a channel. Your app should respond whenever it is tagged in a message or sent a DM!
Your app is now set up to build and deploy whenever you commit to your repo.
## Next steps {#next-steps}
✨ Explore Vercel documentation [here](https://vercel.com/docs/git).
✨ Learn all about [developing apps with AI features](/ai/developing-agents).
---
Source: https://docs.slack.dev/tools/bolt-js/getting-started
# Quickstart with Bolt for JavaScript
This quickstart guide aims to help you get a Slack app using Bolt for JavaScript up and running as soon as possible!
When complete, you'll have a local environment configured with a customized [app](https://github.com/slack-samples/bolt-js-getting-started-app) running that responds to a simple greeting.
Reference for readers
In search of the complete guide to building an app from scratch? Check out the [building an app](/tools/bolt-js/creating-an-app) guide.
#### Prerequisites {#prerequisites}
A few tools are needed for the following steps. We recommend using the [**Slack CLI**](https://docs.slack.dev/tools/slack-cli/) for the smoothest experience, but other options remain available.
* Slack CLI
* Terminal
Install the latest version of the Slack CLI to get started:
* [Slack CLI for macOS & Linux](/tools/slack-cli/guides/installing-the-slack-cli-for-mac-and-linux)
* [Slack CLI for Windows](/tools/slack-cli/guides/installing-the-slack-cli-for-windows)
Then confirm a successful installation with the following command:
```
$ slack version
```
An authenticated login is also required if this hasn't been done before:
```
$ slack login
```
Tooling for the terminal can also be used to follow along:
* [Git](https://git-scm.com/downloads)
* [Node.js](https://nodejs.org/en/download)
Once installed, make sure recent versions are being used:
```
$ git --version$ node --version
```
A workspace where development can happen is also needed.
We recommend using [developer sandboxes](/tools/developer-sandboxes) to avoid disruptions where real work gets done.
## Creating a project {#creating-a-project}
With the toolchain configured, it's time to set up a new Bolt project. This contains the code that handles logic for your app.
If you don’t already have a project, let’s create a new one!
* Slack CLI
* Terminal
A starter template can be used to start with project scaffolding:
```
$ slack create first-bolt-app --template slack-samples/bolt-js-getting-started-app$ cd first-bolt-app
```
After a project is created you'll have a `package.json` file for app dependencies and a `.slack` directory for Slack CLI configuration.
A few other files exist too, but we'll visit these later.
A starter template can be cloned to start with project scaffolding:
```
$ git clone https://github.com/slack-samples/bolt-js-getting-started-app first-bolt-app$ cd first-bolt-app$ npm install
```
Outlines of a project are taking shape, so we can move on to running the app!
## Running the app {#running-the-app}
Before you can start developing with Bolt, you will want a running Slack app.
* Slack CLI
* Browser
The getting started app template contains a `manifest.json` file with details about an app that we will use to get started. Use the following command and select "Create a new app" to install the app to the team of choice:
```
$ slack run...[INFO] bolt-app ⚡️ Bolt app is running!
```
With the app running, you can test it out with the following steps in Slack:
1. Open a direct message with your app or invite the bot `@first-bolt-app (local)` to a public channel.
2. Send "hello" to the current conversation and wait for a response.
3. Click the attached button labelled "Click Me" to post another reply.
After confirming the app responds, celebrate, then interrupt the process by pressing `CTRL+C` in the terminal to stop your app from running.
Navigate to your list of apps and [create a new Slack app](https://api.slack.com/apps/new) using the "from a manifest" option:
1. Select the workspace to develop your app in.
2. Copy and paste the `manifest.json` file contents to create your app.
3. Confirm the app features and click "Create".
You'll then land on your app's **Basic Information** page, which is an overview of your app and which contains important credentials:

To listen for events happening in Slack (such as a new posted message) without opening a port or exposing an endpoint, we will use [Socket Mode](/tools/bolt-js/concepts/socket-mode). This connection requires a specific app token:
1. On the **Basic Information** page, scroll to the **App-Level Tokens** section and click **Generate Token and Scopes**.
2. Name the token "Development" or something similar and add the `connections:write` scope, then click **Generate**.
3. Save the generated `xapp` token as an environment variable within your project:
```
$ export SLACK_APP_TOKEN=xapp-1-A0123456789-example
```
The above command works on Linux and macOS but [similar commands are available on Windows](https://superuser.com/questions/212150/how-to-set-env-variable-in-windows-cmd-line/212153#212153).
Keep it secret. Keep it safe
Treat your tokens like a password and [keep it safe](/concepts/security). Your app uses these to retrieve and send information to Slack.
A bot token is also needed to interact with the Web API methods as your app's bot user. We can gather this as follows:
1. Navigate to the **OAuth & Permissions** on the left sidebar and install your app to your workspace to generate a token.
2. After authorizing the installation, you'll return to the **OAuth & Permissions** page and find a **Bot User OAuth Token**:

3. Copy the bot token beginning with `xoxb` from the **OAuth & Permissions page** and then store it in a new environment variable:
```
$ export SLACK_BOT_TOKEN=xoxb-example
```
After saving tokens for the app you created, it is time to run it:
```
$ npm run start...[INFO] bolt-app ⚡️ Bolt app is running!
```
With the app running, you can test it out with the following steps in Slack:
1. Open a direct message with your app or invite the bot `@BoltApp` to a public channel.
2. Send "hello" to the current conversation and wait for a response.
3. Click the attached button labelled "Click Me" to post another reply.
After confirming the app responds, celebrate, then interrupt the process by pressing `CTRL+C` in the terminal to stop your app from running.
## Updating the app {#updating-the-app}
At this point, you've successfully run the getting started Bolt for JavaScript [app](https://github.com/slack-samples/bolt-js-getting-started-app)!
The defaults included leave opportunities abound, so to personalize this app let's now edit the code to respond with a kind farewell.
#### Responding to a farewell {#responding-to-a-farewell}
Chat is a common thing apps do and responding to various types of messages can make conversations more interesting.
Using an editor of choice, open the `app.js` file and add the following message listener after the "hello" handler:
```
app.message('goodbye', async ({ say }) => { const responses = ['Adios', 'Au revoir', 'Farewell']; const parting = responses[Math.floor(Math.random() * responses.length)]; await say(`${parting}!`);});
```
Once the file is updated, save the changes and then we'll make sure those changes are being used.
* Slack CLI
* Terminal
Run the following command and select the app created earlier to start, or restart, your app with the latest changes:
```
$ slack run...[INFO] bolt-app ⚡️ Bolt app is running!
```
After finding the above output appears, open Slack to perform these steps:
1. Return to the direct message or public channel with your bot.
2. Send "goodbye" to the conversation.
3. Receive a parting response from before and repeat "goodbye" to find another one.
Your app can be stopped again by pressing `CTRL+C` in the terminal to end these chats.
Run the following command to start, or restart, your app with the latest changes:
```
$ npm run start...[INFO] bolt-app ⚡️ Bolt app is running!
```
After finding the above output appears, open Slack to perform these steps:
1. Return to the direct message or public channel with your bot.
2. Send "goodbye" to the conversation.
3. Receive a parting response from before and repeat "goodbye" to find another one.
Your app can be stopped again by pressing `CTRL+C` in the terminal to end these chats.
#### Customizing app settings {#customizing-app-settings}
The created app will have some placeholder values and a small set of [scopes](/reference/scopes) to start, but we recommend exploring the customizations possible on app settings.
* Slack CLI
* Browser
Open app settings for your app with the following command:
```
$ slack app settings
```
This will open the following page in a web browser:

Browse to [https://api.slack.com/apps](https://api.slack.com/apps) and select your app "Getting Started Bolt App" from the list.
This will open the following page:

On these pages you're free to make changes such as updating your app icon, configuring app features, and perhaps even distributing your app!
## Next steps {#next-steps}
You can now continue customizing your app with various features to make it right for whatever job's at hand. Here are some ideas about what to explore next:
* Follow along with the steps that went into making this app on the [creating an app](/tools/bolt-js/creating-an-app) guide for an educational overview.
* Check out the [Agent quickstart](/ai/agent-quickstart) to get up and running with an agent.
* Browse our [curated catalog of samples](/samples) for more apps to use as a starting point for development.
---
Source: https://docs.slack.dev/tools/bolt-js/legacy/conversation-store
# Conversation stores
Bolt for JavaScript includes support for a store, which sets and retrieves state related to a conversation.
Conversation stores have two methods:
* `set()` modifies conversation state. `set()` requires a `conversationId` of type string, `value` of any type, and an optional `expiresAt` of type number. `set()` returns a `Promise`.
* `get()` fetches conversation state from the store. `get()` requires a `conversationId` of type string and returns a Promise with the conversation’s state.
`conversationContext()` is a built-in [global middleware](/tools/bolt-js/concepts/global-middleware) that allows conversations to be updated by other middleware. When receiving an event, middleware functions can use `context.updateConversation()` to set state and `context.conversation` to retrieve it.
The built-in conversation store simply stores conversation state in memory. While this is sufficient for some situations, if there is more than one instance of your app running, the state will not be shared among the processes so you’ll want to implement a conversation store that fetches conversation state from a database.
```
const app = new App({ token, signingSecret, // It's more likely that you'd create a class for a convo store convoStore: new simpleConvoStore()});// A simple implementation of a conversation store with a Firebase-like databaseclass simpleConvoStore { set(conversationId, value, expiresAt) { // Returns a Promise return db().ref('conversations/' + conversationId).set({ value, expiresAt }); } get(conversationId) { // Returns a Promise return new Promise((resolve, reject) => { db().ref('conversations/' + conversationId).once('value').then((result) => { if (result !== undefined) { if (result.expiresAt !== undefined && Date.now() > result.expiresAt) { db().ref('conversations/' + conversationId).delete(); reject(new Error('Conversation expired')); } resolve(result.value) } else { // Conversation not found reject(new Error('Conversation not found')); } }); }); }}
```
---
Source: https://docs.slack.dev/tools/bolt-js/legacy/hubot-migration
# Migrating apps from Hubot to Bolt for JavaScript
Bolt was created to reduce the time and complexity it takes to build Slack apps. It provides Slack developers a single interface to build using modern features and best practices. This guide is meant to step you through the process of migrating your app from using [Hubot](https://hubot.github.com/docs/) to Bolt for JavaScript.
If you already have an [app with a bot user](/legacy/legacy-bot-users) or if you’re looking for code samples that translate Hubot code to Bolt for JavaScript code, you may find it valuable to start by reading through the [example script in the Bolt for JavaScript repository](https://github.com/slackapi/bolt-js/blob/%40slack/bolt%403.0.0/examples/hubot-example/script.js).
* * *
## Setting the stage {#setting-the-stage}
When translating a Hubot app to Bolt for JavaScript, it’s good to know how each are working behind the scenes. Slack’s Hubot adapter is built to interface with the [RTM API](/legacy/legacy-rtm-api), which uses a WebSocket-based connection that sends a stream of workspace events to your Hubot app. The RTM API is not recommended for most use cases since it doesn’t include support for newer platform features and it can become very resource-intensive, particularly if the app is installed on multiple or large Slack teams.
The default Bolt for JavaScript receiver is built to support the [Events API](/apis/events-api/), which uses HTTP-based event subscriptions to send JSON payloads to your Bolt app. The Events API includes newer events that aren’t on RTM and is more granular and scalable. It’s recommended for most use cases, though one reason your app may be stuck using the RTM API could be that the server you’re hosting your app from has a firewall that only allows outgoing requests and not incoming ones.
There are a few other differences you may want to consider before creating a Bolt for JavaScript app:
* The minimum version of Node for Bolt for JavaScript is `v10.0.0`. If the server you’re hosting your app from cannot support `v10`, it’s not possible to migrate your app to Bolt for JavaScript at the moment.
* Bolt for JavaScript doesn’t have support for external scripts. If your Hubot app uses external scripts that are necessary to your app’s functionality or deployment, you probably want to stay with Hubot for now. If you aren’t sure whether your app has any external scripts, you can check the `external-scripts.json` file. As we continue to invest in Bolt for JavaScript, we are thinking about the future and how to make development and deployment of Slack apps easier. If there’s a valuable external script that your app uses, we’d love to hear what it is [in the dedicated GitHub issue](https://github.com/slackapi/bolt-js/issues/119).
* Hubot apps are written in Coffeescript, which transpiles into JavaScript. We decided to write Bolt in Typescript to give access to rich type information. Bolt apps can be developed using Typescript or JavaScript. The [example script](https://github.com/slackapi/bolt-js/blob/%40slack/bolt%403.0.0/examples/hubot-example/script.js) shows you how your Coffeescript may translate to JavaScript. If your app is more than a few simple scripts, it may be worth looking into projects like [Decaffeinate](https://github.com/decaffeinate/decaffeinate) to convert your CoffeeScript to JavaScript.
## Configuring your bot {#configuring-your-bot}
If you have access to an existing Slack app with a bot user, you can [jump ahead to the next section](#configure-what-your-bot-will-hear). If you aren’t sure, go to your [app settings page](https://api.slack.com/apps) and check whether your Hubot app is there. If it is, you can use the credentials from that app ([go ahead and skip to the next section](#configure-what-your-bot-will-hear)). Otherwise, we’ll walk you through creating a Slack app.
### Create a Slack app {#create-a-slack-app}
The first thing you’ll want to do is [create a Slack app](https://api.slack.com/apps/new).
We recommend using a workspace where you won’t disrupt real work getting done — you can create a new one for free.
After you fill out your app’s name and pick a workspace to install it to, hit the `Create App` button and you’ll land on your app’s **Basic Information** page.
This page contains an overview of your app in addition to important credentials you’ll need later, like the `Signing Secret` under the **App Credentials** header.
Look around, add an app icon and description, and then let’s start configuring your app 🔩
### Add a bot user {#add-a-bot-user}
On Slack, Hubot apps employ bot users which are designed to interact with users in conversation.
To add a bot user to your new app, click **Bot Users** on the left sidebar and then **Add A Bot User**. Give it a display name and username, then click **Add Bot User**. There’s more information about what the different fields are [on our API site](/legacy/legacy-bot-users#creating).
## Configure what your bot will hear {#configure-what-your-bot-will-hear}
The [Events API](/legacy/legacy-bot-users#handling-events) is a bot's equivalent of eyes and ears. It gives a bot a way to react to posted messages, changes to channels, and other activities that happen in Slack.
info
Before you configure your bot’s events, you’ll need a public URL. If you’ve never created a Bolt for JavaScript app or never used the Events API, it’d be helpful to go through [setting up your local Bolt project](/tools/bolt-js/creating-an-app) and [setting up events](/tools/bolt-js/creating-an-app/#preparing-receive-events) in the Getting Started guide.
### Listening for messages {#listening-for-messages}
All Hubot apps can listen to messages by default, so we need to configure your bot user to do the same.
After walking through [setting up events](/tools/bolt-js/creating-an-app/#preparing-receive-events), your Request URL should be verified. Scroll down to **Subscribe to Bot Events**. There are four events related to messages: `message.channels` (listens for messages in public channels), `message.groups` (listens for messages in private channels), `message.im` (listens for messages in the App Home/DM space), and `message.mpim` (listens for messages in multi-person DMs).
If you only want your bot to listen to messages in channels, you can listen to `message.channels` and `message.groups`. Or if you want your bot to listen to messages from everywhere it is, choose all four message events.
After you’ve added the kinds of message events you want your bot to listen to, click **Save Changes**.
### Listening for other events {#listening-for-other-events}
Your Hubot app may have responded to other events depending on what functionality you used. Look through your script and identify any places where your script uses `react`, `respond`, or `presenceChange`:
* If your app uses `respond`, subscribe to the `app_mention` event. This listens for any time your bot user is mentioned.
* If your app uses `react`, subscribe to the `reaction_added` event. This listens for any time a reaction is added to a message in channels your bot user is in.
* If your app uses `presenceChange`, there is no corresponding event. If this event is important to your bot’s functionality, you may have to continue using Hubot or modify the app’s logic.
info
An added benefit to Bolt is you can listen to any [Events API event](/reference/events). So after you’re done migrating, you can listen to more events like [when a user joins the workspace](/reference/events/team_join) or [when a user opens a DM with your app](/reference/events/app_home_opened).
After you added events that correspond to your app’s functionality, click **Save Changes**.
## Changes to script interfaces {#changes-to-script-interfaces}
Bolt’s interface was designed to conform to the Slack API language as much as possible, while Hubot was designed with more generalized language to abstract multiple services. While the interfaces are similar, converting a Hubot script to a Bolt for JavaScript one still requires some code changes.
Bolt for JavaScript doesn’t use `res` or expose the raw request from Slack. Instead, you can use the payload body from `payload`, or common functionality like sending a message using `say()`.
info
To make it easier, we’ve created a sample script on GitHub that [showcases Hubot’s core functionality using equivalent functionality written with Bolt for JavaScript](https://github.com/slackapi/bolt-js/blob/%40slack/bolt%403.0.0/examples/hubot-example/script.js).
### Listening to patterns using message() {#listening-to-patterns-using-message}
Hubot scripts use `hear()` listen to messages with a matching pattern. Bolt for JavaScript instead uses `message()` and accepts a `string` or `RegExp` for the pattern.
👨💻👩💻 Anywhere where you use `hear()` in your code, change it to use `message()`
[Read more about listening to messages](/tools/bolt-js/concepts/message-listening).
### Responding with a message using say() and respond() {#responding-with-a-message-using-say-and-respond}
Hubot scripts use `send()` to send a message to the same conversation and `reply()` to send a message to the same conversation with an @-mention to the user that sent the original message.
Bolt for JavaScript uses `await say()` in place of `send()`, or `await respond()` to use the `response_url` to send a reply. To add an @-mention to the beginning of your reply, you can use the user ID found in the `context` object. For example, for a message event you could use `await say('<@${message.user}> Hello :wave:')`
The arguments for Hubot’s `send()` and Bolt for JavaScript's `say()` are mostly the same, although `say()` allows you to send messages with [interactive components like buttons, select menus, and datepickers](/messaging/creating-interactive-messages).
👨💻👩💻 Anywhere where you use `send()` in your code, change it to use `await say()`
[Read more about responding to messages](/tools/bolt-js/concepts/message-sending).
### respond and react {#respond-and-react}
In the previous section, you should have subscribed your app to the `app_mention` event if your Hubot script uses `respond()`, and `reaction_added` if you uses `react()`.
Bolt for JavaScript uses a method called `event()` that allows you to listen to any [Events API event](/reference/events). To change your code, you’ll just change any `respond()` to `app.event(‘app_mention’)` and any `react()` to `app.event(‘reaction_added’)`. This is detailed more [in the example script](https://github.com/slackapi/bolt-js/blob/%40slack/bolt%403.0.0/examples/hubot-example/script.js).
👨💻👩💻 Anywhere where you use `respond()` in your code, change it to use `app.event(‘app_mention’)`. Anywhere you use `react`, change it to `app.event(‘reaction_added’)`.
[Read more about listening to events](/tools/bolt-js/concepts/event-listening).
## Using Web API methods with Bolt for JavaScript {#using-web-api-methods-with-bolt-for-javascript}
In Hubot, you needed to import the `WebClient` package from `@slack/client`. Bolt for JavaScript imports a `WebClient` instance for you by default, and exposes it as the `client` argument available on all listeners.
To use the built-in `WebClient`, you’ll need to pass the token used to instantiate your app or the token associated with the team your request is coming from. This is found on the `context` object passed in to your listener functions. For example, to add a reaction to a message, you’d use:
```
app.message('react', async ({ message, context, client, logger }) => { try { const result = await client.reactions.add({ token: context.botToken, name: 'star', channel: message.channel, timestamp: message.ts, }); } catch (error) { logger.error(error); }});
```
👨💻👩💻 Change your Web API calls to use one the `client` argument.
[Read more about using the Web API with Bolt](/tools/bolt-js/concepts/web-api).
## Using middleware with Bolt for JavaScript {#using-middleware-with-bolt-for-javascript}
Hubot has three kinds of middleware: receive (runs before any listeners are called), listener (runs for every matching listener), and response (runs for every response sent).
Bolt for JavaScript only has two kinds of middleware — global and listener:
* Global middleware runs before any listener middleware is called. It’s attached to the Bolt for JavaScript app itself. [Read more about Bolt for JavaScript's global middleware](/tools/bolt-js/concepts/global-middleware).
* Listener middleware only runs for listener functions it’s attached to. [Read more about Bolt for JavaScript's listener middleware](/tools/bolt-js/concepts/listener-middleware).
In Bolt for JavaScript, both kinds of middleware must call `await next()` to pass control of execution from one middleware to the next. If your middleware encounters an error during execution, you can `throw` it and the error will be bubbled up through the previously-executed middleware chain.
To migrate your existing middleware functions, it’s evident that Hubot’s receive middleware aligns with the use case for global middleware in Bolt for JavaScript. And Hubot and Bolt’s listener middleware are nearly the same. To migrate Hubot’s response middleware, wrap Bolt for JavaScript's `say()` or `respond()` in your own function, and then call it.
If your middleware needs to perform post-processing of an event, you can call `await next()` and any code after will be processed after the downstream middleware has been called.
## Migrating the brain to the conversation store {#migrating-the-brain-to-the-conversation-store}
Hubot has an in-memory store called the brain. This enables a Hubot script to `get` and `set` basic pieces of data. Bolt for JavaScript uses a conversation store, which is a global middleware with a `get()`/`set()` interface.
The default, built-in conversation store uses an in-memory store similar to Hubot, with the ability to set an expiration time in milliseconds. There are two ways to get and set conversation state:
* Call `app.convoStore.get()` with a conversation ID to retrieve the state of a conversation, and call `app.convoStore.set()` with a conversation ID, conversation state (key-value pair), and an optional `expiresAt` time in milliseconds.
* In listener middleware, call `context.updateConversation()` with the updated conversation state, or use `context.conversation` to access the current state of the conversation.
If there is more than one instance of your app running, the built-in conversation store will not be shared among the processes so you’ll want to implement a conversation store that fetches conversation state from a database.
[Read more about conversation stores](/tools/bolt-js/legacy/conversation-store).
## Next steps {#next-steps}
If you’ve made it this far, it means you’ve likely converted your Hubot app into a Bolt for JavaScript app! ✨⚡
Now that you have your flashy new Bolt for JavaScript app, you can explore how to power it up:
* Consider adding interactivity [like buttons and select menus](/messaging/creating-interactive-messages). These weren’t supported by Hubot and will allow your app to include contextual actions when sending messages to Slack.
* Read the rest of the documentation to explore what else is possible with Bolt for JavaScript.
* Check out our [sample app](https://glitch.com/~slack-bolt) that shows you how to use events and interactive components.
And if you have difficulties while developing, reach out to our developer support team to at [developers@slack.com](mailto:developers@slack.com), and if you run into a problem with the framework [open an issue on GitHub](https://github.com/slackapi/bolt-js/issues/new).
---
Source: https://docs.slack.dev/tools/bolt-js/legacy/steps-from-apps
# Steps from Apps
danger
Steps from Apps is a deprecated feature.
Steps from Apps are different than, and not interchangeable with, Slack automation workflows. We encourage those who are currently publishing steps from apps to consider the new [Slack automation features](/workflows/), such as [custom steps for Bolt](/workflows/workflow-steps).
Please [read the Slack API changelog entry](/changelog/2023-08-workflow-steps-from-apps-step-back) for more information.
Steps from apps allow your app to create and process steps that users can add using [Workflow Builder](/workflows/workflow-builder).
A step from app is made up of three distinct user events:
* Adding or editing the step in a Workflow
* Saving or updating the step's configuration
* The end user's execution of the step
All three events must be handled for a step from app to function.
* * *
## Creating steps from apps {#creating-steps-from-apps}
To create a step from app, Bolt provides the `WorkflowStep` class.
When instantiating a new `WorkflowStep`, pass in the step's `callback_id` and a configuration object.
The configuration object contains three properties: `edit`, `save`, and `execute`. Each of these properties must be a single callback or an array of callbacks. All callbacks have access to a `step` object that contains information about the step from app event.
After instantiating a `WorkflowStep`, you can pass it into `app.step()`. Behind the scenes, your app will listen and respond to the step’s events using the callbacks provided in the configuration object.
```
const { App, WorkflowStep } = require('@slack/bolt');// Initiate the Bolt app as you normally wouldconst app = new App({ signingSecret: process.env.SLACK_SIGNING_SECRET, token: process.env.SLACK_BOT_TOKEN,});// Create a new WorkflowStep instanceconst ws = new WorkflowStep('add_task', { edit: async ({ ack, step, configure }) => {}, save: async ({ ack, step, update }) => {}, execute: async ({ step, complete, fail }) => {},});app.step(ws);
```
## Adding or editing steps from apps {#adding-or-editing-steps-from-apps}
When a builder adds (or later edits) your step in their workflow, your app will receive a `workflow_step_edit` event. The `edit` callback in your `WorkflowStep` configuration will be run when this event is received.
Whether a builder is adding or editing a step, you need to send them a step from app configuration modal. This modal is where step-specific settings are chosen, and it has more restrictions than typical modals—most notably, it cannot include `title`, `submit`, or `close` properties. By default, the configuration modal's `callback_id` will be the same as the step from app.
Within the `edit` callback, the `configure()` utility can be used to easily open your step's configuration modal by passing in an object with your view's `blocks`. To disable saving the configuration before certain conditions are met, pass in `submit_disabled` with a value of `true`.
```
const ws = new WorkflowStep('add_task', { edit: async ({ ack, step, configure }) => { await ack(); const blocks = [ { type: 'input', block_id: 'task_name_input', element: { type: 'plain_text_input', action_id: 'name', placeholder: { type: 'plain_text', text: 'Add a task name', }, }, label: { type: 'plain_text', text: 'Task name', }, }, { type: 'input', block_id: 'task_description_input', element: { type: 'plain_text_input', action_id: 'description', placeholder: { type: 'plain_text', text: 'Add a task description', }, }, label: { type: 'plain_text', text: 'Task description', }, }, ]; await configure({ blocks }); }, save: async ({ ack, step, update }) => {}, execute: async ({ step, complete, fail }) => {},});
```
## Saving step configurations {#saving-step-configurations}
After the configuration modal is opened, your app will listen for the `view_submission` event. The `save` callback in your `WorkflowStep` configuration will be run when this event is received.
Within the `save` callback, the `update()` method can be used to save the builder's step configuration by passing in the following arguments:
* `inputs` is an object representing the data your app expects to receive from the user upon step from app execution.
* `outputs` is an array of objects containing data that your app will provide upon the step's completion. Outputs can then be used in subsequent steps of the workflow.
* `step_name` overrides the default Step name
* `step_image_url` overrides the default Step image
```
const ws = new WorkflowStep('add_task', { edit: async ({ ack, step, configure }) => {}, save: async ({ ack, step, view, update }) => { await ack(); const { values } = view.state; const taskName = values.task_name_input.name; const taskDescription = values.task_description_input.description; const inputs = { taskName: { value: taskName.value }, taskDescription: { value: taskDescription.value } }; const outputs = [ { type: 'text', name: 'taskName', label: 'Task name', }, { type: 'text', name: 'taskDescription', label: 'Task description', } ]; await update({ inputs, outputs }); }, execute: async ({ step, complete, fail }) => {},});
```
## Executing steps from apps {#executing-steps-from-apps}
When your step from app is executed by an end user, your app will receive a `workflow_step_execute` event. The `execute` callback in your `WorkflowStep` configuration will be run when this event is received.
Using the `inputs` from the `save` callback, this is where you can make third-party API calls, save information to a database, update the user's Home tab, or decide the outputs that will be available to subsequent steps by mapping values to the `outputs` object.
Within the `execute` callback, your app must either call `complete()` to indicate that the step's execution was successful, or `fail()` to indicate that the step's execution failed.
```
const ws = new WorkflowStep('add_task', { edit: async ({ ack, step, configure }) => {}, save: async ({ ack, step, update }) => {}, execute: async ({ step, complete, fail }) => { const { inputs } = step; const outputs = { taskName: inputs.taskName.value, taskDescription: inputs.taskDescription.value, }; // signal back to Slack that everything was successful await complete({ outputs }); // NOTE: If you run your app with processBeforeResponse: true option, // `await complete()` is not recommended because of the slow response of the API endpoint // which could result in not responding to the Slack Events API within the required 3 seconds // instead, use: // complete({ outputs }).then(() => { console.log('step from app execution complete registered'); }); // let Slack know if something went wrong // await fail({ error: { message: "Just testing step failure!" } }); // NOTE: If you run your app with processBeforeResponse: true, use this instead: // fail({ error: { message: "Just testing step failure!" } }).then(() => { console.log('step from app execution failure registered'); }); },});
```
---
Source: https://docs.slack.dev/tools/bolt-js/migration/migration-v2
# Migrating to V2
End of life for `@slack/bolt@1.x` was **April 30th, 2021**. Development has been fully stopped for `@slack/bolt@1.x` and all remaining open issues and pull requests have been closed.
This guide will walk you through the process of updating your app from using `@slack/bolt@1.x` to `@slack/bolt@2.x`. There are a few changes you'll need to make but for most apps, these changes can be applied in 5 - 15 minutes.
That being said, End of life for `@slack/bolt@2.x` was **May 31st, 2021**. After following this guide, you'll then want to follow the guide for [Migrating to V3](/tools/bolt-js/migration/migration-v3).
* * *
## Upgrading your listeners to async {#upgrading-your-listeners-to-async}
Listeners in your app should updated to `async` functions and `say()`, `respond()`, and `ack()` should be prefaced with `await`.
Before:
```
app.action('some-action-id', ({action, ack, say}) => { ack(); say('hello world');})
```
After:
```
app.action('some-action-id', async ({action, ack, say}) => { await ack(); await say('hello world');})
```
## Error handling {#error-handling}
The recent changes in Bolt for JavaScript V2 have improved our ability to catch errors and filter them to the global error handler. It is still recommended to manage errors in the listeners themselves instead of letting them propagate to the global handler when possible.
#### Handling errors in listeners with try/catch {#handling-errors-in-listeners-with-trycatch}
```
app.action('some-action-id', async ({action, ack, say, logger}) => { try { await ack(); await say('hello world'); } catch (error) { logger.error(error); // handle error }})
```
### Handling errors with the global error handler {#handling-errors-with-the-global-error-handler}
```
app.error(async (error) => { // Check the details of the error to handle cases where you should retry sending a message or stop the app console.error(error);});
```
Other error related changes include:
* When your listener doesn’t call `ack` within the 3 second time limit, we log the failure instead of throwing an error.
* If multiple errors occur when processing multiple listeners for a single event, Bolt for JavaScript will return a wrapper error with a `code` property of `ErrorCode.MultipleListenerError` and an `originals` property that contains an array of the individual errors.
## Message shortcuts {#message-shortcuts}
[Message shortcuts](/interactivity/implementing-shortcuts) (previously referred to as message actions) now use the `shortcut()` method instead of the `action()` method.
Before:
```
app.action({ callback_id: 'message-action-callback' }, ({action, ack, context}) => { ack(); // Do stuff})
```
After:
```
app.shortcut('message-action-callback', async ({shortcut, ack, context}) => { await ack(); // Do stuff})
```
## Upgrading middleware {#upgrading-middleware}
If you wrote a custom middleware, adjust your function to `async` and update `next()` to `await next()`. If your middleware does some post processing, instead of passing a function to `next()`, you can now run it after `await next()`.
Before:
```
function noBotMessages({ message, next }) { function doAfter() { // Post processing goes here }if (!message.subtype || message.subtype !== 'bot_message') { next(doAfter); }}
```
After:
```
async function noBotMessages({ message, next }) { if (!message.subtype || message.subtype !== 'bot_message') { await next(); // Post processing goes here }}
```
## Minimum TypeScript version {#minimum-typescript-version}
`@slack/bolt@2.x` requires a minimum TypeScript version of 3.7.
---
Source: https://docs.slack.dev/tools/bolt-js/migration/migration-v3
# Migrating to V3
End of life for `@slack/bolt@2.x` was **May 31st, 2021**. Development has been fully stopped for `@slack/bolt@2.x` and all remaining open issues and pull requests have been closed.
This guide will walk you through the process of updating your app from using `@slack/bolt@2.x` to `@slack/bolt@3.x`. There are a few changes you'll need to make but for most apps, these changes can be applied in 5 - 15 minutes.
* * *
## Org wide app installation changes to Installation Store & orgAuthorize {#org-wide-app-installation-changes-to-installationstore--orgauthorize}
In [Bolt for JavaScript 2.5.0](https://github.com/slackapi/bolt-js/releases/tag/%40slack%2Fbolt%402.5.0), we introduced support for [org wide app installations](/enterprise/). To add support to your applications, two new methods were introduced to the Installation Store used during OAuth, `fetchOrgInstallation` & `storeOrgInstallation`. With `@slack/bolt@3.x`, we have dropped support for these two new methods for a simpler interface and to be better aligned with Bolt for Python and Bolt for Java. See the code samples below for the recommended changes to migrate.
Before:
```
installationStore: { storeInstallation: async (installation) => { // change the line below so it saves to your database return await database.set(installation.team.id, installation); }, fetchInstallation: async (installQuery) => { // change the line below so it fetches from your database return await database.get(installQuery.teamId); }, storeOrgInstallation: async (installation) => { // include this method if you want your app to support org wide installations // change the line below so it saves to your database return await database.set(installation.enterprise.id, installation); }, fetchOrgInstallation: async (installQuery) => { // include this method if you want your app to support org wide installations // change the line below so it fetches from your database return await database.get(installQuery.enterpriseId); }, },
```
After:
```
installationStore: { storeInstallation: async (installation) => { if (installation.isEnterpriseInstall && installation.enterprise !== undefined) { // support for org wide app installation return await database.set(installation.enterprise.id, installation); } if (installation.team !== undefined) { // single team app installation return await database.set(installation.team.id, installation); } throw new Error('Failed saving installation data to installationStore'); }, fetchInstallation: async (installQuery) => { // replace database.get so it fetches from your database if (installQuery.isEnterpriseInstall && installQuery.enterpriseId !== undefined) { // org wide app installation lookup return await database.get(installQuery.enterpriseId); } if (installQuery.teamId !== undefined) { // single team app installation lookup return await database.get(installQuery.teamId); } throw new Error('Failed fetching installation'); }, },
```
Along with this change, we have also dropped support for `orgAuthorize`, and instead recommend developers to use `authorize` for both the single workspace installs and org wide app installs (if you are not using the built-in OAuth or providing a token when initializing App). See the code sample below for migration steps:
Before:
```
const app = new App({ authorize: authorizeFn, orgAuthorize: orgAuthorizeFn, signingSecret: process.env.SLACK_SIGNING_SECRET });const authorizeFn = async ({ teamId, enterpriseId}) => { // Use teamId to fetch installation details from database}const orgAuthorizeFn = async ({ teamId, enterpriseId }) => { // Use enterpriseId to fetch installation details from database}
```
After:
```
const app = new App({ authorize: authorizeFn, signingSecret: process.env.SLACK_SIGNING_SECRET });const authorizeFn = async ({ teamId, enterpriseId, isEnterpriseInstall}) => { // if isEnterpriseInstall is true, use enterpriseId to fetch installation details from database // else, use teamId to fetch installation details from database}
```
## HTTP Receiver as default {#http-receiver-as-default}
In `@slack/bolt@3.x`, we have introduced a new default [`HTTPReceiver`](https://github.com/slackapi/bolt-js/issues/670) which replaces the previous default `ExpressReceiver`. This will allow Bolt for JavaScript apps to easily work with other popular web frameworks (Hapi.js, Koa, etc). `ExpressReceiver` is still being shipped with Bolt for JavaScript and `HTTPReceiver` will not provide all the same functionality. One use case that isn't supported by `HTTPReceiver` is creating custom routes (ex: create a route to do a health check). For these use cases, we recommend continuing to use `ExpressReceiver` by importing the class, and creating your own instance of it, and passing this instance into the constructor of `App`. See [our documentation on adding custom http routes](/tools/bolt-js/concepts/custom-routes) for an example.
## Minimum Node version {#minimum-node-version}
`@slack/bolt@3.x` requires a minimum Node version of `12.13.0` and minimum npm version of `6.12.0` .
## Minimum TypeScript version {#minimum-typescript-version}
`@slack/bolt@3.x` requires a minimum TypeScript version of `4.1`.
---
Source: https://docs.slack.dev/tools/bolt-js/migration/migration-v4
# Migrating to V4
This guide will walk you through the process of updating your app from using `@slack/bolt@3.x` to `@slack/bolt@4.x`. There may be a few changes you'll need to make depending on which features you use, but for most apps, these changes can be applied in a few minutes. Some apps may need no changes at all.
* * *
## 🚨 Breaking Changes {#-breaking-changes}
* ⬆️ [Support for node v14 and v16 have been officially dropped, as these node versions have been EOL'ed](#minimum-node-version).
* 🚥 [`*MiddlewareArgs` interfaces, modeling middleware arguments for different _kinds_ of Slack event payloads processed by bolt apps, have been improved](#middleware-arg-types).
* 🌐 [The Web API client, `@slack/web-api`, has been upgraded from v6 to v7](#web-api-v7).
* 🔌 [The Socket Mode handler package, `@slack/socket-mode`, has been upgraded from v1 to v2](#socket-mode-v2).
* 🚅 For those using the `ExpressReceiver`, [`express` has been upgraded from v4 to v5](#express-v5).
* 🍽️ [The `@slack/types` package is no longer exported without a namespace; it is now exported under the named `types` export](#types-named-export).
* 🧘 [The `SocketModeFunctions` class with a single static method instead now directly exports the single `defaultProcessEventErrorHandler` method from it](#socketmodefunctions).
* 🏭 [Some of the built-in middleware functions like `ignoreSelf` and `directMention` have had their APIs changed to create a consistent middleware style](#built-in-middleware-changes).
* 🌩️ [The `AwsEvent` interface has changed](#awsevent-changes).
* 🧹 [Deprecated methods, modules and properties in v3 were removed](#removed-deprecations).
## ✨ Other Changes {#-other-changes}
* 🚳 [Steps From Apps related types, methods and constants were marked as deprecated](#sfa-deprecation).
* 📦 [The `@slack/web-api` package leveraged within bolt-js is now exported under the `webApi` namespace](#web-api-export).
* * *
## ⬆️ Minimum Node version {#minimum-node-version}
`@slack/bolt@4.x` requires a minimum Node version of `18` and minimum npm version of `8.6.0` .
## 🚥 Changes to middleware argument types {#middleware-arg-types}
This change primarily applies to TypeScript users.
Many middleware argument types, for example [the `SlackEventMiddlewareArgs` type](https://github.com/slackapi/bolt-js/blob/%40slack/bolt%403.22.0/src/types/events/index.ts#L11-L19), previously used a conditional to sometimes define particular additional helper utilities on the middleware arguments. For example, [the `say`](https://github.com/slackapi/bolt-js/blob/%40slack/bolt%403.22.0/src/types/actions/index.ts#L47) utility, or [tacking on a convenience `message` property](https://github.com/slackapi/bolt-js/blob/%40slack/bolt%403.22.0/src/types/events/index.ts#L14) for message-event-related payloads. This was problematic: when the payload was not of a type that required the extra utility, these properties would be required to exist on the middleware arguments but have a type of `undefined`. Those of us trying to build generic middleware utilities would have to deal with TypeScript compilation errors and needing to liberally type-cast to avoid these conditional mismatches with `undefined`.
Instead, these `MiddlewareArgs` types now conditionally create a type intersection when appropriate in order to provide this conditional-utility-extension mechanism. That looks something like:
```
type SomeMiddlewareArgs = { // some type in here} & (EventType extends 'message' // If this is a message event, add a `message` property ? { message: EventFromType } : unknown)
```
With the above, now when a message payload is wrapped in middleware arguments, it will contain an appropriate `message` property, whereas a non-message payload will be intersected with `unknown` - effectively a type "noop." No more e.g. `say: undefined` or `message: undefined` to deal with!
## 🌐 @slack/web-api v7 upgrade {#web-api-v7}
All bolt handlers are [provided a convenience `client` argument](/tools/bolt-js/concepts/web-api) that developers can use to make API requests to [Slack's public HTTP APIs](/reference/methods). This `client` is powered by [the `@slack/web-api` package](https://www.npmjs.com/package/@slack/web-api). In bolt v4, `web-api` has been upgraded from v6 to v7.
More APIs! Better argument type safety! And a whole slew of other changes, too. Many of these changes won't affect JavaScript application builders, but if you are building a bolt app using TypeScript, you may see some compilation issues. Head over to [the `@slack/web-api` v6 -> v7 migration guide](/tools/node-slack-sdk/migration/migrating-web-api-package-to-v7) to get the details on what changed and how to migrate to v7.
## 🔌 @slack/socket-mode v2 upgrade {#socket-mode-v2}
While the breaking changes from this upgrade should be shielded from most bolt-js users, if you are using [the `SocketModeReceiver` or setting `socketMode: true`](/tools/bolt-js/concepts/socket-mode) _and_ attach custom code to how the `SocketModeReceiver` operates, we suggest you read through [the `@slack/socket-mode` v1 -> v2 migration guide](/tools/node-slack-sdk/migration/migrating-socket-mode-package-to-v2/), just in case.
## 🚅 express v5 upgrade {#express-v5}
For those building bolt-js apps using the `ExpressReceiver`, the packaged `express` version has been upgraded to v5. Best to check [the list of breaking changes in `express` v5](https://github.com/expressjs/express/blob/5.x/History.md#500--2024-09-10) and keep tabs on [express#5944](https://github.com/expressjs/express/issues/5944), which tracks the creation of an `express` v4 -> v5 migration guide.
## 🍽️ @slack/types exported as a named types export {#types-named-export}
We are slowly moving more core Slack domain object types and interfaces into [the utility package `@slack/types`](https://www.npmjs.com/package/@slack/types). For example, recently we shuffled [Slack Events API payloads](/reference/events) from bolt-js over to `@slack/types`. Similar moves will continue as we improve bolt-js. Ideally, we'd like for everyone - ourselves as Slack employees but of course you as well, dear developer - to leverage these types when modeling Slack domain objects.
Anyways, previously we simply `export * from '@slack/types';` in bolt-js. We've tweaked this somewhat, it is now: `export * as types from '@slack/types';`. So if you are using `@slack/types` when packaged within bolt-js, please update your references to something like:
```
import { App, type types } from '@slack/bolt';// Now you can get references to e.g. `types.BotMessageEvent`
```
## 🧘 SocketModeFunctions class disassembled {#socketmodefunctions}
If you previously imported the `SocketModeFunctions` class, you likely only did so to get a reference to the single static method available on this class: [`defaultProcessEventErrorHandler`](https://github.com/slackapi/bolt-js/blob/cd662ed540aa40b5cf20b4d5c21b0008db8ed427/src/receivers/SocketModeFunctions.ts#L13). Instead, you can now directly import the named `defaultProcessEventErrorHandler` export instead:
```
// before:import { SocketModeFunctions } from '@slack/bolt';// you probably did something with:SocketModeFunctions.defaultProcessEventErrorHandler// now:import { defaultProcessEventHandler } from '@slack/bolt';
```
## 🏭 Built-in middleware changes {#built-in-middleware-changes}
Two [built-in middlewares](/tools/bolt-js/reference#built-in-middleware-functions), `ignoreSelf` and `directMention`, previously needed to be invoked as a function in order to _return_ a middleware. These two built-in middlewares were not parameterized in the sense that they should just be used directly; as a result, you no longer should invoke them and instead pass them directly.
As an example, previously you may have leveraged `directMention` like this:
```
app.message(directMention(), async (args) => { // my handler here});
```
Instead, you should now use it like so:
```
app.message(directMention, async (args) => { // my handler here});
```
## 🌩️ AwsEvent interface changes {#awsevent-changes}
For users of the `AwsLambdaReceiver` and TypeScript, [we previously modeled, rather simplistically, the AWS event payloads](https://github.com/slackapi/bolt-js/blob/cd662ed540aa40b5cf20b4d5c21b0008db8ed427/src/receivers/AwsLambdaReceiver.ts#L11-L24): liberal use of `any` and in certain cases, incorrect property types altogether. We've now improved these to be more accurate and to take into account the two versions of API Gateway payloads that AWS supports (v1 and v2). Details for these changes are available in [#2277](https://github.com/slackapi/bolt-js/pull/2277).
As for userland changes that may be required, this depends on your use of the `AwsEvent` interface. The major change here is that it is a union type of V1 and V2 payload structures. Check out the source code and changes in [#2277](https://github.com/slackapi/bolt-js/pull/2277) for details on what each payload version structure looks like and how to adapt your application code to account for these differences. Most likely, your code will need to test for the existence of certain properties in order for TypeScript to narrow down to the appropriate payload version. For example, one change bolt-js had to employ in its code as a result of this more correct typing is the following:
```
// the variable `awsEvent` is of type `AwsEvent`let path: string;if ('path' in awsEvent) { // This is a v1 payload, so `awsEvent.path` exists and points to the request URL path. path = awsEvent.path;} else { // This is a v2 payload, so `awsEvent.rawPath` exists and points to the request URL path. path = awsEvent.rawPath;}this.logger.info(`No request handler matched the request: ${path}`);
```
## 🧹 Removed deprecations {#removed-deprecations}
* The deprecated type `KnownKeys` was removed. Admittedly, it wasn't very useful: `export type KnownKeys<_T> = never;`
* The deprecated types `VerifyOptions` and `OptionsRequest` were removed.
* The deprecated methods `extractRetryNum`, `extractRetryReason`, `defaultRenderHtmlForInstallPath`, `renderHtmlForInstallPath` and `verify` were removed.
## 🚳 Steps From Apps related deprecations {#sfa-deprecation}
A variety of methods, constants and types related to Steps From Apps were deprecated and will be removed in bolt-js v5.
## 📦 @slack/web-api exported as webApi {#web-api-export}
To help application developers keep versions of various `@slack/*` dependencies in sync with those used by bolt-js, `@slack/web-api` is now exported from bolt-js under the `webApi` export. Unless applications have specific version needs from the `@slack/web-api` package, apps should be able to import `web-api` from bolt instead:
```
import { webApi } from '@slack/bolt';// now can use e.g. webApi.WebClient, etc.
```
---
Source: https://docs.slack.dev/tools/bolt-js/reference
# Bolt for JavaScript interface and configuration reference
This guide is intended to detail the Bolt interface–including listeners and their arguments, initialization options, and errors. It may be helpful to first go through the ⚡️[Building an app guide](/tools/bolt-js/creating-an-app) to learn the basics of building Bolt for JavaScript apps.
* * *
## Listener functions {#listener-functions}
Slack apps typically receive and/or respond to one to many incoming events from Slack. This can be something like listening to an Events API event (like when a link associated with your app is shared) or a user invoking one of your app's shortcuts. For each type of incoming request from Slack, there are distinct methods that you can pass **listener functions** to handle and respond to the event.
### Methods {#methods}
Below is the current list of methods that accept listener functions. These methods handle specific event types coming from Slack, and typically include an identifying parameter before the listener function. The identifying parameter (included below) narrows the events to specific interactions that your listener function is intended to handle, such as a specific `callback_id`, or a certain substring within a message.
Method
Description
`app.event(eventType, fn);`
Listens for Events API events. The `eventType` is a `string` to identify a [specific event](/reference/events) to handle (which must be subscribed to in your app's configuration).
`app.message([pattern ,] fn);`
Convenience method to listen specifically to the [`message`](/reference/events/message) event. The pattern parameter can be any substring (`string`) or `RegExp` expression, which will be used to identify the incoming message.
`app.action(actionId, fn);`
Listens for an action event from a Block Kit element, such as a user interaction with a button, select menu, or datepicker. The `actionId` identifier is a `string` that should match the unique `action_id` included when your app sends the element to a view. Note that a view can be a message, modal, or app home. Note that action elements included in an `input` block do not trigger any events.
`app.shortcut(callbackId, fn);`
Listens for global or message shortcut invocation. The `callbackId` is a `string` or `RegExp` that must match a shortcut `callback_id` specified within your app's configuration.
`app.view(callbackId, fn);`
Listens for `view_submission` and `view_closed` events. `view_submission` events are sent when a user submits a modal that your app opened. `view_closed` events are sent when a user closes the modal rather than submits it.
`app.step(workflowStep)`
Listen and responds to steps from apps events using the callbacks passed in an instance of `WorkflowStep`. Callbacks include three callbacks: `edit`, `save`, and `execute`. More information on steps from apps can be found [in the documentation](/tools/bolt-js/legacy/steps-from-apps).
`app.command(commandName, fn);`
Listens for slash command invocations. The `commandName` is a `string` that must match a slash command specified in your app's configuration. Slash command names should be prefaced with a `/` (ex: `/helpdesk`).
`app.options(actionId, fn);`
Listens for options requests (from select menus with an external data source). This isn't often used, and shouldn't be mistaken with `app.action`. The `actionId` identifier is a `string` that matches the unique `action_id` included when you app sends a [select with an external data source](/reference/block-kit/block-elements/multi-select-menu-element/#external_multi_select).
#### Constraint objects {#constraint-objects}
There are a collection of constraint objects that some methods have access to. These can be used to narrow the event your listener function handles, or to handle special cases. Constraint objects can be passed in lieu of the identifiers outlined above. Below is a collection of constraint objects and the methods they can be passed to.
Method
Options
Details
`app.action(constraints, fn)`
`block_id`, `action_id`, `callback_id`, (,`type`)
Listens for more than just the `action_id`. `block_id` is the ID for the element's parent block. `callback_id` is the ID of the view that is passed when instantiating it (only used when action elements are in modals). To specifically handle an action element in blocks or in legacy attachments, you can use `type` with the value of `block_actions` or `interactive_message` respectively.
`app.shortcut(constraints, fn)`
`type`, `callback_id`
Allows specification of the type of shortcut. `type` must either be `shortcut` for **global shortcuts** or `message_action` for **message\_shortcuts**. `callbackId` can be a `string` or `RegExp`.
`app.view(constraints, fn)`
`type`, `callback_id`
`type` must either be `view_closed` or `view_submission`, which determines what specific event your listener function is sent. `callback_id` is the `callback_id` of the view that is sent when your app opens the modal.
`app.options(constraints, fn)`
`block_id`, `action_id`, `callback_id`
Optionally listens for `block_id` and `callback_id` in addition to `action_id`. `callback_id` can only be passed when handling options elements within modals.
### Listener function arguments {#listener-function-arguments}
Listener functions have access to a set of arguments that may change based on the method which the function is passed to. Below is an explanation of the different arguments. The below table details the different arguments and the methods they'll be accessible in.
Argument
Listener
Description
`payload`
All listeners
The unwrapped contents of the incoming event, which varies based on event. This is a subset of the information included in `body` which is detailed below. `payload` is also accessible via the alias corresponding to the method name that the listener is passed to (`message`, `event`, `action`, `shortcut`, `view`, `command`, `options`) **An easy way to understand what's in a payload is to log it**, or [use TypeScript](https://github.com/slackapi/bolt-js/tree/main/examples/getting-started-typescript).
`say`
`message`, `event`, `action` `command`
Function to send a message to the channel associated with the incoming event. This argument is only available when the listener is triggered for events that contain a channel ID (the most common being `message` events). `say` accepts simple strings (for plain-text messages) and objects (for messages containing blocks). `say` returns a promise that will resolve with a [`chat.postMessage` response](/reference/methods/chat.postMessage). If you're using an the `action` method, or an event other than `message`, you should [ensure that the event payload contains a channel ID](/reference/events).
`ack`
`action`, `shortcut`, `view`, `command`, `options`
Function that **must** be called to acknowledge that an incoming event was received by your app. `ack` returns a promise that resolves when complete. Read more in [Acknowledging requests](/tools/bolt-js/concepts/acknowledge)
`client`
All listeners
Web API client that uses the token associated with that event. For single-workspace installations, the token is provided to the constructor. For multi-workspace installations, the token is returned by the `authorize` function.
`respond`
`action`, `shortcut`, `view`, `command`
Function that responds to an incoming event **if** it contains a `response_url`. `respond` returns a promise that resolves with the results of responding using the `response_url`. For shortcuts, `respond` will **only** work for message shortcuts (not global shortcuts). For views, `respond` will **only** work when using `response_url_enabled: true` for [conversations list](/reference/block-kit/block-elements/multi-select-menu-element/#conversation_multi_select) and [channels list](/reference/block-kit/block-elements/multi-select-menu-element/#channel_multi_select) select menus in input blocks in modals.
`context`
All listeners
Event context. This object contains data about the event and the app, such as the `botId`. Middleware can add additional context before the event is passed to listeners.
`body`
All listeners
Object that contains the entire body of the request (superset of `payload`). Some accessory data is only available outside of the payload (such as `trigger_id` and `authorizations`).
`logger`
All listeners
The application logger with all of [the logging functions](/tools/bolt-js/concepts/logging) for output.
#### Body and payload references {#body-and-payload-references}
The structure of the `payload` and `body` is detailed on the API site:
* `action`: [`body`](/reference/interaction-payloads/block_actions-payload) and [`payload`s](/reference/block-kit/block-elements)
* `event`: [`body`](/reference/objects/event-object) and [`payload`s](/reference/events)
* `shortcut`: [`body` and `payload`](/reference/interaction-payloads/shortcuts-interaction-payload)
* `command`: [`body`](/interactivity/implementing-slash-commands)
* `view`: [`view_submission` `body` and `payload`](/reference/interaction-payloads/view-interactions-payload#view_submission); [`view_closed` `body` and `payload`](/reference/interaction-payloads/view-interactions-payload#view_closed)
* `options`: [`body` and `payload`](/reference/block-kit/block-elements/multi-select-menu-element#external_multi_select)
### Difference from listener middleware {#difference-from-listener-middleware}
Listener middleware is used to implement logic across many listener functions (though usually not all of them). Listener middleware has the same arguments as the above listener functions, with one distinction: they also have a `next()` function that **must** be called in order to pass the chain of execution. Learn more about listener middleware [in the documentation](/tools/bolt-js/concepts/listener-middleware).
## Built-in middleware functions {#built-in-middleware-functions}
Bolt offers a variety of built-in middleware functions to help simplify development of your Slack applications. These middleware functions implement common patterns to help filter out or focus your own listener function implementations.
These middleware functions are exported from the main `@slack/bolt` package for you to easily `import` in your applications:
```
import { matchMessage } from '@slack/bolt';app.message(matchMessage('hello'), async ({ message, logger }) => { // this function will now only execute if "hello" is present in the message});
```
These middleware functions are divided into two groups: [global middleware functions](/tools/bolt-js/concepts/global-middleware) and [listener middleware functions](/tools/bolt-js/concepts/listener-middleware).
### Built-in global middleware functions {#built-in-global-middleware-functions}
* `ignoreSelf()`: Filters out any event that originates from the app. Note that this middleware is enabled by default via the [`ignoreSelf` App initialization options](#app-options).
* `onlyActions`: Filters out any event that isn't an action.
* `onlyCommands`: Filters out any event that isn't a command.
* `onlyEvents`: Allows for only events to propagate down the middleware chain.
* `onlyOptions`: Filters out any event that isn't a drop-down-options event.
* `onlyShortcuts`: Filters out any event that isn't a shortcut.
* `onlyViewActions`: Filters out any event that isn't a `view_submission` or `view_closed` event.
### Built-in listener middleware functions {#built-in-listener-middleware-functions}
* `directMention()`: Filters out any `message` event whose text does not start with an @-mention of the handling app.
* `matchCommandName(pattern)`: Filters out any shortcut command whose name does not match the provided `pattern`; `pattern` can be a string or regular expression.
* `matchConstraints(constraint)`: Filters out any `block_action`, View or Options event that does not match the properties of the provided `constraint` object. Supported `constraint` object properties include:
* `block_id` and `action_id`: for filtering out `block_action` events that do not match the provided IDs.
* `callback_id`: for filtering out `view_*` events not matching the provided `callback_id`.
* `type`: for filtering out any event `type`s not matching the provided `type`.
* `matchEventType(pattern)`: filters out any event whose `type` does not match the provided `pattern`. `pattern` can be a string or regular expression.
* `matchMessage(pattern)`: filters out any `message` or `app_mention` events whose message contents do not match the provided `pattern`. `pattern` can be a string or regular expression.
* `subtype(type)`: Filters out any `message` event whose `subtype` does not exactly equal the provided `type`.
## Initialization options {#initialization-options}
Bolt includes a collection of initialization options to customize apps. There are two primary kinds of options: Bolt app options and receiver options. The receiver options may change based on the receiver your app uses. The following receiver options are for the default `HTTPReceiver` (so they'll work as long as you aren't using a custom receiver).
### Receiver options {#receiver-options}
`HTTPReceiver` options can be passed into the `App` constructor, just like the Bolt app options. They'll be passed to the `HTTPReceiver` instance upon initialization.
Option
Description
`signingSecret`
A `string` from your app's configuration (under "Basic Information") which verifies that incoming events are coming from Slack
`endpoints`
A `string` or `object` that specifies the endpoint(s) that the receiver will listen for incoming requests from Slack. Currently, the only key for the object is `key`, the value of which is the customizable endpoint (ex: `/myapp/events`). **By default, all events are sent to the `/slack/events` endpoint**
`processBeforeResponse`
`boolean` that determines whether events should be immediately acknowledged. This is primarily useful when running apps on FaaS since listeners will terminate immediately once the request has completed. When set to `true` it will defer sending the acknowledgement until after your handlers run to prevent early termination. Defaults to `false`.
`clientId`
The client ID `string` from your app's configuration which is [required to configure OAuth](/tools/bolt-js/concepts/authenticating-oauth).
`clientSecret`
The client secret `string` from your app's configuration which is [required to configure OAuth](/tools/bolt-js/concepts/authenticating-oauth).
`stateSecret`
Recommended parameter (`string`) that's passed when [configuring OAuth](/tools/bolt-js/concepts/authenticating-oauth) to prevent CSRF attacks
`installationStore`
Defines how to save, fetch and delete installation data when [configuring OAuth](/tools/bolt-js/concepts/authenticating-oauth). Contains three methods: `fetchInstallation`, `storeInstallation` and `deleteInstallation`. The default `installationStore` is an in-memory store.
`scopes`
Array of scopes that your app will request [within the OAuth process](/tools/bolt-js/concepts/authenticating-oauth).
`installerOptions`
Optional object that can be used to customize [the default OAuth support](/tools/bolt-js/concepts/authenticating-oauth). Read more in the OAuth documentation.
`dispatchErrorHandler`
Error handler triggered if an incoming request is to an unexpected path. More details available in the [Error Handling documentation](/tools/bolt-js/concepts/error-handling).
`processEventErrorHandler`
Error handler triggered if event processing threw an exception. More details available in the [Error Handling documentation](/tools/bolt-js/concepts/error-handling).
`unhandledRequestHandler`
Error handler triggered when a request from Slack goes unacknowledged. More details available in the [Error Handling documentation](/tools/bolt-js/concepts/error-handling).
`unhandledRequestTimeoutMillis`
How long to wait, in milliseconds, from the time a request is received to when the `unhandledRequestHandler` should be triggered. Default is `3001`. More details available in the [Error Handling documentation](/tools/bolt-js/concepts/error-handling).
`signatureVerification`
`boolean` that determines whether Bolt should [verify Slack's signature on incoming requests](/authentication/verifying-requests-from-slack). Defaults to `true`.
`customPropertiesExtractor`
Optional `function` that can extract custom properties from an incoming receiver event -- for example, extracting custom headers to propagate to other services. The function receives one argument that will have the type of the event received by your receiver (e.g. an HTTP request or websocket message) and should return an object with string keys containing your custom properties. More details available in the [Customizing a receiver documentation](/tools/bolt-js/concepts/receiver).
### App options {#app-options}
App options are passed into the `App` constructor. When the `receiver` argument is `undefined` the `App` constructor also accepts the [above `Receiver` options](#receiver-options) to initialize either a `HttpReceiver` or a `SocketModeReceiver` depending on the value of the `socketMode` argument.
Option
Description
`receiver`
An instance of `Receiver` that parses and handles incoming events. Must conform to the [`Receiver` interface](/tools/bolt-js/concepts/receiver), which includes `init(app)`, `start()`, and `stop()`. More information about receivers is [in the documentation](/tools/bolt-js/concepts/receiver).
`agent`
Optional HTTP `Agent` used to set up proxy support. Read more about custom agents in the [Node Slack SDK documentation](/tools/node-slack-sdk/web-api#proxy-requests-with-a-custom-agent).
`clientTls`
Optional `string` to set a custom TLS configuration for HTTP client requests. Must be one of: `"pfx"`, `"key"`, `"passphrase"`, `"cert"`, or `"ca"`.
`convoStore`
A store to set and retrieve state-related conversation information. `set()` sets conversation state and `get()` fetches it. By default, apps have access to an in-memory store. More information and an example can be found [in the documentation](/tools/bolt-js/legacy/conversation-store).
`token`
A `string` from your app's configuration (under "Settings" > "Install App") required for calling the Web API. May not be passed when using `authorize`, `orgAuthorize`, or OAuth.
`botId`
Can only be used when `authorize` is not defined. The optional `botId` is the ID for your bot token (ex: `B12345`) which can be used to ignore messages sent by your app. If a `xoxb-` token is passed to your app, this value will automatically be retrieved by your app calling the [`auth.test` method](/reference/methods/auth.test).
`botUserId`
Can only be used when `authorize` is not defined. The optional `botUserId` is distinct from the `botId`, as it's the user ID associated with your bot user used to identify direct mentions. If a `xoxb-` token is passed to your app, this value will automatically be retrieved by your app calling the [`auth.test` method](/reference/methods/auth.test).
`authorize`
Function for multi-team installations that determines which token is associated with the incoming event. The `authorize` function is passed source data that sometimes contains a `userId`, `conversationId`, `enterpriseId`, `teamId` and `isEnterpriseInstall` (depending which information the incoming event contains). An `authorize` function should either return a `botToken`, `botId`, and `botUserId`, or could return a `userToken`. If using [built-in OAuth support](/tools/bolt-js/concepts/authenticating-oauth), an `authorize` function will automatically be created so you do not need to pass one in. More information about `authorization` functions can be found on
`logger`
Option that allows you to pass a custom logger rather than using the built-in one. Loggers must implement specific methods ([the `Logger` interface](https://github.com/slackapi/node-slack-sdk/blob/main/packages/logger/src/index.ts)), which includes `setLevel(level: LogLevel)`, `getLevel()`, `setName(name: string)`, `debug(...msgs: any[])`, `info(...msgs: any[])`, `warn(...msgs: any[])`, and `error(...msgs: any[])`. More information about logging are [in the documentation](/tools/bolt-js/concepts/logging)
`logLevel`
Option to control how much or what kind of information is logged. The `LogLevel` export contains the possible levels–in order of most to least information: `DEBUG`, `INFO`, `WARN`, and `ERROR`. By default, `logLevel` is set to `INFO`. More information on logging can be found [in the documentation](/tools/bolt-js/concepts/logging).
`extendedErrorHandler`
Option that accepts a `boolean` value. When set to `true`, the global error handler is passed an object with additional request context. Available from version 3.8.0, defaults to `false`. More information on advanced error handling can be found [in the documentation](/tools/bolt-js/concepts/error-handling).
`ignoreSelf`
`boolean` to enable a middleware function that ignores any messages coming from your app. Requires a `botId`. Defaults to `true`.
`clientOptions.slackApiUrl`
Allows setting a custom endpoint for the Slack API. Used most often for testing.
`socketMode`
Option that accepts a `boolean` value. When set to `true` the app is started in [Socket Mode](/tools/bolt-js/concepts/socket-mode), i.e. it allows your app to connect and receive data from Slack via a WebSocket connection. Defaults to `false`.
`developerMode`
`boolean` to activate the developer mode. When set to `true` the `logLevel` is automatically set to `DEBUG` and `socketMode` is set to `true`. However, explicitly setting these two properties takes precedence over implicitly setting them via `developerMode`. Furthermore, a custom OAuth failure handler is provided to help debugging. Finally, the body of all incoming requests are logged and thus sensitive information like tokens might be contained in the logs. Defaults to `false`.
`deferInitialization`
`boolean` to defer initialization of the app and places responsibility for manually calling the `async` `App#init()` method on the developer. `init()` must be called before `App#start()`. Defaults to `false`.
`signatureVerification`
`boolean` that determines whether Bolt should [verify Slack's signature on incoming requests](/authentication/verifying-requests-from-slack). Defaults to `true`.
info
Bolt's client is an instance of `WebClient` from the [Node Slack SDK](/tools/node-slack-sdk), so some of that documentation may be helpful as you're developing.
## Agents & Assistants {#agents-assistants}
### The AssistantConfig configuration object {#the-assistantconfig-configuration-object}
Property
Required?
Description
`threadContextStore`
Optional
When provided, must have the required methods to get and save thread context, which will override the `getThreadContext` and `saveThreadContext` utilities.
If not provided, a `DefaultAssistantContextStore` instance is used.
`threadStarted`
Required
Executes when the user opens the assistant container or otherwise begins a new chat, thus sending the [`assistant_thread_started`](/reference/events/assistant_thread_started) event.
`threadContextChanged`
Optional
Executes when a user switches channels while the assistant container is open, thus sending the [`assistant_thread_context_changed`](/reference/events/assistant_thread_context_changed) event.
If not provided, context will be saved using the AssistantContextStore's `save` method (either the `DefaultAssistantContextStore` instance or provided `threadContextStore`).
`userMessage`
Required
Executes when a [message](/reference/events/message) is received, thus sending the [`message.im`](/reference/events/message.im) event. These messages do not contain a subtype and must be deduced based on their shape and metadata (if provided). Bolt handles this deduction out of the box for those using the `Assistant` class.
### Assistant utilities {#assistant-utilities}
Utility
Description
`getThreadContext`
Alias for `AssistantContextStore.get()` method. Executed if custom `AssistantContextStore` value is provided.
If not provided, the `DefaultAssistantContextStore` instance will retrieve the most recent context saved to the instance.
`saveThreadContext`
Alias for `AssistantContextStore.save()`. Executed if `AssistantContextStore` value is provided.
If not provided, the `DefaultAssistantContextStore` instance will save the `assistant_thread.context` to the instance and attach it to the initial assistant message that was sent to the thread.
`say(message: string)`
Alias for the `postMessage` method.
Sends a message to the current assistant thread.
`setTitle(title: string)`
[Sets the title](/reference/methods/assistant.threads.setTitle) of the assistant thread to capture the initial topic/question.
`setStatus(status: string)`
Sets the [status](/reference/methods/assistant.threads.setStatus) of the assistant to give the appearance of active processing.
`setSuggestedPrompts({ prompts: [{ title: string; message: string; }] })`
Provides the user up to 4 optional, preset [prompts](/reference/methods/assistant.threads.setSuggestedPrompts) to choose from.
## Framework error types {#framework-error-types}
Bolt includes a set of error types to make errors easier to handle, with more specific contextual information. Below is a non-exhaustive list of error codes you may run into during development:
Error code
Details
`AppInitializationError`
Invalid initialization options were passed. This could include not passing a signing secret, or passing in conflicting options (for example, you can't pass in both `token` and `authorize`). Includes an `original` property with more details. This error is only thrown during initialization (within the App's constructor).
`AuthorizationError`
Error exclusively thrown when installation information can't be fetched or parsed. You may encounter this error when using the built-in OAuth support, or you may want to import and use this error when building your own `authorize` function.
`ContextMissingPropertyError`
Error thrown when the `context` object is missing necessary information, such as not including `botUserId` or `botId` when `ignoreSelf` is set to `true`. The missing property is available in the `missingProperty` property.
`ReceiverMultipleAckError`
Error thrown within Receiver when your app calls `ack()` when that request has previously been acknowledged. Currently only used in the default `HTTPReceiver`.
`ReceiverAuthenticityError`
Error thrown when your app's request signature could not be verified. The error includes information on why it failed, such as an invalid timestamp, missing headers, or invalid signing secret.
`MultipleListenerError`
Thrown when multiple errors occur when processing multiple listeners for a single event. Includes an `originals` property with an array of the individual errors.
`WorkflowStepInitializationError`
Error thrown when configuration options are invalid or missing when instantiating a new `WorkflowStep` instance. This could be scenarios like not including a `callback_id`, or not including a configuration object. More information on steps from apps [can be found in the documentation](/tools/bolt-js/legacy/steps-from-apps).
`UnknownError`
An error that was thrown inside the framework but does not have a specified error code. Contains an `original` property with more details.
info
You can find the code for error definition and construction within [errors.ts](https://github.com/slackapi/bolt-js/blob/main/src/errors.ts).
### Client errors {#client-errors}
Bolt imports a `WebClient` to call Slack's APIs. Below is a set of errors you may encounter when making API calls with the client, though you can read more [in the web API documentation](/tools/node-slack-sdk/web-api#handle-errors). When handling client errors, more information can be found in the body within the `data` property.
Error code
Details
`PlatformError`
Error received when calling a Slack API. Includes a `data` property.
`RequestError`
A request could not be sent, perhaps because your network connection is not available. It has an `original` property with more details.
`RateLimitedError`
Your app has made too many requests too quickly. Includes a `retryAfter` property with the number of seconds you should wait before trying to send again. The `WebClient` will handle rate limit errors by default–[you can read more in the documentation](/tools/node-slack-sdk/web-api#rate-limits).
`HTTPError`
The HTTP response contained an unfamiliar status code. The Web API only responds with `200` (including for errors), or `429` for rate limiting.
---
Source: https://docs.slack.dev/tools/bolt-js/tutorials/ai-assistant
# AI Assistant
In this tutorial, you will create an app, enable the features to take advantage of platform AI capabilities, and explore adding code to set suggested prompts, respond to assistant-related events, and integrate an LLM with which you can correspond.
## Prerequisites {#prereqs}
Before getting started, you will need the following:
* a development workspace where you have permissions to install apps. If you don’t have a workspace, go ahead and set that up now—you can [go here](https://slack.com/get-started#create) to create one, or you can join the [Developer Program](https://api.slack.com/developer-program) and provision a sandbox with access to all Slack features for free.
* an [OpenAI](https://auth.openai.com/log-in) account with sufficient credits, and in which you can generate an API key.
**Skip to the code**
If you'd rather skip the tutorial and just head straight to the code, you can use our [Bolt for JavaScript App Agent & Assistant Template](https://github.com/slack-samples/bolt-js-assistant-template).
## Creating your app {#create-app}
1. Navigate to the [app creation page](https://api.slack.com/apps/new) and select **From a manifest**.
2. Select the workspace you want to install the application in.
3. Copy the contents of the [`manifest.json`](https://github.com/slack-samples/bolt-js-assistant-template/blob/main/manifest.json) file into the text box that says **Paste your manifest code here** (within the **JSON** tab) and click **Next**.
4. Review the configuration and click **Create**.
5. You're now in your app configuration's **Basic Information** page. Navigate to the **Install App** link in the left nav and click **Install to Workspace**, then **Allow** on the screen that follows.
### Obtaining your environment variables {#env-variables}
Before you'll be able to successfully run the app, you'll need to first obtain and set some environment variables.
1. **Bot token**: On the **Install App** page, copy your **Bot User OAuth Token**. You will store this in your environment as `SLACK_BOT_TOKEN` (we'll get to that next).
2. **App token**: Navigate to **Basic Information** and in the **App-Level Tokens** section, click **Generate Token and Scopes**. Add the [`connections:write`](/reference/scopes/connections.write) scope, name the token, and click **Generate**. (More on tokens [here](/authentication/tokens)). Copy this token. You will store this in your environment as `SLACK_APP_TOKEN`.
3. **OpenAI token**: Obtain a [secret key](https://platform.openai.com/settings/organization/api-keys) from OpenAI with the "all" permission selected. Keep this for `OPENAI_API_KEY`.
Save these for the moment; we first need to clone the project, then we'll set these variables.
### Clone the sample project {#clone}
In your terminal window, run the following command to clone the project repository locally:
```
# Clone this project onto your machinegit clone https://github.com/slack-samples/bolt-js-assistant-template.git
```
Then navigate to its directory:
```
# Change into this project directorycd bolt-js-assistant-template
```
Open the project in a new Visual Studio Code window by running the following command:
```
code .
```
### Set your environment variables {#set-vars}
Now, we are ready to store those environment variables.
1. Rename the `.env.sample` file to `.env`
2. Open the file and replace `YOUR_SLACK_APP_TOKEN` with the value of the token you generated on the **Basic Information** page. Replace `YOUR_SLACK_BOT_TOKEN` with the value of the token generated when you installed the app. Replace `OPENAI_API_KEY` with the key you generated with OpenAI.
.env
```
SLACK_APP_TOKEN=xapp-1-example-tokenSLACK_BOT_TOKEN=xoxb-example-tokenOPENAI_API_KEY=openai_exampletoken
```
### Run the app {#run}
We are almost ready to run the app. First, navigate to your terminal window and run the following command to install all necessary packages:
```
npm install
```
Then:
```
npm run
```
If your app is up and running, you'll see a message that says `⚡️ Bolt app is running!`.
## Exploring app functionality {#assistant-functionality}
Creating this app from the manifest of a sample app added several features you can explore in the [app settings](https://api.slack.com/apps). These include setting several scopes (found on the **OAuth & Permissions** page), enabling the chat tab (found on the **App Home** page), enabling the feature for AI capabilities (found on the **Agents & AI Apps** page), and listening for a few events (found under **Subscribe to bot events** on the **Event Subscriptions** page). We'll see how these all come together to support the app's AI functionality in the app logic. Navigate back to Visual Studio Code and open the `app.js` file.
## App code {#app-code}
### Import relevant modules {#import-modules}
This app's code is split into a few different files. The main ones we'll look at here are the `app.js` file, the `ai/index.js` file, and the `listeners/assistant/index.js` file.
The app is initialized in the `app.js` file, and we import a few relevant modules to be able to use the Bolt classes.
```
import 'dotenv/config';import { App, LogLevel } from '@slack/bolt';import { registerListeners } from './listeners/index.js';
```
After the import statements, we initialize the app using the environment variables we previously saved in the `.env` file, then register the listeners. Listeners are a utility for responding to app events.
```
// Initialize the Bolt appconst app = new App({ token: process.env.SLACK_BOT_TOKEN, appToken: process.env.SLACK_APP_TOKEN, socketMode: true, logLevel: LogLevel.DEBUG, clientOptions: { slackApiUrl: process.env.SLACK_API_URL || 'https://slack.com/api', },});// Register the action and event listenersregisterListeners(app);// Start the Bolt app(async () => { try { await app.start(); app.logger.info('⚡️ Bolt app is running!'); } catch (error) { app.logger.error('Failed to start the app', error); }})();
```
The AI part of initialization happens in the `index.js` file in the `ai` directory. In this file, we import another important module that allows the app to communicate with OpenAI.
```
import { OpenAI } from 'openai';
```
After this, we see some text saved to the `DEFAULT_SYSTEM_CONTENT` variable. This is used later when constructing the message to send to OpenAI; we'll get to why this is necessary later.
```
// LLM system promptexport const DEFAULT_SYSTEM_CONTENT = `You're an assistant in a Slack workspace.Users in the workspace will ask you to help them write something or to think better about a specific topic.You'll respond to those questions in a professional way.When you include markdown text, convert them to Slack compatible ones.When a prompt has Slack's special syntax like <@USER_ID> or <#CHANNEL_ID>, you must keep them as-is in your response.`;
```
Next, we initialize the `openai` client with the `OPENAI_API_KEY` token we previously saved as an environment variable in the `.env` file.
```
// OpenAI LLM clientexport const openai = new OpenAI({ apiKey: process.env.OPENAI_API_KEY,});
```
In the `listeners/assistant/index.js` file, we initialize the Bolt Assistant class. The Assistant class is a [Bolt feature](/tools/bolt-js/concepts/using-the-assistant-class) that simplifies handling incoming events related to the app assistant.
```
import { Assistant } from '@slack/bolt';import { assistantThreadContextChanged } from './assistant_thread_context_changed.js';import { assistantThreadStarted } from './assistant_thread_started.js';import { message } from './message.js';/** * @param {import("@slack/bolt").App} app */export const register = (app) => { const assistant = new Assistant({ threadStarted: assistantThreadStarted, threadContextChanged: assistantThreadContextChanged, userMessage: message, }); app.assistant(assistant);};
```
### ThreadContextStore {#thread-context-store}
In this sample app, we've opted to rely on the thread context information provided by the `assistant_thread_started` and `assistant_thread_context_changed` events; however, it's important to know that the `message.im` event does not provide this information. You may therefore opt to use a custom `ThreadContextStore`.
### Responding to assistant_thread_started event {#responding-to-assistant_thread_started-event}
The [`assistant_thread_started`](/reference/events/assistant_thread_started) event is sent when a user opens the assistant container, either with a DM or from the top nav bar entry point. Responding to this event starts the conversation with the user. Here (in the [`assistant_thread_started.js`](https://github.com/slack-samples/bolt-js-assistant-template/blob/main/listeners/assistant/assistant_thread_started.js) listener file) we greet the user then set some suggested prompts. The `message` field of each prompt is what is sent to the assistant when the user clicks on the prompt.
```
export const assistantThreadStarted = async ({ event, logger, say, setSuggestedPrompts, saveThreadContext }) => { const { context } = event.assistant_thread; try { /** * Since context is not sent along with individual user messages, it's necessary to keep * track of the context of the conversation to better assist the user. Sending an initial * message to the user with context metadata facilitates this, and allows us to update it * whenever the user changes context (via the `assistant_thread_context_changed` event). * The `say` utility sends this metadata along automatically behind the scenes. * !! Please note: this is only intended for development and demonstrative purposes. */ await say('Hi, how can I help?'); await saveThreadContext(); /** * Provide the user up to 4 optional, preset prompts to choose from. * * The first `title` prop is an optional label above the prompts that * defaults to 'Try these prompts:' if not provided. * * @see {@link https://docs.slack.dev/reference/methods/assistant.threads.setSuggestedPrompts} */ if (!context.channel_id) { await setSuggestedPrompts({ title: 'Start with this suggested prompt:', prompts: [ { title: 'This is a suggested prompt', message: 'When a user clicks a prompt, the resulting prompt message text ' + 'can be passed directly to your LLM for processing.\n\n' + 'Assistant, please create some helpful prompts I can provide to ' + 'my users.', }, ], }); } /** * If the user opens the Assistant container in a channel, additional * context is available. This can be used to provide conditional prompts * that only make sense to appear in that context. */ if (context.channel_id) { await setSuggestedPrompts({ title: 'Perform an action based on the channel', prompts: [ { title: 'Summarize channel', message: 'Assistant, please summarize the activity in this channel!', }, ], }); } } catch (e) { logger.error(e); }};
```
In this sample app, we only set suggested prompts at the initial interaction with the user, but you can set these dynamically at any time during your interaction. Alternatively, if you'd like to set fixed, hardcoded prompts, you can do so in the [app settings](https://api.slack.com/apps) under **Agents & AI Apps**.
### Reacting to assistant_thread_context_changed event {#reacting-to-assistant_thread_context_changed-event}
The [`assistant_thread_context_changed`](/reference/events/assistant_thread_context_changed) event is sent when the user switches channels while the assistant container is open. Listening to this event, and subsequently saving the new context, is important because it gives you timely information about what your user is looking at, and therefore, asking about. This updated context allows you to respond more appropriately. See how we do that in the [`assistant_thread_context_changed.js`](https://github.com/slack-samples/bolt-js-assistant-template/blob/main/listeners/assistant/assistant_thread_context_changed.js) listener:
```
/** * The `assistant_thread_context_changed` event is sent when a user switches * channels while the Assistant container is open. If `threadContextChanged` is * not provided, context will be saved using the AssistantContextStore's `save` * method (either the DefaultAssistantContextStore or custom, if provided). * * @param {Object} params * @param {import("@slack/bolt").Logger} params.logger - Logger instance. * @param {Function} params.saveThreadContext - Function to save thread context. * * @see {@link https://docs.slack.dev/reference/events/assistant_thread_context_changed} */export const assistantThreadContextChanged = async ({ logger, saveThreadContext }) => { // const { channel_id, thread_ts, context: assistantContext } = event.assistant_thread; try { await saveThreadContext(); } catch (e) { logger.error(e); }};
```
### Processing a user message for LLM {#user-message}
When a user sends a message to the app, there are a couple of things we do before processing that message: set the title and set the status. Sample code here is taken from the [`message.js`](https://github.com/slack-samples/bolt-js-assistant-template/blob/c39c4e3c3d9162e1dcff406e2b05f184947231c3/listeners/assistant/message.js) listener:
```
... try { /** * Set the title of the Assistant thread to capture the initial topic/question * as a way to facilitate future reference by the user. * * @see {@link https://docs.slack.dev/reference/methods/assistant.threads.setTitle} */ await setTitle(message.text); /** * Set the status of the Assistant to give the appearance of active processing. * * @see {@link https://docs.slack.dev/reference/methods/assistant.threads.setStatus} */ await setStatus({ status: 'thinking...', loading_messages: [ 'Teaching the hamsters to type faster…', 'Untangling the internet cables…', 'Consulting the office goldfish…', 'Polishing up the response just for you…', 'Convincing the AI to stop overthinking…', ], });...
```
The `setTitle` method calls the [`assistant.threads.setTitle`](/reference/methods/assistant.threads.setTitle) method. Setting this title helps organize the conversations to the app, as they appear in a referential list in the history tab of the app.
The `setStatus` method calls the [`assistant.threads.setStatus`](/reference/methods/assistant.threads.setStatus) method. This status shows like a typing indicator underneath the message composer. This status automatically clears when the app sends a reply. You can also clear it by sending an empty string, like this:
```
await setStatus('');
```
We show a couple of examples in this sample app of how to handle user message processing: use channel history to give context to the user's message, and use thread history to give context to the user's message. Here is how to do each and prepare the information for sending to OpenAI.
#### Using channel history for context {#channel-history}
For this scenario, the user is in a channel and the app has access to that channel context. For demonstrative purposes, we use the string that we previously set as a suggested prompt for the `if` statement, but you could parse the user message for certain keywords to get the same result.
```
/** Scenario 1: Handle suggested prompt selection * The example below uses a prompt that relies on the context (channel) in which * the user has asked the question (in this case, to summarize that channel). */ if (message.text === 'Assistant, please summarize the activity in this channel!') { const threadContext = await getThreadContext(); let channelHistory; try { channelHistory = await client.conversations.history({ channel: threadContext.channel_id, limit: 50, }); } catch (e) { // If the Assistant is not in the channel it's being asked about, // have it join the channel and then retry the API call if (e.data.error === 'not_in_channel') { await client.conversations.join({ channel: threadContext.channel_id }); channelHistory = await client.conversations.history({ channel: threadContext.channel_id, limit: 50, }); } else { logger.error(e); } }
```
After getting the channel history, it's time to construct the prompt to send to OpenAI. OpenAI prompts contain an array of `messages` in which each message object has a `role` and `content`.
The `role` represents the perspective from which you'd like model to respond to the provided input and influences how the model might interpret the input. The three possible role values are `system`, `assistant`, and `user`.
* The `system` role provides high-level instructions; it sets the scene.
* The `assistant` role denotes the model's response. We'll see this further down in the code when we provided a thread history to the model for context.
* The `user` role is the user talking to the assistant or other users.
Refer back to the top of the `ai/index.js` file to where we defined the `DEFAULT_SYSTEM_CONTENT` variable, and notice how that message now makes sense to provide the model alongside the `system` role for setting the scene of the model's response.
```
// Prepare and tag the prompt and messages for LLM processing let llmPrompt = `Please generate a brief summary of the following messages from Slack channel <#${threadContext.channel_id}>:`; for (const m of channelHistory.messages.reverse()) { if (m.user) llmPrompt += `\n<@${m.user}> says: ${m.text}`; } // Send channel history and prepared request to LLM const llmResponse = await openai.responses.create({ model: 'gpt-4o-mini', input: `System: ${DEFAULT_SYSTEM_CONTENT}\n\nUser: ${llmPrompt}`, stream: true, }); // Provide a response to the user const streamer = client.chatStream({ channel: channel, recipient_team_id: teamId, recipient_user_id: userId, thread_ts: thread_ts, }); for await (const chunk of llmResponse) { if (chunk.type === 'response.output_text.delta') { await streamer.append({ markdown_text: chunk.delta, }); } } await streamer.stop({ blocks: [feedbackBlock] }); return; }
```
In this scenario, we've provided the channel history within the user message. Let's take a look at how you might provide contextual information as separate objects in the `messages` array.
#### Using thread history for context {#thread-history}
In the code that follows, we provide the thread history to the LLM for interpreting, rather than the channel history. This is for simplification in the sample, but you could combine the two concepts in your own app.
```
/** * Scenario 2: Format and pass user messages directly to the LLM */ // Retrieve the Assistant thread history for context of question being asked const thread = await client.conversations.replies({ channel, ts: thread_ts, oldest: thread_ts, }); // Prepare and tag each message for LLM processing const threadHistory = thread.messages.map((m) => { const role = m.bot_id ? 'Assistant' : 'User'; return `${role}: ${m.text || ''}`; }); // parsed threadHistory to align with openai.responses api input format const parsedThreadHistory = threadHistory.join('\n');
```
After getting the thread replies, we map them to the appropriate object structure to send to OpenAI, providing the `role` and `content` from each conversation reply. Notice how we check for the presence of a `bot_id` to determine which `role` to set. This constructs the message history for the LLM to interpret and use as context when providing a response.
```
// Send message history and newest question to LLM const llmResponse = await openai.responses.create({ model: 'gpt-4o-mini', input: `System: ${DEFAULT_SYSTEM_CONTENT}\n\n${parsedThreadHistory}\nUser: ${message.text}`, stream: true, }); const streamer = client.chatStream({ channel: channel, recipient_team_id: teamId, recipient_user_id: userId, thread_ts: thread_ts, }); for await (const chunk of llmResponse) { if (chunk.type === 'response.output_text.delta') { await streamer.append({ markdown_text: chunk.delta, }); } } await streamer.stop({ blocks: [feedbackBlock] }); } catch (e) { logger.error(e); // Send message to advise user and clear processing status if a failure occurs await say({ text: `Sorry, something went wrong! ${e}` }); }
```
The entirety of the user message processing in this example is wrapped in a try-catch block to provide the user an error message when something goes wrong, which is a best practice. If successful, the final action we take is to call the `say` method with the LLM response. This sample also shows how to implement [text streaming](/ai/developing-agents#streaming) in code. Omitting the `streamer` would result in the app responding with one block of text, versus providing chunks at a time.
#### Using the markdown block in say {#markdown-block}
To safeguard against any markdown translation errors, we can return our text response inside of a [markdown block](/reference/block-kit/blocks/markdown-block) in the `say` section of code, instead of relying on providing precise enough instructions to the LLM. Here's how that would look:
```
... await say( { blocks: [ { "type": "markdown", "text": llmResponse.choices[0].message.content, } ] } )...
```
This ensures that if the LLM's response included, for example, a code block, it would be formatted appropriately when sent to the user as a response.
## Next steps {#next-steps}
### Consider HTTP {#http}
This sample app uses Socket Mode to receive events. This is great for developing and testing out your app, but we recommend using HTTP to receive events for a production-ready app. Read more about the differences between Socket Mode and HTTP [here](/apis/events-api/comparing-http-socket-mode).
### Learn more {#learn}
➡️ Read more about Bolt support for apps using platform AI features in the documentation [here](/tools/bolt-js/concepts/adding-agent-features).
➡️ Level up your AI game after reading through the [usage guide](/ai/developing-agents) and [Best practices for AI feature-enabled apps](/ai/developing-agents/).
### Explore pre-built apps using AI features {#marketplace}
Check out pre-built apps ready for use in the [Slack Marketplace](https://community.slack.com/marketplace/category/At07HZAKCSAC-agents-assistants).
---
Source: https://docs.slack.dev/tools/bolt-js/tutorials/code-assistant
# AI Code Assistant with Hugging Face
In this tutorial, we will create an [app that has platform AI features enabled](/ai/developing-agents) with the Bolt framework and integrate a [Hugging Face](https://huggingface.co) model to assist the user with coding questions. We'll also make this functionality available as a step in a workflow to use in Workflow Builder.
Hugging Face is an open-source community best known for its transformers library and platform for machine learning models. Hugging Face's model hub is an online repository where you can find thousands of pre-trained models for natural language processing, computer vision, speech recognition, and more. The platform is open-source, so anyone can contribute to the models and browse the models others have started. Here, we will be using the [Qwen2.5-Coder-32B-Instruct](https://huggingface.co/Qwen/Qwen2.5-Coder-32B-Instruct) model to create an app that can answer coding questions.
## Prerequisites {#prereqs}
Before getting started, you will need the following:
* a development workspace where you have permissions to install apps. If you don’t have a workspace, go ahead and set that up now—you can [go here](https://slack.com/get-started#create) to create one, or you can join the [Developer Program](https://api.slack.com/developer-program) and provision a sandbox with access to all Slack features for free.
* a Hugging Face account in which you can generate an access token.
## Creating your app {#create-app}
1. Navigate to the [app creation page](https://api.slack.com/apps/new) and select **From a manifest**.
2. Select the workspace you want to install the application in and click **Next**.
3. Copy the contents below and paste it into the text box that says **Paste your manifest code here** (within the **JSON** tab), replacing the placeholder text, and click **Next**.
```
{ "display_information": { "name": "Code Assistant" }, "features": { "app_home": { "home_tab_enabled": false, "messages_tab_enabled": true, "messages_tab_read_only_enabled": false }, "bot_user": { "display_name": "Code Assistant", "always_online": false }, "assistant_view": { "assistant_description": "An Assistant to help you with coding questions and challenges!", "suggested_prompts": [] } }, "oauth_config": { "scopes": { "bot": [ "assistant:write", "channels:join", "im:history", "channels:history", "groups:history", "chat:write" ] } }, "settings": { "event_subscriptions": { "bot_events": [ "assistant_thread_context_changed", "assistant_thread_started", "message.im", "function_executed" ] }, "interactivity": { "is_enabled": true }, "org_deploy_enabled": true, "socket_mode_enabled": true, "function_runtime": "remote", "token_rotation_enabled": false }, "functions": { "code_assist": { "title": "Code Assist", "description": "Get an answer about a code related question", "input_parameters": { "message_id": { "type": "string", "title": "Message ID", "description": "The message the question was asked in.", "is_required": true }, "channel_id": { "type": "slack#/types/channel_id", "title": "Channel ID", "description": "The channel the question was asked in", "is_required": true } }, "output_parameters": { "message": { "type": "string", "title": "Answer", "description": "The response from the Code Assistant LLM", "is_required": true } } } }}
```
4. Review the configuration and click **Create**. Clicking around in these settings, you can see what the manifest has created for us. Some highlights:
* Within **App Home**, we've enabled the **Chat Tab**. This will allow users to access your app both in the split-view container as well as within a chat tab of the app.
* **Agents & AI Apps** is enabled. With this toggled on, the split-view container is available for your app.
* A custom step has been added to **Workflow Steps**. A workflow step is a custom step that can be used in Workflow Builder. Setting up information about that step here (its name, input parameters, and output parameters) lets Slack know what data to collect from the workflow to send to the function. We'll implement the logic step for this in code.
* **Org Level Apps** has been enabled. This means that your app will be installed at the organization level. Upon installation, it is not added to any workspaces, but the workspace admin can choose which workspaces in the org to add the app to.
* Within **OAuth & Permissions**, you will find several bot scopes have been added.
* Within **Event Subscriptions**, you will find several events this app subscribes to, which allow it to respond to user requests appropriately.
5. Navigate to the **Install App** page in the left nav and click **Install to Workspace**, then **Allow** on the screen that follows.
### Obtaining your environment variables {#env-variables}
In order to connect this configuration with the app we are about to code, you'll need to first obtain and set some environment variables.
1. **Bot token**: On the **Install App** page, copy your **Bot User OAuth Token**. You will store this in your environment as `SLACK_BOT_TOKEN` (we'll get to that next).
2. **App token**: Navigate to **Basic Information** and in the **App-Level Tokens** section, click **Generate Token and Scopes**. Add the [`connections:write`](/reference/scopes/connections.write) scope, name the token, and click **Generate**. (More on tokens [here](/authentication/tokens)). Copy this token. You will store this in your environment as `SLACK_APP_TOKEN`.
3. **Hugging Face token**: Obtain a fine grained [access token](https://huggingface.co/settings/tokens) from Hugging Face with the "Make calls to Inference Providers" permission is also needed. Keep this for `HUGGINGFACE_API_KEY`.
Save these for the moment; we first need to set up our project locally, then we'll set these variables.
### Clone the starter template {#clone}
Create a new directory for your app:
```
mkdir code-assistantcd code-assistant
```
In your terminal window, run the following command to clone the starter template repository locally:
```
# Clone this project onto your machinegit clone https://github.com/slack-samples/bolt-js-starter-template.git .
```
For this project, we will need to install [Hugging Face Inference](https://www.npmjs.com/package/@huggingface/inference) to interact with pre-trained models. Run this command in your terminal window to install the dependencies we need:
```
npm install @huggingface/inference
```
Open the project in a new Visual Studio Code window by running the following command:
```
code .
```
You'll see the dependencies we've installed reflected in the `package.json` file.
This template also comes with a `manifest.json`, which may be confusing because we've already created our app in the [app settings](https://api.slack.com/apps) with a different manifest. This local manifest can safely be ignored. Everything we set in the app settings is the source of truth.
### Set your environment variables {#set-vars}
Now, we are ready to store those environment variables.
1. Rename the `.env.sample` file to `.env`
2. Open the file and replace `YOUR_SLACK_APP_TOKEN` with the value of the token you generated on the **Basic Information** page. Replace `YOUR_SLACK_BOT_TOKEN` with the value of the token generated when you installed the app. On a new line, add `HUGGINGFACE_API_KEY=` and the value of the access token you've generated in your account. Save your changes.
.env
```
SLACK_APP_TOKEN=xapp-1-example-tokenSLACK_BOT_TOKEN=xoxb-example-tokenHUGGINGFACE_API_KEY=hf_exampletoken
```
### Add app code {#app-code}
Delete the template contents in the `app.js` file and replace it with this:
app.js
```
const { App, LogLevel, Assistant } = require("@slack/bolt");const { config } = require("dotenv");const { InferenceClient } = require("@huggingface/inference");config();/** Initialization */const app = new App({ token: process.env.SLACK_BOT_TOKEN, appToken: process.env.SLACK_APP_TOKEN, socketMode: true, logLevel: LogLevel.DEBUG,});// HuggingFace configurationconst hfClient = new InferenceClient(process.env.HUGGINGFACE_API_KEY);// Model instructionsconst DEFAULT_SYSTEM_CONTENT = `You're an AI assistant specialized in answering questions about code.You'll analyze code-related questions and provide clear, accurate responses.When you include markdown text, convert them to Slack compatible ones.When you include code examles, convert them to Slack compatible ones. (There must be an empty line before a code block.)When a prompt has Slack's special syntax like <@USER_ID> or <#CHANNEL_ID>, you must keep them as-is in your response.`;function convertMarkdownToSlack(markdown) { let text = markdown; // Add newlines around code blocks first text = text.replace(/```([\s\S]*?)```/g, (match, code) => { code = code.trim(); return "\n\n```\n" + code + "\n```\n\n"; }); // Fix up any triple+ newlines to be double newlines text = text.replace(/\n{3,}/g, "\n\n"); // Remaining markdown conversions text = text.replace(/`([^`]+)`/g, "`$1`"); text = text.replace(/\*\*([^*]+)\*\*/g, "*$1*"); text = text.replace(/__([^_]+)__/g, "*$1*"); text = text.replace(/\*([^*]+)\*/g, "_$1_"); text = text.replace(/_([^_]+)_/g, "_$1_"); text = text.replace(/~~([^~]+)~~/g, "~$1~"); text = text.replace(/^>\s(.+)/gm, ">>>\n$1"); text = text.replace(/^#{1,6}\s(.+)$/gm, "*$1*"); text = text.replace(/^[\*\-\+]\s(.+)/gm, "• $1"); text = text.replace(/^\d+\.\s(.+)/gm, "$1"); text = text.replace(/\[([^\]]+)\]\(([^)]+)\)/g, "<$2|$1>"); return text;}// Create the assistantconst assistant = new Assistant({ threadStarted: async ({ logger, say, setSuggestedPrompts }) => { try { await say( "Hi! I'm your coding assistant. Ask me any questions about code!", ); const prompts = [ { title: "Code Example", message: "Show me an example of implementing a binary search tree in JavaScript.", }, { title: "Code Review", message: "What are best practices for writing clean, maintainable code?", }, { title: "Debug Help", message: "How do I debug memory leaks in Node.js applications?", }, ]; await setSuggestedPrompts({ prompts, title: "Here are some questions you can ask:", }); } catch (error) { logger.error("Error in threadStarted:", error); } }, userMessage: async ({ message, client, logger, say, setTitle, setStatus }) => { const { channel, thread_ts } = message; try { await setTitle(message.text); await setStatus("is thinking..."); // Retrieve the Assistant thread history for context of question being asked const thread = await client.conversations.replies({ channel, ts: thread_ts, oldest: thread_ts, }); // Prepare and tag each message for LLM processing const userMessage = { role: "user", content: message.text }; const threadHistory = thread.messages.map((m) => { const role = m.bot_id ? "assistant" : "user"; return { role, content: m.text }; }); const messages = [ { role: "system", content: DEFAULT_SYSTEM_CONTENT }, ...threadHistory, userMessage, ]; const modelResponse = await hfClient.chatCompletion({ model: "Qwen/Qwen2.5-Coder-32B-Instruct", messages, max_tokens: 2000, }); await setStatus("is typing..."); await say( convertMarkdownToSlack(modelResponse.choices[0].message.content), ); } catch (error) { logger.error("Error in userMessage:", error); await say( "I'm sorry, I ran into an error processing your request. Please try again.", ); } },});// Register the assistant with the appapp.assistant(assistant);// Set up custom function for assistantapp.function("code_assist", async ({ client, inputs, logger, complete, fail }) => { try { const { channel_id, message_id } = inputs; let messages; try { const result = await client.conversations.history({ channel: channel_id, oldest: message_id, limit: 1, inclusive: true, }); messages = [ { role: "system", content: DEFAULT_SYSTEM_CONTENT }, { role: "user", content: result.messages[0].text }, ]; } catch (e) { // If the Assistant is not in the channel it's being asked about, // have it join the channel and then retry the API call if (e.data.error === "not_in_channel") { await client.conversations.join({ channel: channel_id }); const result = await client.conversations.history({ channel: channel_id, oldest: message_id, limit: 1, inclusive: true, }); messages = [ { role: "system", content: DEFAULT_SYSTEM_CONTENT }, { role: "user", content: result.messages[0].text }, ]; } else { logger.error(e); } } const modelResponse = await hfClient.chatCompletion({ model: "Qwen/Qwen2.5-Coder-32B-Instruct", messages, max_tokens: 2000, }); await complete({ outputs: { message: convertMarkdownToSlack( modelResponse.choices[0].message.content, ), }, }); } catch (error) { logger.error(error); fail({ error: `Failed to complete the step: ${error}` }); }});// Start the app(async () => { try { await app.start(); app.logger.info("⚡️ Code Assistant app is running!"); } catch (error) { app.logger.error("Failed to start app:", error); }})();
```
This is the meat of our app! Here's a breakdown of what we've added:
* `DEFAULT_SYSTEM_CONTENT` is a set of instructions for the model. Think of it as setting the scene in the play that is the interaction between your users and the AI model; it is the context for the role that the model will be playing.
* `convertMarkdownToSlack` is a function that converts traditional markdown to the markdown that Slack uses (which is different). Alternatively, you could send the model's response through the [markdown block](/reference/block-kit/blocks/markdown-block) to achieve the same result.
* `assistant` is an instance of the [`Assistant` class](/tools/bolt-js/concepts/using-the-assistant-class); this sets up the suggested prompts that the user sees in the split-view container upon opening your app.
* `userMessage` is the handler that takes care of the fiddly bits around getting the thread history, preparing the structure of the messages for processing in a way that the model is expecting, interacting with the model, and responding to the user.
* `app.function` sets up the custom function that can be used to achieve the same result of `userMessage` but as a custom step in a workflow built in Workflow Builder 🎉 This is the implementation logic of the custom workflow step we saw created by the manifest in the app settings. We use the [`conversations.history`](/reference/methods/conversations.history) method to find the message where the emoji reaction was placed, then send that to the model as the question.
### Run the app {#run}
We are ready to run the app. Navigate to your terminal window and run the following command:
```
npm start
```
If your app is up and running, you'll see a message that says `⚡️ Code Assistant app is running!`.
## Run your app in Slack {#run-in-slack}
With your app running, head over to the Slack client and open your app from the icon in the upper right of the window. If you don't see it there, open your Preferences by clicking on your workspace name, then **Preferences**, then **Navigation**. Under a section that says **App agents & assistants**, check the box next to your app. Note: if you do not see the **App agents & assistants** section, check that your app is installed both to your organization and your workspace.
You should now see it and be able to open it from the icon in the upper right of the Slack client window. This opens the split-view. Upon opening your app's split-view, you should see the suggested prompts we set up in `app.js` file. Click on one of the suggested prompts or formulate a question of your own to see your AI-enabled app in action!
## Side quest: Use your function as a custom step in Workflow Builder {#custom-step}
Let's explore how to use the functionality you've created in your app inside of a workflow. In case you're unfamiliar, [Workflow Builder](https://slack.com/help/articles/360035692513-Guide-to-Slack-Workflow-Builder) is the no-code solution for executing tasks in Slack. Once your app is installed on your org, you can grant anyone access to use its function as a custom step in their workflow. Here's how that's done.
1. Open Workflow Builder by clicking on your workspace name in Slack, then hovering over **Tools** and clicking on **Workflow Builder**.
2. Click the button to create a **New Workflow**, then **Build Workflow**.
3. Select an event for how you will start your workflow. For this example, choose **When an emoji reaction is used**, then add the robot emoji 🤖, as well as which channels you'd like the workflow to work in. Confirm your selection by clicking **Continue**.
4. Select **Add steps**, then in the search bar, search for your app `Code Assist` and select it. This is your function as a custom step!
5. Click the `{}` next to **Message ID** and select **Time when the reacted message was sent**. Once it populates the box, click on the down arrow next to it and select **Timestamp**. Then, under **Channel ID**, select **The channel where the reacted message is in**, then **Save**.
6. Now that we have the app concocting a reply to the question in the message that was reacted to with the robot emoji, we need to do something with it. Let's post it in the channel where the question originated so that all interested parties know the answer.
7. Click **Add Step** once more, then **Messages**. Select **Send a message to a channel** and choose **The channel where the reacted message is in**. Below the message composer box, click **Insert a variable**, and under `Code Assist`, select **Answer**. This is the output of our custom function, as we defined it back in the [manifest](#create-app) from which the app was created. Click **Save**.
8. Now it's time to publish our workflow. Click **Finish Up** in the upper right, give your workflow a name, then **Publish**.
Test it out by navigating to a channel that you allowed the workflow to work in and post a question. React to that message with the robot 🤖 emoji. Wait and be amazed as your app works behind the scenes to reach out to the Hugging Face model and respond appropriately!
---
Source: https://docs.slack.dev/tools/bolt-js/tutorials/custom-steps-workflow-builder-existing
# Custom Steps for Workflow Builder (existing app)
This feature requires a paid plan
If you don't have a paid workspace for development, you can join the [Developer Program](https://api.slack.com/developer-program) and provision a sandbox with access to all Slack features for free.
If you followed along with our [create a custom step for Workflow Builder: new app](/tools/bolt-js/tutorials/custom-steps-workflow-builder-new) tutorial, you have seen how to add custom steps to a brand new app. But what if you have an app up and running currently to which you'd like to add custom steps? You've come to the right place!
In this tutorial we will:
* Start with an existing Bolt app
* Add a custom **workflow step** in the [app settings](https://api.slack.com/apps)
* Wire up the new step to a **function listener** in our project, using the [Bolt for JavaScript](https://slack.dev/bolt-js/) framework
* See the step as a custom workflow step in Workflow Builder
## Prerequisites {#prereqs}
The custom steps feature is compatible with Bolt version 1.20.0 and above. First, update your `package.json` file to reflect version 1.20.0 of Bolt, then run the following command in your terminal:
```
npm install
```
In order to add custom workflow steps to an app, the app also needs to be org-ready. To do this, navigate to your [app settings page](https://api.slack.com/apps) and select your Bolt app.
Navigate to **Org Level Apps** in the left nav and click **Opt-In**, then confirm **Yes, Opt-In**.
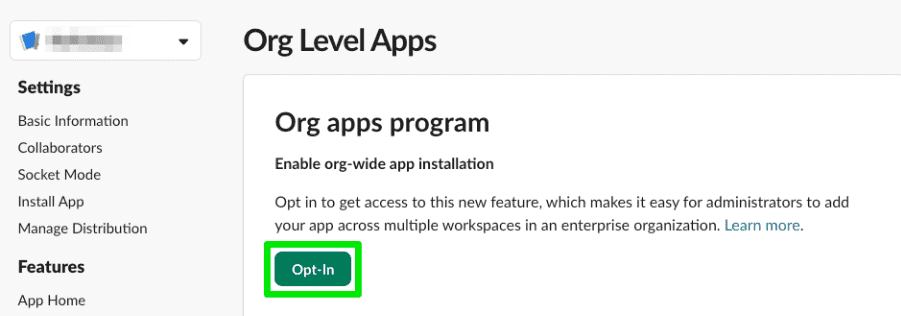
## Adding a new workflow step {#add-step}
Before we can add the new workflow step, we first need to ensure the workflow step is listening for the `function_executed` event so that our app knows when the workflow step is executed.
### Adding the function_executed event subscription {#event-subscription}
Navigate to **App Manifest** in the left nav and add the `function_executed` event subscription, then click **Save Changes**:
```
... "settings": { "event_subscriptions": { "bot_events": [ ... "function_executed" ] }, }
```
### Adding the workflow step {#add-step}
Navigate to **Workflow Steps** in the left nav and click **Add Step**. This is where we'll configure our step's inputs, outputs, name, and description.
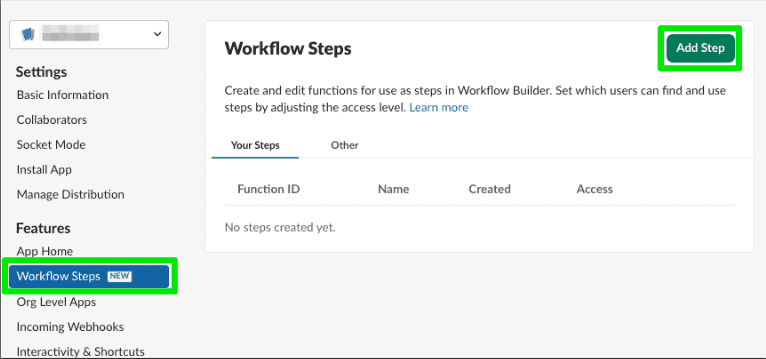
For illustration purposes in this tutorial, we're going to write a custom step called Request Time Off. When the step is invoked, a message will be sent to the provided manager with an option to approve or deny the time-off request. When the manager takes an action (approves or denies the request), a message is posted with the decision and the manager who made the decision. The step will take two user IDs as inputs, representing the requesting user and their manager, and it will output both of those user IDs as well as the decision made.
Add the pertinent details to the step:

Remember this `callback_id`. We will use this later when implementing a function listener. Then add the input and output parameters:
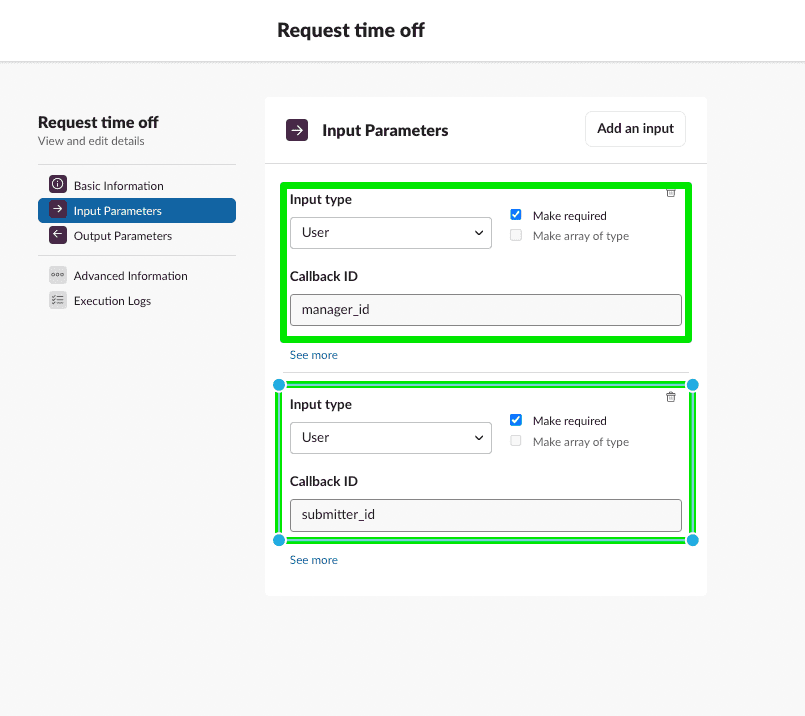
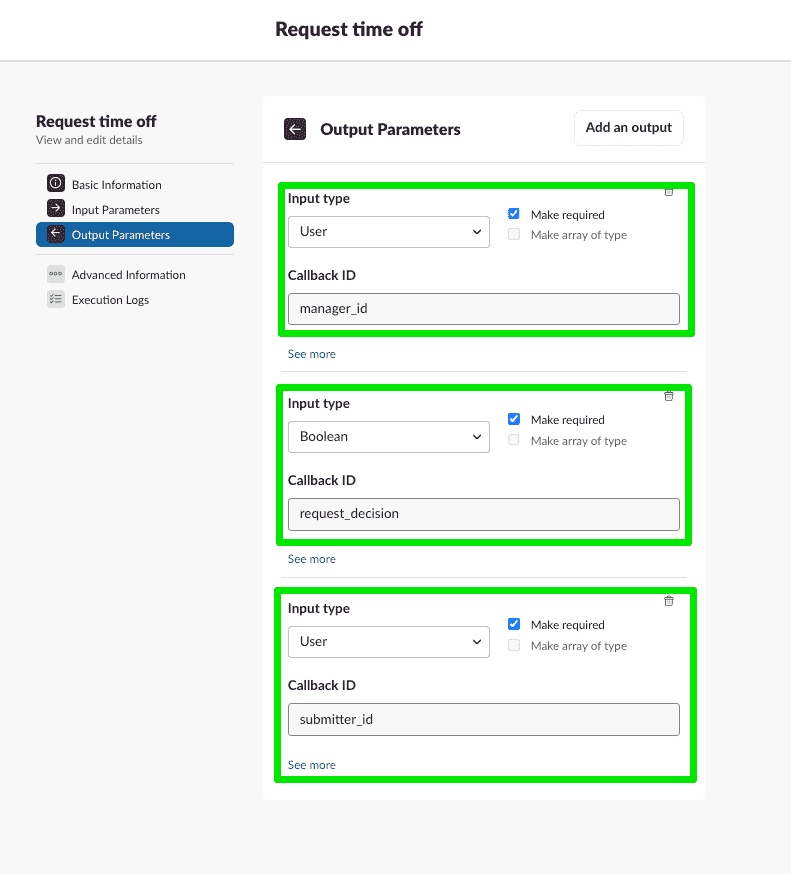
Save your changes.
### Viewing our updates in the App Manifest {#view-updates}
Navigate to **App Manifest** and notice your new step reflected in the `functions` property! Exciting. It should look like this:
```
"functions": { "request_time_off": { "title": "Request time off", "description": "Submit a request to take time off", "input_parameters": { "manager_id": { "type": "slack#/types/user_id", "title": "Manager", "description": "Approving manager", "is_required": true, "hint": "Select a user in the workspace", "name": "manager_id" }, "submitter_id": { "type": "slack#/types/user_id", "title": "Submitting user", "description": "User that submitted the request", "is_required": true, "name": "submitter_id" } }, "output_parameters": { "manager_id": { "type": "slack#/types/user_id", "title": "Manager", "description": "Approving manager", "is_required": true, "name": "manager_id" }, "request_decision": { "type": "boolean", "title": "Request decision", "description": "Decision to the request for time off", "is_required": true, "name": "request_decision" }, "submitter_id": { "type": "slack#/types/user_id", "title": "Submitting user", "description": "User that submitted the request", "is_required": true, "name": "submitter_id" } } } }
```
Next, we'll define a function listener to handle what happens when the workflow step is used.
## Adding function and action listeners {#adding-listeners}
### Implementing the function listener {#function-listener}
Direct your attention back to your app project in VSCode or your preferred code editor. Here we'll add logic that your app will execute when the custom step is executed.
Open your `app.js` file and add the following function listener code for the `request_time_off` step.
```
app.function('request_time_off', async ({ client, inputs, fail }) => { try { const { manager_id, submitter_id } = inputs; await client.chat.postMessage({ channel: manager_id, text: `<@${submitter_id}> requested time off! What say you?`, blocks: [ { type: 'section', text: { type: 'mrkdwn', text: `<@${submitter_id}> requested time off! What say you?`, }, }, { type: 'actions', elements: [ { type: 'button', text: { type: 'plain_text', text: 'Approve', emoji: true, }, value: 'approve', action_id: 'approve_button', }, { type: 'button', text: { type: 'plain_text', text: 'Deny', emoji: true, }, value: 'deny', action_id: 'deny_button', }, ], }, ], }); } catch (error) { console.error(error); fail({ error: `Failed to handle a function request: ${error}` }); }});
```
#### Anatomy of a .function() listener {#function-listener-anatomy}
The function listener registration method (`.function()`) takes two arguments:
* The first argument is the unique callback ID of the step. For our custom step, we’re using `request_time_off`. Every custom step you implement in an app needs to have a unique callback ID.
* The second argument is an asynchronous callback function, where we define the logic that will run when Slack tells the app that a user in the Slack client started a workflow that contains the `request_time_off` custom step.
The callback function offers various utilities that can be used to take action when a function execution event is received. The ones we’ll be using here are:
* `client` provides access to Slack API methods — like the `chat.postMessage` method, which we’ll use later to send a message to a channel
* `inputs` provides access to the workflow variables passed into the step when the workflow was started
* `fail` is a utility method for indicating that the step invoked for the current workflow step had an error
### Implementing the action listener {#action-listener}
This custom step also requires an action listener to respond to the action of a user clicking a button.
In that same `app.js` file, add the following action listener:
```
app.action(/^(approve_button|deny_button).*/, async ({ action, body, client, complete, fail }) => { const { channel, message, function_data: { inputs } } = body; const { manager_id, submitter_id } = inputs; const request_decision = action.value === 'approve'; try { await complete({ outputs: { manager_id, submitter_id, request_decision } }); await client.chat.update({ channel: channel.id, ts: message.ts, text: `Request ${request_decision ? 'approved' : 'denied'}!`, }); } catch (error) { console.error(error); fail({ error: `Failed to handle a function request: ${error}` }); }});
```
#### Anatomy of an .action() listener {#action-listener-anatomy}
Similar to a function listener, the action listener registration method (`.action()`) takes two arguments:
* The first argument is the unique callback ID of the action that your app will respond to. In our case, because we want to execute the same logic for both buttons, we’re using a little bit of RegEx magic to listen for two callback IDs at the same time — `approve_button` and `deny_button`.
* The second argument is an asynchronous callback function, where we define the logic that will run when Slack tells our app that the manager has clicked or tapped the Approve button or the Deny button.
Just like the function listener’s callback function, the action listener’s callback function offers various utilities that can be used to take action when an action event is received. The ones we’ll be using here are:
* `client`, which provides access to Slack API methods
* `action`, which provides the action’s event payload
* `complete`, which is a utility method indicating to Slack that the step behind the workflow step that was just invoked has completed successfully
* `fail`, which is a utility method for indicating that the step invoked for the current workflow step had an error
Slack will send an action event payload to your app when one of the buttons is clicked or tapped. In the action listener, we’ll extract all the information we can use, and if all goes well, let Slack know the step was successful by invoking complete. We’ll also handle cases where something goes wrong and produces an error.
Now that the custom step has been added to the app and we've defined step and action listeners for it, we're ready to see the step in action in Workflow Builder. Go ahead and run your app to pick up the changes.
### Creating a workflow with the new step {#add-new-step}
Turn your attention to the Slack client where your app is installed.
Open Workflow Builder by clicking on the workspace name, then **Tools**, then **Workflow Builder**.
Click the button to create a **New Workflow**, then **Build Workflow**. Choose to start your workflow **from a link in Slack**.
In the **Steps** pane to the right, search for your app name and locate the **Request time off** step we created.
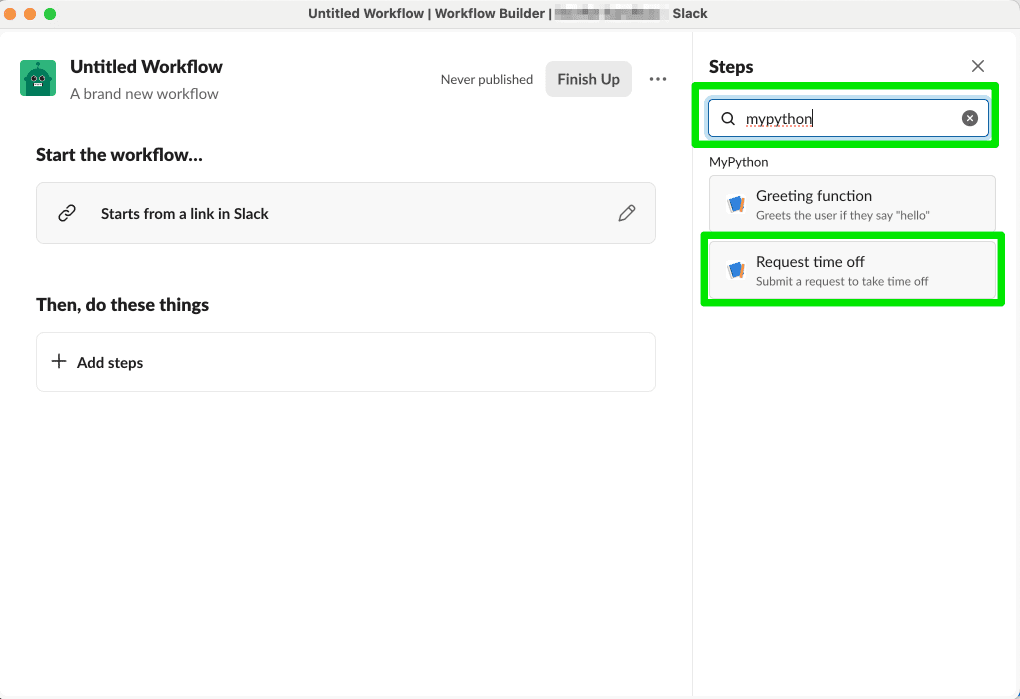
Select the step and choose the desired inputs and click **Save**.
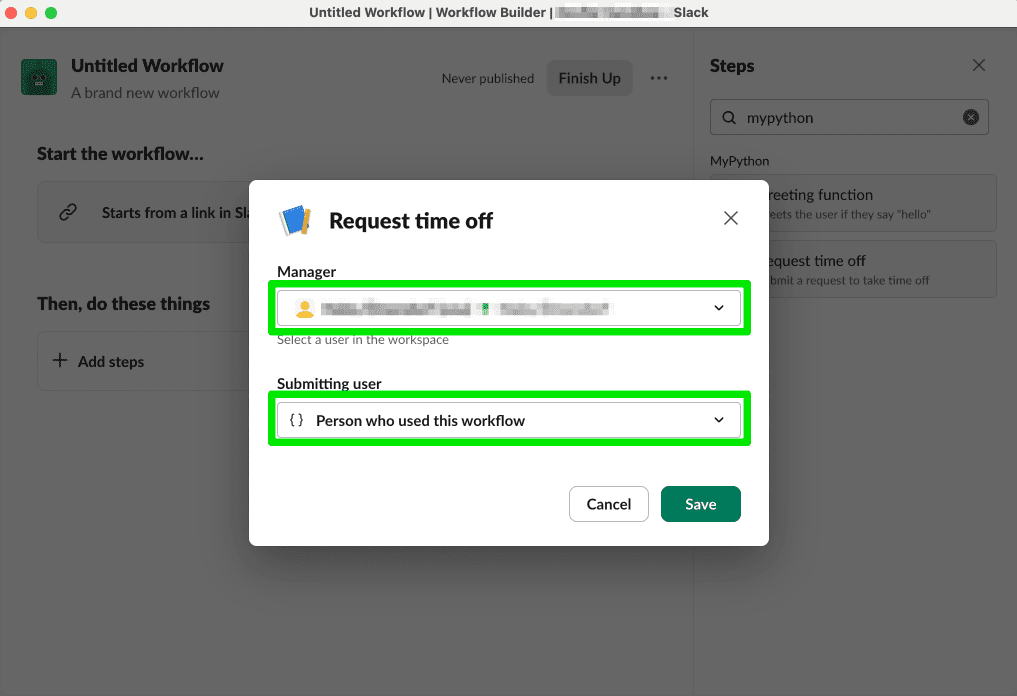
Next, click **Finish Up**, give your workflow a name and description, then click **Publish**. Copy the link for your workflow on the next screen, then click **Done**.
### Running the workflow {#run-workflow}
In any channel where your app is installed, paste the link you copied and send it as a message. The link will unfurl into a button to start the workflow. Click the button to start the workflow. If you set yourself up as the manager, you will then see a message from your app. Pressing either button will return a confirmation or denial of your time off request.
## Next steps {#next-steps}
Nice work! Now that you've added a workflow step to your Bolt app, a world of possibilities is open to you! Create and share workflow steps across your organization to optimize Slack users' time and make their working lives more productive.
If you're looking to create a brand new Bolt app with custom workflow steps, check out [the tutorial here](/tools/bolt-js/tutorials/custom-steps-workflow-builder-new).
If you're interested in exploring how to create custom steps to use in Workflow Builder as steps with our Deno Slack SDK, too, that tutorial can be found [here](/tools/deno-slack-sdk/tutorials/workflow-builder-custom-step/).
---
Source: https://docs.slack.dev/tools/bolt-js/tutorials/custom-steps-workflow-builder-new
# Custom Steps for Workflow Builder (new app)
This feature requires a paid plan
If you don't have a paid workspace for development, you can join the [Developer Program](https://api.slack.com/developer-program) and provision a sandbox with access to all Slack features for free.
Adding a workflow step to your app and implementing a corresponding function listener is how you define a custom Workflow Builder step. In this tutorial, you'll use [Bolt for JavaScript](/tools/bolt-js/) to add your workflow step, then wire it up in [Workflow Builder](https://slack.com/help/articles/360035692513-Guide-to-Workflow-Builder).
When finished, you'll be ready to build scalable and innovative workflow steps for anyone using Workflow Builder in your workspace.
## What are we building? {#what-are-we-building}
In this tutorial, you'll be wiring up a sample app with a sample step and corresponding function listener to be used as a workflow step in Workflow Builder. Here's how it works:
* When someone starts the workflow, Slack will notify your app that your custom step was invoked as part of a workflow.
* Your app will send a message to the requestor, along with a button to complete the step.
* When the user clicks or taps the button, Slack will let your app know, and your app will respond by changing the message.
Skip to the code
If you'd rather skip the tutorial and just head straight to the code, create a new app and use our [Bolt JS custom step sample](https://github.com/slack-samples/bolt-js-custom-step-template) as a template. The sample custom step provided in the template will be a good place to start exploring!
## Prerequisites {#prereqs}
Before we begin, let's make sure you're set up for success. Ensure you have a development workspace where you have permission to install apps. We recommend setting up your own space used for exploration and testing in a [developer sandbox](https://api.slack.com/developer-program).
## Cloning the sample project {#clone}
For this tutorial, We'll use `boltstep` as the app name. For your app, be sure to use a unique name that will be easy for you to find: then, use that name wherever you see `boltstep` in this tutorial. The app will be named "Bolt Custom Step", as that is defined in the `manifest.json` file of the sample app code.
Let's start by opening a terminal and cloning the starter template repository:
```
git clone https://github.com/slack-samples/bolt-js-custom-step-template.git boltstep
```
Once the terminal is finished cloning the template, change directories into your newly prepared app project:
```
cd boltstep
```
If you're using VSCode (highly recommended), you can enter `code .` from your project's directory and VSCode will open your new project.
You can also open a terminal window from inside VSCode like this: `Ctrl` + `~`
Once in VSCode, open the terminal. Let's install our package dependencies: run the following command(s) in the terminal inside VSCode:
```
npm install
```
We now have a Bolt app ready for development! Open the `manifest.json` file and copy its contents; you'll need this in the next step.
## Creating your app from a manifest {#create-app}
Open a browser and navigate to [your apps page](https://api.slack.com/apps). This is where we will create a new app with our previously copied manifest details. Click the **Create New App** button, then select **From an app manifest** when prompted to choose how you'd like to configure your app's settings.
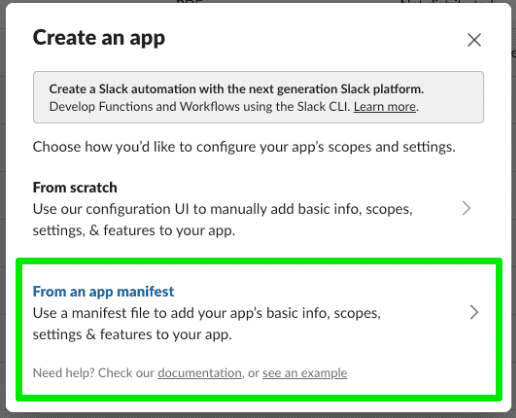
Next, select a workspace where you have permissions to install apps, and click **Next**. Select the **JSON** tab and clear the existing contents. Paste the contents of the `manifest.json` file you previously copied.
Click **Next** again. You will be shown a brief overview of the features your app includes. You'll see we are creating an app with a `chat:write` bot scope, an App Home and Bot User, as well as Socket Mode, Interactivity, an Event Subscription, and Org Deploy. We'll get into these details later. Click **Create**.
### App settings {#app-settings}
All of your app's settings can be configured within these screens. By creating an app from an existing manifest, you will notice many settings have already been configured. Navigate to **Org Level Apps** and notice that we've already opted in. This is a requirement for adding workflow steps to an app.
Navigate to **Event Subscriptions** and expand **Subscribe to bot events** to see that we have subscribed to the `function_executed` event. This is also a requirement for adding workflow steps to our app, as it lets our app know when a step has been triggered, allowing our app to respond to it.
Another configuration setting to note is **Socket Mode**. We have turned this on for our local development, but socket mode is not intended for use in a production environment. When you are satisfied with your app and ready to deploy it to a production environment, you should switch to using public HTTP request URLs. Read more about getting started with HTTP in [Bolt for JavaScript here](/tools/bolt-js/creating-an-app).
Clicking on **Workflow Steps** in the left nav will show you that one workflow step has been added! This reflects the `function` defined in our manifest: functions are workflow steps. We will get to this step's implementation later.
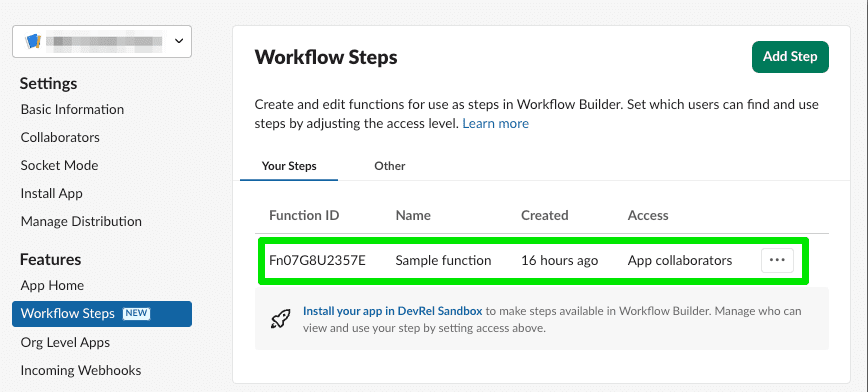
### Tokens {#tokens}
In order to connect our app here with the logic of our sample code set up locally, we need to obtain two tokens, a bot token and an app token.
* **Bot tokens** are associated with bot users, and are only granted once in a workspace where someone installs the app. The bot token your app uses will be the same no matter which user performed the installation. Bot tokens are the token type that most apps use.
* **App-level** tokens represent your app across organizations, including installations by all individual users on all workspaces in a given organization and are commonly used for creating websocket connections to your app.
To generate an app token, navigate to **Basic Information** and scroll down to **App-Level Token**.
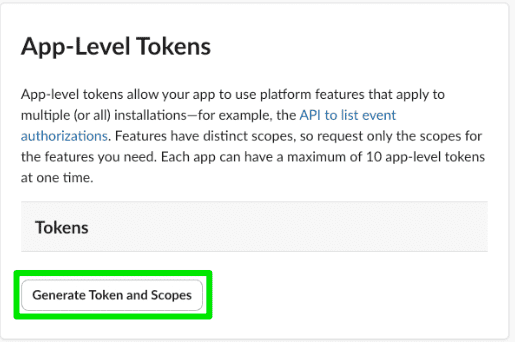
Click **Generate Token and Scopes**, then **Add Scope** and choose `connections:write`. Choose a name for your token and click **Generate**. Copy that value, save it somewhere accessible, and click **Done** to close out of the modal.
Next up is the bot token. We can only get this token by installing the app into the workspace. Navigate to **Install App** and click the button to install, choosing **Allow** at the next screen.
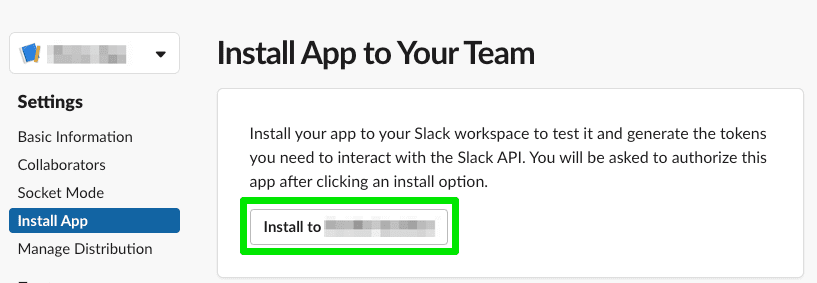
You will then have a bot token. Again, copy that value and save it somewhere accessible.
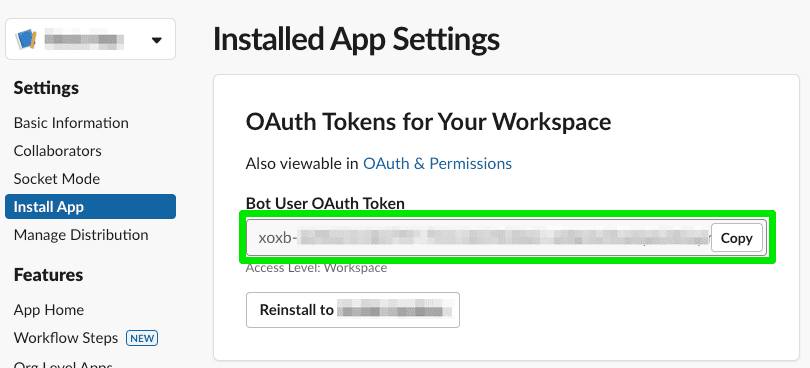
💡 Treat your tokens like passwords and keep them safe. Your app uses them to post and retrieve information from Slack workspaces. Minimally, do NOT commit them to version control.
## Starting your local development server {#local}
While building your app, you can see your changes appear in your workspace in real-time with `npm start`. Soon we'll start our local development server and see what our sample code is all about! But first, we need to store those tokens we gathered as environment variables.
Navigate back to VSCode. Rename the `.env.sample` file to `.env`. Open this file and update `SLACK_APP_TOKEN` and `SLACK_BOT_TOKEN` with the values you previously saved. It will look like this, with your actual token values where you see `` and ``:
```
SLACK_APP_TOKEN=SLACK_BOT_TOKEN=
```
Now save the file and try starting your app:
```
npm start
```
You'll know the local development server is up and running successfully when it emits a bunch of `[DEBUG]` statements to your terminal, the last one containing `connected:ready`.
With your development server running, continue to the next step.
info
If you need to stop running the local development server, press `` + `c` to end the process.
## Wiring up the sample step in Workflow Builder {#wfb}
The starter project you cloned contains a sample custom step lovingly titled “Sample step". Let’s see how a custom step defined in Bolt appears in Workflow Builder.
In the Slack Client of your development workspace, open Workflow Builder by clicking on the workspace name, **Tools**, then **Workflow Builder**. Create a new workflow, then select **Build Workflow**:
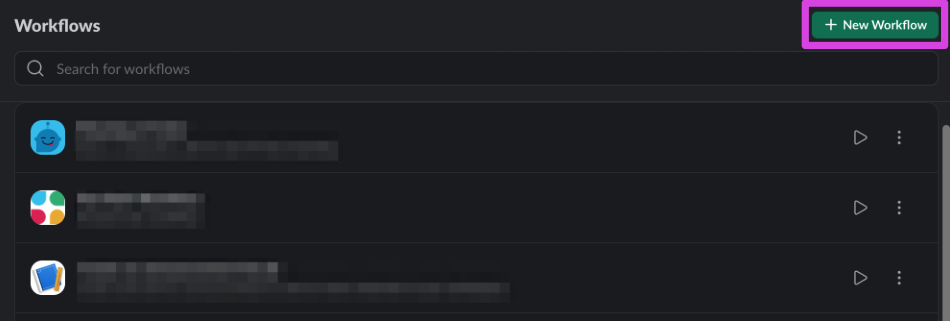
Select **Choose an event** under **Start the workflow...**, then **From a link in Slack** to configure this workflow to start when someone clicks its shortcut link:

Click the **Continue** button to confirm that this is workflow should start with a shortcut link:
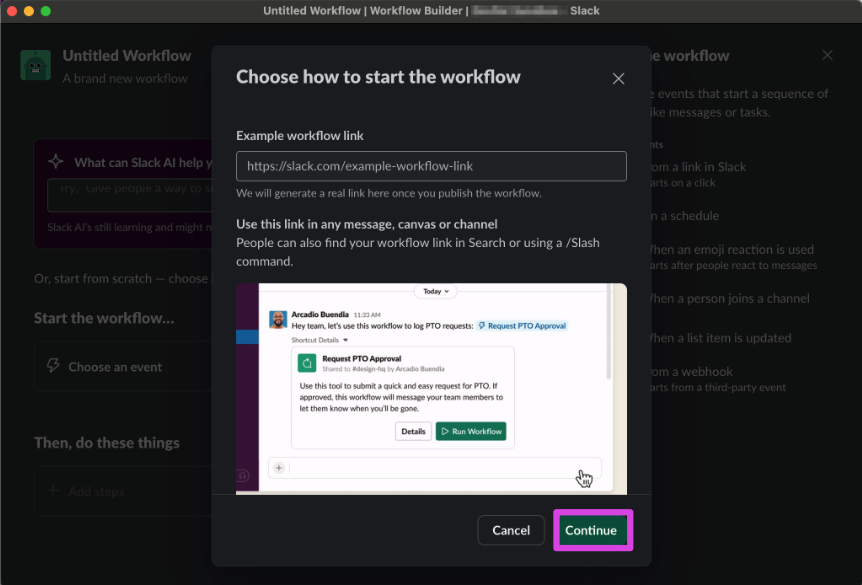
Find the sample step provided in the template by either searching for the name of your app (e.g., `Bolt Custom Step`) or the name of your step (e.g. `Sample step`) in the Steps search bar.
If you search by app name, any custom step that your app has defined will be listed.
Add the “Sample step" in the search results to the workflow:

As soon as you add the “Sample step" to the workflow, a modal will appear to configure the step's input—in this case, a user variable:
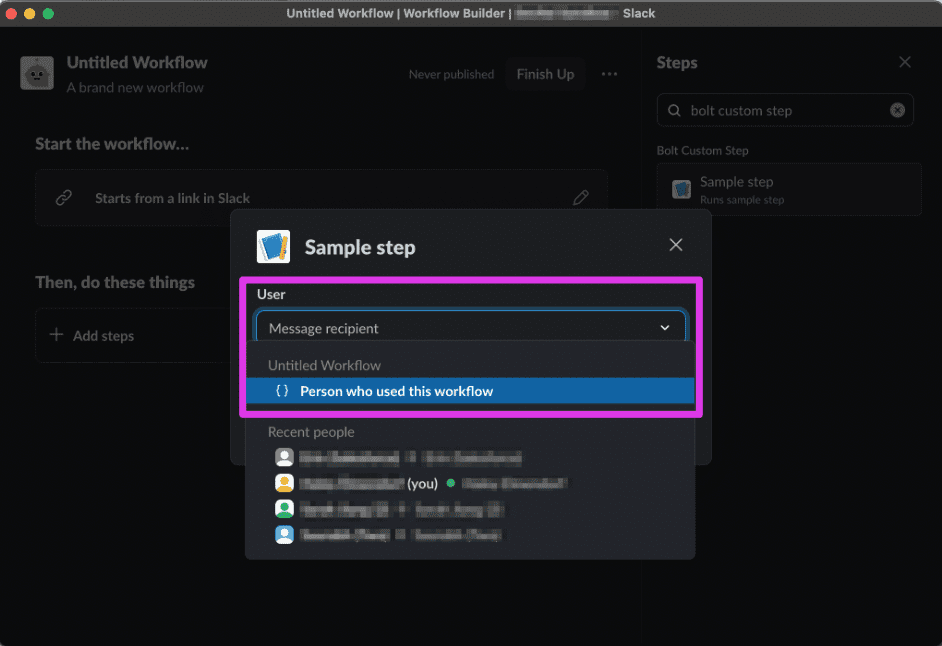
Configure the user input to be “Person who used this workflow”, then click the **Save** button:

Click the **Finish Up** button, then provide a name and description for your workflow.
Finally, click the **Publish** button:
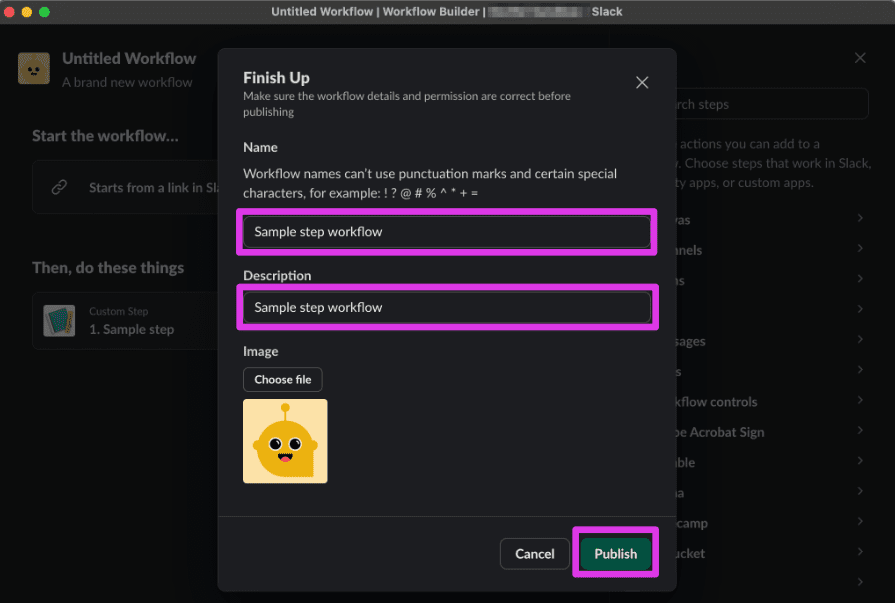
Copy the shortcut link, then exit Workflow Builder and paste the link to a message in any channel you’re in:

After you send a message containing the shortcut link, the link will unfurl and you’ll see a **Start Workflow** button.
Click the **Start Workflow** button:

You should see a new direct message from your app:

The message from your app asks you to click the **Complete step** button:

Once you click the button, the direct message to you will be updated to let you know that the step interaction was successfully completed:

Now that we’ve gotten a feel for how we will use the custom step, let’s learn more about how function listeners work.
## Discovering listeners {#listeners}
Now that we’ve seen how custom steps are used in Workflow Builder, let’s understand how the function listener code works to respond to an event when the step is triggered.
We’ll first review the step definition in the `manifest.json`, then we’ll look at the two listener functions in our app code: one to let us know when the step starts, and one to let us know when someone clicks or taps one of the buttons we sent over.
### Defining the custom step {#define-custom-step}
Opening the `manifest.json` file included in the sample app shows a `functions` property that includes a definition for our `sample_step`:
```
// manifest.json... "functions": { "sample_step": { "title": "Sample step", "description": "Runs sample step", "input_parameters": { "user_id": { "type": "slack#/types/user_id", "title": "User", "description": "Message recipient", "is_required": true, "hint": "Select a user in the workspace", "name": "user_id" } }, "output_parameters": { "user_id": { "type": "slack#/types/user_id", "title": "User", "description": "User that completed the step", "is_required": true, "name": "user_id" } } } }
```
From the step definition, we can see an input parameter and an output parameter defined.
### Inputs and outputs {#inputs-outputs}
The custom step will take the following input: Message recipient (as a Slack User ID).
The custom step will produce the following output: The user that completed the step.
* When the step is invoked, a message will be sent to the user who invoked the workflow with a button to complete the step.
* When the button is clicked, a message is posted indicating the step's completion.
### Implementing the function listener {#function-listener}
The first thing we’ll do when adding a custom workflow step to our Bolt app is register a new **function listener**. In Bolt, a function listener allows developers to execute custom code in response to specific Slack events or actions by registering a method that handles predefined requests or commands. We register a function listener via the `function` method provided by our app instance.
1. Open your project’s `app.js` file in your code editor.
2. Between the initialization code for the app instance and the `sample_step` registration, you'll see a listener defined for our custom step:
```
// app.js...app.function('sample_step', async ({ client, inputs, fail }) => { try { const { user_id } = inputs; await client.chat.postMessage({ channel: user_id, text: 'Click the button to signal the step has completed', blocks: [ { type: 'section', text: { type: 'mrkdwn', text: 'Click the button to signal the step has completed', }, accessory: { type: 'button', text: { type: 'plain_text', text: 'Complete step', }, action_id: 'sample_button', }, }, ], }); } catch (error) { console.error(error); fail({ error: `Failed to handle a step request: ${error}` }); }});
```
#### Anatomy of a .function() listener {#function-listener-anatomy}
The function listener registration method (`.function()`) takes two arguments:
* The first argument is the unique callback ID of the step. For our custom step, we’re using `sample_step`. Every custom step you implement in an app needs to have a unique callback ID.
* The second argument is an asynchronous callback function, where we define the logic that will run when Slack tells the app that a user in the Slack client started a workflow that contains the `sample_step` custom step.
The callback function offers various utilities that can be used to take action when a function execution event is received. The ones we’ll be using here are:
* `client` provides access to Slack API methods — like the `chat.postMessage` method, which we’ll use later to send a message to a channel
* `inputs` provides access to the workflow variables passed into the step when the workflow was started
* `fail` is a utility method for indicating that the step invoked for the current workflow step had an error
#### Understanding the function listener's callback logic {#function-listener-callback-logic}
When our step is executed, we want a message to be sent to the invoking user. That message should include a button that prompts the user to complete the step.
When Slack tells your Bolt app that the `sample_step` step was invoked, this step uses `chat.postMessage` to send a message to the `user_id` channel (which means this will be sent as a DM to the Slack user whose ID == `user_id`) with some text and blocks. The Block Kit element being sent as part of the message is a button, labeled 'Complete step' (which sends the `sample_click` action ID).
Once the message is sent, your Bolt app will wait until the user has clicked the button. As soon as they click or tap the button, Slack will send back the action ID associated with the button to your Bolt app.
In order for your Bolt app to listen for these actions, we’ll now define an action listener.
### Implementing the action listener {#action-listener}
The message we send to the user will include the button prompting them to complete the step.
To listen for and respond to this button click, you'll see an `.action()` listener to `app.js`, right after the function listener definition:
```
// app.js...app.action('sample_button', async ({ body, client, complete, fail }) => { const { channel, message, user } = body; try { // Steps should be marked as successfully completed using `complete` or // as having failed using `fail`, else they'll remain in an 'In progress' state. await complete({ outputs: { user_id: user.id } }); await client.chat.update({ channel: channel.id, ts: message.ts, text: 'Step completed successfully!', }); } catch (error) { console.error(error); fail({ error: `Failed to handle a step request: ${error}` }); }});
```
#### Anatomy of an .action() listener {#action-listener-anatomy}
Similar to a function listener, the action listener registration method (`.action()`) takes two arguments:
* The first argument is the unique callback ID of the action that your app will respond to.
* The second argument is an asynchronous callback function, where we define the logic that will run when Slack tells our app that the user has clicked or tapped the button.
Just like the function listener’s callback function, the action listener’s callback function offers various utilities that can be used to take action when an action event is received. The ones we’ll be using here are:
* `client`, which provides access to Slack API methods
* `action`, which provides the action’s event payload
* `complete`, which is a utility method indicating to Slack that the step behind the workflow step that was just invoked has completed successfully
* `fail`, which is a utility method for indicating that the step invoked for the current workflow step had an error
#### Understanding the action listener's callback logic {#action-listener-callback-logic}
Recall that we sent over a message with the button back in the function listener.
When the button is pressed, we want to complete the step, update the message, and define `outputs` that can be used for subsequent steps in Workflow Builder.
Slack will send an action event payload to your app when the button is clicked or tapped. In the action listener, we extract all the information we can use, and if all goes well, let Slack know the step was successful by invoking `complete`. We also handle cases where something goes wrong and produces an error.
## Next steps {#next-steps}
That's it — we hope you learned a lot!
In this tutorial, we added custom steps via the manifest, but if you'd like to see how to add custom steps in the [app settings](https://api.slack.com/apps) to an existing app, follow along with the [Create a custom step for Workflow Builder: existing Bolt app](/tools/bolt-js/tutorials/custom-steps-workflow-builder-existing) tutorial.
If you're interested in exploring how to create custom steps to use in Workflow Builder as steps with our Deno Slack SDK, too, that tutorial can be found [here](/tools/deno-slack-sdk/tutorials/workflow-builder-custom-step/).
---
Source: https://docs.slack.dev/tools/bolt-js/tutorials/custom-steps
# Custom Steps
This feature requires a paid plan
If you don't have a paid workspace for development, you can join the [Developer Program](https://api.slack.com/developer-program) and provision a sandbox with access to all Slack features for free.
With custom steps for Bolt apps, your app can create and process workflow steps that users later add in Workflow Builder. This guide goes through how to build a custom step for your app using the [app settings](https://api.slack.com/apps).
If you're looking to build a custom step using the Deno Slack SDK, check out our guide on [creating a custom step for Workflow Builder with the Deno Slack SDK](/tools/deno-slack-sdk/tutorials/workflow-builder-custom-step/).
You can also take a look at the template for the [Bolt for JavaScript custom workflow step](https://github.com/slack-samples/bolt-js-custom-step-template) on GitHub.
There are two components of a custom step: the step definition in the app manifest, and a listener to handle the `function_executed` event in your project code.
## Opt in to org-ready apps {#org-ready-apps}
Before we create the step definition, we first need to opt in to organization-ready apps. The app must opt-in to org-ready apps to be able to add the custom step to its manifest. This can be done in one of two ways:
* Set the manifest `settings.org_deploy_enabled` property to `true`.
* Alternatively, navigate to your [apps](https://api.slack.com/apps), select your app, then under the **Features** section in the navigation, select **Org Level Apps** and then **Opt-In**.
Whichever method you use, the following will be reflected in the app manifest as such:
```
"settings": { "org_deploy_enabled": true, ... }
```
Next, the app must be installed at the organization level. While it is possible to install the app at a workspace level, doing so means that the custom steps will not appear in Workflow Builder. To remedy this, install the app at the organization level.
If you are a developer who is not an admin of their organization, you will need to request an Org Admin to perform this installation at the organization level. To do this:
* Navigate to your [apps](https://api.slack.com/apps) page and select the app you'd like to install.
* Under **Settings**, select **Collaborators**.
* Add an Org Admin as a collaborator.
The Org Admin can then install your app directly at the org level from the [app settings](https://api.slack.com/apps) page.
## Defining the custom step {#define-step}
A workflow step's definition contains information about the step, including its `input_parameters`, `output_parameters`, as well as display information.
Each step is defined in the `functions` object of the manifest. Each entry in the `functions` object is a key-value pair representing each step. The key is the step's `callback_id`, which is any string you wish to use to identify the step (max 100 characters), and the value contains the details listed in the table below for each separate custom step. We recommend using the step's name, like `sample_step` in the code example below for the step's `callback_id`.
Field
Type
Description
Required?
`title`
String
A string to identify the step. Max 255 characters.
Yes
`description`
String
A succinct summary of what your step does.
No
`input_parameters`
Object
An object which describes one or more [input parameters](#inputs-outputs) that will be available to your step. Each top-level property of this object defines the name of one input parameter available to your step.
No
`output_parameters`
Object
An object which describes one or more [output parameters](#inputs-outputs) that will be returned by your step. Each top-level property of this object defines the name of one output parameter your step makes available.
No
Once you are in your [app settings](https://api.slack.com/apps), navigate to **Workflow Steps** in the left nav. Click **Add Step** and fill out your step details, including callback ID, name, description, input parameters, and output parameters.
### Defining input and output parameters {#inputs-outputs}
Step inputs and outputs (`input_parameters` and `output_parameters`) define what information goes into a step before it runs and what comes out of a step after it completes, respectively.
Both inputs and outputs adhere to the same schema and consist of a unique identifier and an object that describes the input or output.
Each input or output that belongs to `input_parameters` or `output_parameters` must have a unique key.
Field
Type
Description
`type`
String
Defines the data type and can fall into one of two categories: primitives or Slack-specific.
`title`
String
The label that appears in Workflow Builder when a user sets up this step in their workflow.
`description`
String
The description that accompanies the input when a user sets up this step in their workflow.
`dynamic_options`
Object
For custom steps dynamic options in Workflow Builder, define this property and point to a custom step designed to return the set of dynamic elements once the step is added to a workflow within Workflow Builder. Dynamic options in Workflow Builder can be rendered in one of two ways: as a drop-down menu (single-select or multi-select), or as a set of fields. Refer to custom steps dynamic options for Workflow Builder using [Bolt for JavaScript](/tools/bolt-js/concepts/custom-steps-dynamic-options) or [Bolt for Python](/tools/bolt-python/concepts/custom-steps-dynamic-options) for more details.
`is_required`
Boolean
Indicates whether or not the input is required by the step in order to run. If it’s required and not provided, the user will not be able to save the configuration nor use the step in their workflow. This property is available only in v1 of the manifest. We recommend v2, using the `required` array as noted in the example above.
`hint`
String
Helper text that appears below the input when a user sets up this step in their workflow.
In addition, the `dynamic_options` field has two required properties:
Property
Type
Description
`function`
String
A reference to the custom step that should be used as a dynamic option.
`inputs`
Object
Maps the inputs from the custom step consuming the dynamic option to the inputs required by the step used as a dynamic option.
For example:
```
"inputs": { "category": { "value": "{{input_parameters.category}}" }}
```
Once you've added your step details, save your changes, then navigate to **App Manifest**. Notice your new step configuration reflected in the `function` property!
#### Sample manifest {#sample-manifest}
Here is a sample app manifest laying out a step definition. This definition tells Slack that the step in our workspace with the callback ID of `sample_step` belongs to our app, and that when it runs, we want to receive information about its execution event.
```
"functions": { "sample_step": { "title": "Sample step", "description": "Runs sample step", "input_parameters": { "properties": { "user_id": { "type": "slack#/types/user_id", "title": "User", "description": "Message recipient", "hint": "Select a user in the workspace", "name": "user_id" } }, "required": { "user_id" } }, "output_parameters": { "properties": { "user_id": { "type": "slack#/types/user_id", "title": "User", "description": "User that received the message", "name": "user_id" } }, "required": { "user_id" } }, }}
```
### Adding steps for existing apps {#existing-apps}
If you are adding custom steps to an existing app directly to the app manifest, you will also need to add the `function_runtime` property to the app manifest. Do this in the `settings` section as such:
```
"settings": { ... "function_runtime": "remote"}
```
If you are adding custom steps in the **Workflow Steps** section of the [App Config](https://api.slack.com/apps) as shown above, then this will be added automatically.
## Listening to function executions {#listener}
When your custom step is executed in a workflow, your app will receive a `function_executed` event. The callback provided to the `function()` method will be run when this event is received.
The callback is where you can access `inputs`, make third-party API calls, save information to a database, update the user’s Home tab, or set the output values that will be available to subsequent workflow steps by mapping values to the `outputs` object.
Your app must call `complete()` to indicate that the step’s execution was successful, or `fail()` to signal that the step failed to complete.
Notice in the example code here that the name of the step, `sample_step`, is the same as it is listed in the manifest above. This is required.
```
app.function('sample_step', async ({ client, inputs, complete, fail }) => { try { const { user_id } = inputs; await client.chat.postMessage({ channel: user_id, text: `Greetings <@${user_id}>!` }); await complete({ outputs: { user_id } }); } catch (error) { console.error(error); fail({ error: `Failed to complete the step: ${error}` }); }});
```
Here's another example. Note in this snippet, the name of the step, `create_issue`, must be listed the same as it is listed in the manifest file.
```
app.function('create_issue', async ({ inputs, complete, fail }) => { try { const { project, issuetype, summary, description } = inputs; /** Prepare the URL to POST new issues to */ const jiraBaseURL = process.env.JIRA_BASE_URL; const issueEndpoint = `https://${jiraBaseURL}/rest/api/latest/issue`; /** Set custom headers for the request */ const headers = { Accept: 'application/json', Authorization: `Bearer ${process.env.JIRA_SERVICE_TOKEN}`, 'Content-Type': 'application/json', }; /** Provide information about the issue in the body */ const body = JSON.stringify({ fields: { project: Number.isInteger(project) ? { id: project } : { key: project }, issuetype: Number.isInteger(issuetype) ? { id: issuetype } : { name: issuetype }, description, summary, }, }); /** Create the issue on a project by POST request */ const issue = await fetch(issueEndpoint, { method: 'POST', headers, body, }).then(async (res) => { if (res.status === 201) return res.json(); throw new Error(`${res.status}: ${res.statusText}`); }); /** Return a prepared output for the step */ const outputs = { issue_id: issue.id, issue_key: issue.key, issue_url: `https://${jiraBaseURL}/browse/${issue.key}`, }; await complete({ outputs }); } catch (error) { console.error(error); await fail({ error }); }});
```
### Anatomy of a function listener {#anatomy}
The first argument (in our case above, `sample_step`) is the unique callback ID of the step. After receiving an event from Slack, this identifier is how your app knows which custom step handler to invoke. This `callback_id` also corresponds to the step definition provided in your manifest file.
The second argument is the callback function, or the logic that will run when your app receives notice from Slack that `sample_step` was run by a user—in the Slack client—as part of a workflow.
Field
Description
`client`
A `WebClient` instance used to make things happen in Slack. From sending messages to opening modals, `client` makes it all happen. For a full list of available methods, refer to the [Web API methods](/reference/methods). Read more about the `WebClient` for Bolt JS [here](https://slack.dev/bolt-js/concepts/web-api/).
`complete`
A utility method that invokes `functions.completeSuccess`. This method indicates to Slack that a step has completed successfully without issue. When called, `complete` requires you include an `outputs` object that matches your step definition in [`output_parameters`](#inputs-outputs).
`fail`
A utility method that invokes `functions.completeError`. True to its name, this method signals to Slack that a step has failed to complete. The `fail` method requires an argument of `error` to be sent along with it, which is used to help users understand what went wrong.
`inputs`
An alias for the `input_parameters` that were provided to the step upon execution.
## Responding to interactivity {#interactivity}
Interactive elements provided to the user from within the `function()` method’s callback are associated with that unique `function_executed` event. This association allows for the completion of steps at a later time, like once the user has clicked a button.
Incoming actions that are associated with a step have the same `inputs`, `complete`, and `fail` utilities as offered by the `function()` method.
```
// If associated with a step, step-specific utilities are made available app.action('approve_button', async ({ complete, fail }) => { // Signal the step has completed once the button is clicked await complete({ outputs: { message: 'Request approved 👍' } });});
```
## Deploying a custom step {#deploy}
When you're ready to deploy your steps for wider use, you'll need to decide _where_ to deploy, since Bolt apps are not hosted on the Slack infrastructure.
Not sure where to host your app? We recommend following the [Heroku Deployment Guide](https://slack.dev/bolt-js/deployments/heroku).
### Control step access {#access}
You can choose who has access to your custom steps. To define this, refer to the [custom function access](/tools/deno-slack-sdk/guides/controlling-access-to-custom-functions) page.
### Distribution {#distribution}
Distribution works differently for Slack apps that contain custom steps when the app is within a standalone (non-Enterprise Grid) workspace versus within an Enterprise Grid organization.
* **Within a standalone workspace**: Slack apps that contain custom steps can be installed on the same workspace and used within that workspace. We do not support distribution to other standalone workspaces (also known as public distribution).
* **Within an organization**: Slack apps that contain custom steps should be org-ready (enabled for private distribution) and installed on the organization level. They must also be granted access to at least one workspace in the organization for the steps to appear in Workflow Builder.
Apps containing custom steps cannot be distributed publicly or submitted to the Slack Marketplace. We recommend sharing your code as a public repository in order to share custom steps in Bolt apps.
## Related tutorials {#tutorials}
* [Custom steps for Workflow Builder (new app)](/tools/bolt-js/tutorials/custom-steps-workflow-builder-new)
* [Custom steps for Workflow Builder (existing app)](/tools/bolt-js/tutorials/custom-steps-workflow-builder-existing)
---
Source: https://docs.slack.dev/tools/bolt-js/tutorials/random-fact-generator
# Build a random fact generator
In this tutorial, we’ll create a workflow that fetches data from a third-party API and sends a formatted message to a Slack channel with the results. We’ll use the [random useless facts API](https://uselessfacts.jsph.pl/) to post a daily fact to a Slack channel. You’ll also learn how to use the [Bolt for JavaScript](/tools/bolt-js) framework to add custom steps that can be used in Workflow Builder, the no-code workflow tool in Slack.
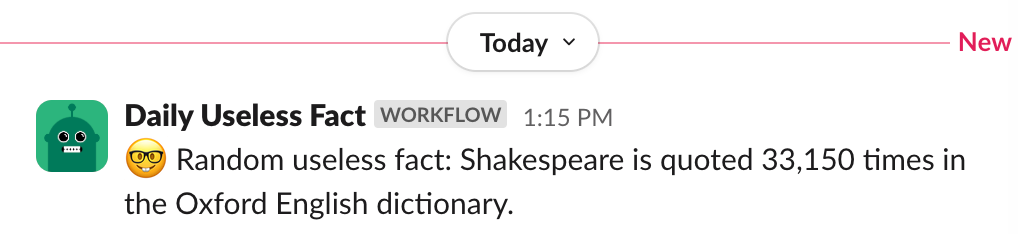
## Create your new Slack app {#create-your-new-slack-app}
All apps built for Slack have an [app manifest](/app-manifests). This is the configuration for the app, such as the name, settings, and required permissions. The app manifest also describes any functions (custom steps) your app will make available to your Slack workspace. We'll create an app from the manifest shown below.
First, log in to your Slack workspace or [join the Developer Program](https://api.slack.com/developer-program/join) to get a free enterprise sandbox. [Create a new app](https://api.slack.com/apps/new), then, choose **From a manifest**. Follow the prompts, copying and pasting the manifest contents below in the JSON tab, replacing the placeholder text that is there.
```
{ "display_information": { "name": "Useless Fact App" }, "features": { "app_home": { "home_tab_enabled": true, "messages_tab_enabled": true, "messages_tab_read_only_enabled": true }, "bot_user": { "display_name": "Useless Fact App", "always_online": false } }, "oauth_config": { "scopes": { "bot": [ "chat:write", "app_mentions:read", "workflow.steps:execute" ] } }, "settings": { "event_subscriptions": { "user_events": [ "message.app_home" ], "bot_events": [ "app_mention", "workflow_step_execute", "function_executed" ] }, "interactivity": { "is_enabled": true }, "org_deploy_enabled": true, "socket_mode_enabled": true, "token_rotation_enabled": false, "function_runtime": "remote" }, "functions": { "useless_fact_step": { "title": "Useless Fact Custom Step", "description": "Runs useless fact step", "input_parameters": {}, "output_parameters": { "message": { "type": "string", "title": "Fact", "description": "A random useless fact", "is_required": true, "name": "message" } } } }}
```
Note the app manifest includes a function named `useless_fact_step` and declares the function returns one value named “Fact” as its output. We'll get to this later.
### Save tokens {#save-tokens}
Once your app has been created, scroll down to **App-Level Tokens** on the **Basic Information** page and create a token that requests the [`connections:write`](/reference/scopes/connections.write) scope. This token will allow you to use [Socket Mode](/apis/events-api/using-socket-mode), which is a secure way to develop on Slack through the use of WebSockets. Save the value of your app token and store it in a safe place. We’ll use these later.
### Install app in workspace {#install-app-in-workspace}
Still in the app settings, navigate to the **Install App** page in the left sidebar. Install your app. When you press **Allow**, this means you’re agreeing to install your app with the permissions that it’s requesting. Copy the bot token that you receive and store it in a safe place for subsequent steps.
Now that you’ve completed the app setup, it’s time to write some code!
### Install Node and set up the project {#install-node-and-set-up-the-project}
Open your terminal or command prompt. First, check to see that you have Node.js installed and it is a recent long-term support (LTS) version by typing the following command.
```
node -v
```
If you get an error or if it’s an older version than what’s available for download on the [Node.js website](https://nodejs.org/), take a moment to install the latest version.
Next, create a new directory for the project named `useless-fact-app` and change to the new directory.
```
mkdir useless-fact-appcd useless-fact-app
```
For Windows, the command looks like this:
```
md useless-fact-app
```
In your terminal window, run the following command to clone the starter template repository locally:
```
# Clone this project onto your machinegit clone https://github.com/slack-samples/bolt-js-starter-template.git .
```
Open the project in VS Code or your favorite code editor. Rename the `.env.sample` file to `.env`. Open the file and paste the following, replacing the placeholders with the values you saved earlier.
```
SLACK_BOT_TOKEN={your-bot-token-xoxb-1234}SLACK_APP_TOKEN={your-app-token-xapp-1234}
```
### Add function code {#add-function-code}
Replace the contents of the `app.js` with the code shown here.
```
import bolt from "@slack/bolt";import "dotenv/config";const { App } = bolt;// Initialize the Bolt appconst app = new App({ token: process.env.SLACK_BOT_TOKEN, appToken: process.env.SLACK_APP_TOKEN, socketMode: true,});// Make an API call to retrieve a random factasync function getUselessFact() { const res = await fetch("https://uselessfacts.jsph.pl/api/v2/facts/random"); if (!res.ok) { return null; } const data = await res.json(); return data;}// Define the function for Workflow Builderapp.function("useless_fact_step", async ({ complete, fail, logger }) => { try { app.logger.info("Running useless fact step..."); // Get the fact using the API const fact = await getUselessFact(); if (fact && fact.text) { // Use complete() to send results to Slack await complete({ outputs: { message: fact.text, }, }); } else { // Use fail() to send an error to Slack await fail({ error: "There was an error retrieving a random useless fact :cry:" }); } } catch (error) { // Log the error and send an error message back to Slack logger.error(error); await fail({ error: `There was an error 😥 : ${error}` }) }});// Start the Bolt App!async function main() { await app.start(); app.logger.info("⚡️ Bolt app is running!");}main();
```
The code in the `app.js` file initializes the Bolt app using your tokens and enables Socket Mode. Next, it defines the `getUselessFact()` function that fetches a random fact. It uses the Bolt framework to create a Slack function named `useless_fact_step`. This is the same function we registered in the app manifest previously; the function's name, inputs, and outputs in the code must match with the what is defined in the app manifest. Finally, a function named `main()` is used to start the Bolt app.
## Run your Bolt app {#run-your-bolt-app}
From your terminal, enter the following command:
```
npm run dev
```
You should see the following printed to the console.
```
> bolt-useless-facts@0.1.0 dev> node --env-file=.env --watch app.js[INFO] bolt-app ⚡️ Bolt app is running!
```
Your Bolt app is running, and you can now use it in your Slack workspace!
## Create a new workflow using Workflow Builder {#create-a-new-workflow-using-workflow-builder}
To create a new workflow, open Workflow Builder in Slack using one of the following methods.
* **Use the message box:** In any channel, type `/workflow` and select **Create a workflow**.
* **Use the sidebar:** Navigate to the left sidebar in Slack and click **More**, then **Tools**, then **Workflows**. Click **+New** then **Build Workflow** to create a new workflow.
### Schedule the workflow {#schedule-the-workflow}
Every workflow starts with a trigger. For this workflow, it may make sense to have it scheduled for each work day at a specific time.
1. Under **Start the workflow...**, click **Choose an event**.
2. From the list of events, click **On a schedule**.
3. Configure the schedule for your app to run. Under **Starts on**, choose today’s date. Change the time to 15 or 30 minutes from now (you can update the scheduled time and frequency after you verify it is working). Under **Frequency**, choose **Every weekday (Monday to Friday)**. Click **Continue**.
### Add the Bolt app's function to the workflow {#add-the-bolt-apps-function-to-the-workflow}
After the workflow is triggered, the next step is to call the function in the Bolt app. This is done using a custom step.
1. Click **\+ Add steps**.
2. Click **Search steps...**.
3. In the search box, start typing the name of your Bolt app.
4. Click **Useless Fact Custom Step**.
5. Click **Save**.
### Add a channel message step {#add-a-channel-message-step}
After calling the Bolt app and retrieving a random fact, the next step is to send a message to a channel.
1. Click **\+ Add Step**.
2. Click **Messages**, then **Send a message to a channel**.
3. Click **Select a channel** and choose a channel to send a message to.
4. Under **Add a message**, type something like `“🤓 Random useless fact:”`.
5. Click **Insert a variable** and then select **Fact** under **1\. Useless Fact Custom Step**.
6. Click **Save**.
### Publish and test the workflow {#publish-and-test-the-workflow}
Almost there! The final task is to publish the workflow and wait for the next scheduled run to see it in action!
1. Click **Finish Up**.
2. Enter a **Name**, such as `Daily Useless Fact`.
3. Update the **Description**.
4. Click **Publish**.
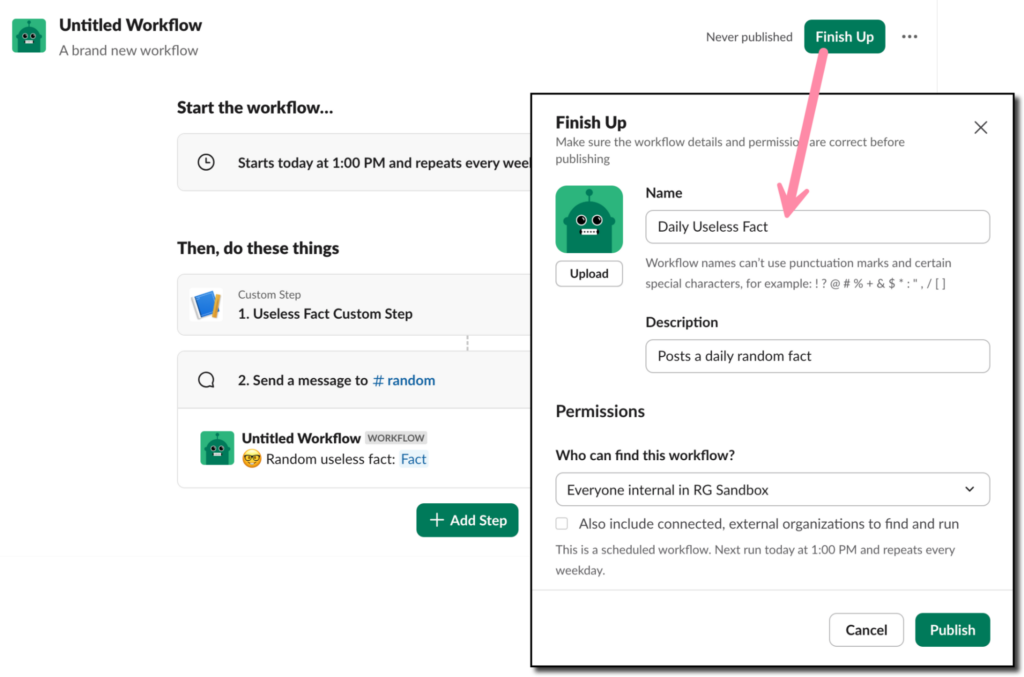
Wait for the scheduled time and see your new custom Bolt app in action!
### Make changes to the workflow {#make-changes-to-the-workflow}
If needed, you can always make changes to elements of your workflow, such as the schedule, channel, or message.
1. From the left sidebar in Slack, click **More**, then **Tools**, then **Workflows**.
2. Find your workflow and click the three vertical dots on the right side.
3. Click **Edit workflow** and make changes. Don't forget to publish!
## Deploy your Bolt app {#deploy-your-bolt-app}
Congratulations! You’ve learned how to create a Bolt app using the [Bolt for JavaScript](/tools/bolt-js) framework and a daily scheduled workflow using [Workflow Builder](/workflows/workflow-builder)!
The Bolt app will continue to work as long as you have it running on your computer. This is acceptable for development and testing purposes, but a better long-term solution is to deploy the application to a production environment. You can follow the guides available for [Deploying to AWS Lambda](/tools/bolt-js/deployments/aws-lambda/) or [Deploying to Heroku](/tools/bolt-js/deployments/heroku) for steps on deploying to those environments. Alternatively, you can deploy to any platform that supports JavaScript serverless functions or Node.js applications.
---
Source: https://docs.slack.dev/tools/node-slack-sdk
# Node Slack SDK
The Node Slack SDK is a collection of single-purpose packages for building Slack apps that are performant, secure, and scalable.
Just starting out?
The [Getting Started tutorial](/tools/node-slack-sdk/getting-started) will walk you through building your first Slack app using Node.js.
## Slack APIs {#slack-apis}
The Node Slack SDK has corresponding packages for Slack APIs. They are small and powerful when used independently, and work seamlessly when used together, too.
Slack API
Use
NPM package
Web API
Send data to or query data from Slack using any of [more than 200 methods](/reference/methods).
[`@slack/web-api`](/tools/node-slack-sdk/web-api)
OAuth
Set up the authentication flow using V2 OAuth for Slack apps.
[`@slack/oauth`](/tools/node-slack-sdk/oauth)
Incoming Webhooks
Send notifications to a single channel that the user picks on installation.
[`@slack/webhook`](/tools/node-slack-sdk/webhook)
Socket Mode
Listen for incoming messages and a limited set of events happening in Slack, using WebSocket.
[`@slack/socket-mode`](/tools/node-slack-sdk/socket-mode)
`@slack/events-api` and `@slack/interactive-messages` officially reached EOL on May 31st, 2021. Development has fully stopped for these packages and all remaining open issues and pull requests have been closed.
At this time, we recommend migrating to [Bolt for JavaScript](/tools/bolt-js), a framework that offers all of the functionality available in those packages.
## Installation {#installation}
This package supports Node v14 and higher. It's highly recommended to use [the latest LTS version of node](https://github.com/nodejs/Release#release-schedule), and the documentation is written using syntax and features from that version.
Use your favorite package manager to install any of the packages and save to your `package.json`:
You can use `npm`:
```
$ npm install @slack/web-api @slack/oauth
```
Or you can use `yarn`:
```
$ yarn add @slack/web-api @slack/oauth
```
## Getting help {#getting-help}
These docs have lots of information on the Node Slack SDK. There's also an in-depth Reference section. Please explore!
If you otherwise get stuck, we're here to help. The following are the best ways to get assistance working through your issue:
* [Issue Tracker](http://github.com/slackapi/node-slack-sdk/issues) for questions, bug reports, feature requests, and general discussion related to the Node Slack SDK. Try searching for an existing issue before creating a new one.
* [Email](mailto:support@slack.com) our developer support team: `support@slack.com`.
## Release notes {#release-notes}
Check out the [Node Slack SDK release notes](https://github.com/slackapi/node-slack-sdk/releases) for all the latest happenings.
## Contributing {#contributing}
These docs live within the [Node Slack SDK](https://github.com/slackapi/node-slack-sdk) repository and are open source.
We welcome contributions from everyone! Please check out our [Contributor's Guide](https://github.com/slackapi/node-slack-sdk/blob/main/.github/contributing.md) for how to contribute in a helpful and collaborative way.
---
Source: https://docs.slack.dev/tools/node-slack-sdk/getting-started
# Getting started
This guide shows how to use the packages in the Node Slack SDK to get a simple Slack app running. If you've never used the Slack APIs before, you're in the right place. Welcome, and let's get started!
## Create a Slack app {#create-a-slack-app}
The first step is to [create a new app](https://api.slack.com/apps?new_app=1). Give your app a fun name and choose a development Slack workspace. We recommend using a workspace where you aren't going to disrupt real work getting done — you can create a new one for free. After you create an app, you'll be greeted with some basic information.
In this guide, we'll be calling a method of the Web API to post a message to a channel. The Web API is the foundation of the Slack platform, and nearly every Slack app uses it. Aside from posting messages, the Web API allows your app to call [methods](/reference/methods) that can be used for everything from creating a channel to updating a user's status. Before we can call any methods, we first need to configure our new app with the proper permissions.
## Get a token to use the Web API {#get-a-token-to-use-the-web-api}
In your [app settings](https://api.slack.com/apps), select the app you created and navigate to **OAuth & Permissions** in the left nav. Scroll down to the section for scopes. Slack describes the various permissions your app could obtain from an installing bot as scopes. There are [over 80 scopes](/reference/scopes)! Some are broad and authorize your app to access lots of data, while others are very specific and let your app touch just a tiny sliver. Your users (and their IT admins) will have opinions about which data your app should access and only agree to install the app if the data permissions seem reasonable, so we recommend finding the scope(s) with the least amount of privilege for your app's needs. In this guide, we will use the Web API to post a message. The scope required for this is [`chat:write`](/reference/scopes/chat.write). Scroll down to **Bot Token Scopes**, ensure this section is expanded, then click **Add an OAuth Scope**, find the [`chat:write`](/reference/scopes/chat.write) scope and select it to add it to your app.
Now our app has declared which scope it desires in the workspace, but we haven't added it to your workspace yet. To install your app, scroll up to the top of the page and click the **Install to Workspace** button. You'll be taken to the app installation page. This page is where you grant the bot user permission to install the app in your development workspace with specific capabilities.
Click **Allow**. This will install the app on the workspace and generate the token we'll need.
When you return to the **OAuth & Permissions** page, copy the **Bot User OAuth Access Token** (it should begin with `xoxb`). Treat this value like a password and keep it safe. The Web API uses tokens to authenticate the requests your app makes. In a later step, you'll be asked to use this token in your code.
## Set up your local project {#set-up-your-local-project}
If you don't already have a project, let's create a new one. In an empty directory, you can initialize a new project using the following command:
```
$ npm init
```
You'll be prompted with a series of questions to describe your project, and you can accept the defaults if you aren't picky. After you're done, you'll have a new `package.json` file in your directory.
Install the `@slack/web-api` package and save it to your `package.json` dependencies using the following command:
```
$ npm install @slack/web-api
```
Create a new file called `tutorial.js` in this directory and add the following code:
```
const { WebClient } = require('@slack/web-api');console.log('Getting started with Node Slack SDK');
```
Back at the command line, run the program using the following command:
```
$ node tutorial.jsGetting started with Node Slack SDK
```
If you see the same output as above, we're ready to start.
## Send a message with the Web API {#send-a-message-with-the-web-api}
In this guide, we'll post a simple message that contains the current time. We'll also follow the best practice of keeping secrets outside of your code (do not hardcode sensitive data).
Before we move forward, add the bot user you created above to the `#general` channel in your workspace. Bots need to be invited to channels to be able to post in them. You can do this by going to the `#general` channel inside slack in your workspace and type `/invite @YourBotUser` with the display name of your bot user.
Store the access token in a new environment variable. The following example works on Linux and MacOS; but [similar commands are available on Windows](https://superuser.com/a/212153/94970). Replace the value with OAuth Access token that you copied earlier.
```
$ export SLACK_TOKEN=xoxb-...
```
Re-open `tutorial.js` and add the following code:
```
// Create a new instance of the WebClient class with the token read from your environment variableconst web = new WebClient(process.env.SLACK_TOKEN);// The current dateconst currentTime = new Date().toTimeString();(async () => { try { // Use the `chat.postMessage` method to send a message from this app await web.chat.postMessage({ channel: '#general', text: `The current time is ${currentTime}`, }); console.log('Message posted!'); } catch (error) { console.log(error); }})();
```
This code creates an instance of the `WebClient`, which uses an access token to call Web API methods. The app reads the access token from an environment variable. Then this app will post a message in the `#general` channel, assuming you have invited your bot to that channel.
Run the program. The output should look like the following:
```
$ node tutorial.jsGetting started with Node Slack SDKMessage posted!
```
Look inside Slack to verify a message was sent to `#general`.
## Next Steps {#next-steps}
You just built your first Slack app with Node.js! 🎉
There's plenty more to learn and explore about the Node Slack SDK and the Slack platform. Here are some ideas about where to look next:
* This tutorial only used two of **over 200 Web API methods** available. [Look through them](/reference/methods) to get ideas about what to build next!
* You now know how to build a Slack app for a single workspace, [learn how to implement Slack OAuth](/authentication/installing-with-oauth) to make your app installable in many workspaces. If you are using [Passport](http://www.passportjs.org/) to handle authentication, you may find the [`@aoberoi/passport-slack`](https://github.com/aoberoi/passport-slack) strategy package helpful.
---
Source: https://docs.slack.dev/tools/node-slack-sdk/legacy/events-api
# Events API
`@slack/events-api` officially reached EOL on May 31st, 2021.
Development has fully stopped for this package and all remaining open issues and pull requests have been closed. The package was removed from the project in [PR #2517](https://github.com/slackapi/node-slack-sdk/pull/2517).
At this time, we recommend migrating to [Bolt for JavaScript](https://github.com/slackapi/bolt-js), a framework that offers all of the functionality available in those packages (and more). To help with that process, we've provided some [migration samples](/tools/node-slack-sdk/migration/migrating-to-v6) for those looking to convert their existing apps.
The `@slack/events-api` package helps your app respond to events from the Slack [Events API](/apis/events-api) such as new messages, emoji reactions, and files. This package will help you start with convenient and secure defaults.
## Installation {#installation}
```
$ npm install @slack/events-api
```
Before building an app, you'll need to [create a Slack app](https://api.slack.com/apps/new) and install it to your development workspace. You'll also need a public URL where the app can begin receiving events. Finally, you'll need to find the request signing secret given to you by Slack under the **Basic Information** of your app configuration.
It may be helpful to read the tutorial on [developing Slack apps locally](/tools/node-slack-sdk/tutorials/local-development). After you have a URL for development, see the section on [verifying a request URL for development](#verify-tool) so you can save it as the Request URL in your app configuration. Now you can begin adding event subscriptions, just be sure to install the app in your development workspace again each time you add new scopes (typically whenever you add new event subscriptions).
* * *
## Initialize the event adapter {#initialize-the-event-adapter}
The package exports a `createEventAdapter()` function, which returns an instance of the `SlackEventAdapter` class. The function requires one parameter, the request signing secret, which it uses to enforce that all events are coming from Slack to keep your app secure.
```
const { createEventAdapter } = require('@slack/events-api');// Read the signing secret from the environment variablesconst slackSigningSecret = process.env.SLACK_SIGNING_SECRET;// Initializeconst slackEvents = createEventAdapter(slackSigningSecret);
```
* * *
## Start a server {#start-a-server}
The event adapter transforms incoming HTTP requests into verified and parsed events. That means in order for it to emit events for your app, it needs an HTTP server. The adapter can receive requests from an existing server, or as a convenience, it can create and start the server for you.
In the following example, the event adapter starts an HTTP server using the `.start()` method. Starting the server requires a `port` for it to listen on. This method returns a `Promise` which resolves for an instance of an [HTTP server](https://nodejs.org/api/http.html#http_class_http_server) once it's ready to emit events. By default, the built-in server will be listening for events on the path `/slack/events`, so make sure your Request URL ends with this path.
```
const { createEventAdapter } = require('@slack/events-api');const slackSigningSecret = process.env.SLACK_SIGNING_SECRET;const slackEvents = createEventAdapter(slackSigningSecret);// Read the port from the environment variables, fallback to 3000 default.const port = process.env.PORT || 3000;(async () => { // Start the built-in server const server = await slackEvents.start(port); // Log a message when the server is ready console.log(`Listening for events on ${server.address().port}`);})();
```
To gracefully stop the server, there's also the `.stop()` method, which returns a `Promise` that resolves when the server is no longer listening.
Using an existing HTTP server
The event adapter can receive requests from an existing Node HTTP server. You still need to specify a port, but this time it's only given to the server. Starting a server in this manner means it is listening to requests on all paths; as long as the Request URL is routed to this port, the adapter will receive the requests.
```
const { createServer } = require('http');const { createEventAdapter } = require('@slack/events-api');const slackSigningSecret = process.env.SLACK_SIGNING_SECRET;const slackEvents = createEventAdapter(slackSigningSecret);// Read the port from the environment variables, fallback to 3000 default.const port = process.env.PORT || 3000;// Initialize a server using the event adapter's request listenerconst server = createServer(slackEvents.requestListener());server.listen(port, () => { // Log a message when the server is ready console.log(`Listening for events on ${server.address().port}`);});
```
Using an Express app
The event adapter can receive requests from an [Express](http://expressjs.com/) application. Instead of plugging the adapter's request listener into a server, it's plugged into the Express `app`. With Express, `app.use()` can be used to set which path you'd like the adapter to receive requests from. You should be careful about one detail: if your Express app is using the `body-parser` middleware, then the adapter can only work if it comes _before_ the body parser in the middleware stack. If you accidentally allow the body to be parsed before the adapter receives it, the adapter will emit an error, and respond to requests with a status code of `500`.
```
const { createServer } = require('http');const express = require('express');const bodyParser = require('body-parser');const { createEventAdapter } = require('@slack/events-api');const slackSigningSecret = process.env.SLACK_SIGNING_SECRET;const port = process.env.PORT || 3000;const slackEvents = createEventAdapter(slackSigningSecret);// Create an express applicationconst app = express();// Plug the adapter in as a middlewareapp.use('/my/path', slackEvents.requestListener());// Example: If you're using a body parser, always put it after the event adapter in the middleware stackapp.use(bodyParser());// Initialize a server for the express app - you can skip this and the rest if you prefer to use app.listen()const server = createServer(app);server.listen(port, () => { // Log a message when the server is ready console.log(`Listening for events on ${server.address().port}`);});
```
* * *
## Listen for an event {#listen-for-an-event}
Apps register functions, called listeners, to be triggered when an event of a specific type is received by the adapter. If you've used Node's [`EventEmitter`](https://nodejs.org/api/events.html#events_class_eventemitter) pattern before, then you're already familiar with how this works, since the adapter is an `EventEmitter`.
The `event` argument passed to the listener is an object. Its contents corresponds to the [type of event](/reference/events) it's registered for.
```
const { createEventAdapter } = require('@slack/events-api');const slackSigningSecret = process.env.SLACK_SIGNING_SECRET;const slackEvents = createEventAdapter(slackSigningSecret);const port = process.env.PORT || 3000;// Attach listeners to events by Slack Event "type". See: /reference/events/message.imslackEvents.on('message', (event) => { console.log(`Received a message event: user ${event.user} in channel ${event.channel} says ${event.text}`);});(async () => { const server = await slackEvents.start(port); console.log(`Listening for events on ${server.address().port}`);})();
```
* * *
## Handle errors {#handle-errors}
If an error is thrown inside a listener, it must be handled, otherwise it will crash your program. The adapter allows you to define an error handler for errors thrown inside any listener, using the `.on('error', handlernFn)` method. It's a good idea to, at the least, log these errors so you're aware of what happened.
```
const { createEventAdapter } = require('@slack/events-api');const slackSigningSecret = process.env.SLACK_SIGNING_SECRET;const slackEvents = createEventAdapter(slackSigningSecret);const port = process.env.PORT || 3000;slackEvents.on('message', (event) => { // Oops! This throws a TypeError. event.notAMethod();});// All errors in listeners are caught here. If this weren't caught, the program would terminate.slackEvents.on('error', (error) => { console.log(error.name); // TypeError});(async () => { const server = await slackEvents.start(port); console.log(`Listening for events on ${server.address().port}`);})();
```
* * *
## Debugging {#debugging}
If you're having difficulty understanding why a certain request received a certain response, you can try debugging your program. A common cause is a request signature verification failing, sometimes it's because the wrong secret was used. The following example shows how you might figure this out using debugging.
Start your program with the `DEBUG` environment variable set to `@slack/events-api:*`. This should only be used for development/debugging purposes, and should not be turned on in production. This tells the adapter to write messages about what it's doing to the console. The easiest way to set this environment variable is to prepend it to the `node` command when you start the program.
```
$ DEBUG=@slack/events-api:* node app.js
```
`app.js`:
```
const { createEventAdapter } = require('@slack/events-api');const port = process.env.PORT || 3000;// Oops! Wrong signing secretconst slackEvents = createEventAdapter('not a real signing secret');slackEvents.on('message', (event) => { console.log(`Received a message event: user ${event.user} in channel ${event.channel} says ${event.text}`);});(async () => { const server = await slackEvents.start(port); console.log(`Listening for events on ${server.address().port}`);})();
```
When the adapter receives a request, it will now output something like the following to the console:
```
@slack/events-api:adapter adapter instantiated - options: { includeBody: false, includeHeaders: false, waitForResponse: false }@slack/events-api:adapter server created - path: /slack/events@slack/events-api:adapter server started - port: 3000@slack/events-api:http-handler request received - method: POST, path: /slack/events@slack/events-api:http-handler request signature is not valid@slack/events-api:http-handler handling error - message: Slack request signing verification failed, code: SLACKHTTPHANDLER_REQUEST_SIGNATURE_VERIFICATION_FAILURE@slack/events-api:http-handler sending response - error: Slack request signing verification failed, responseOptions: {}
```
This output tells the whole story of why the adapter responded to the request the way it did. Towards the end you can see that the signature verification failed.
If you believe the adapter is behaving incorrectly, before filing a bug please gather the output from debugging and include it in your bug report.
* * *
## Verify tool {#verify-tool}
Once you have a URL where you'd like to receive requests from the Events API, you must save it as a Request URL in your Slack app configuration. But in order to save it, your app needs to respond to a challenge request, so that Slack knows its your app that owns this URL. _How can you do that if you haven't built the app yet?_ For development, there is a command line tool built into this package that you can use to respond to the challenge.
Once the package is installed in your app, a command line program will be available in your `node_modules` directory.
```
$ ./node_modules/.bin/slack-verify --secret [--path=/slack/events] [--port=3000]
```
Run the command with your own signing secret (provided by Slack in the **Basic Information** of the app settings), and optionally a path and a port. A web server will be listening for requests containing a challenge and respond to them the way Slack expects. Now input input and save the Request URL. Once it's saved, you can stop the server with `Ctrl-C` and start working on your app.
If you're using a tunneling tool like [ngrok](https://ngrok.com), the Request URL you save in Slack would be the tunnel URL, such as `https://abcdef.ngrok.io`, appended with the path. In other words, it should look like `https://abcdef.ngrok.io/slack/events`. Also make sure that when ngrok was started, it's set to use the port that the tool is listening on. In other words, start ngrok with a command like `ngrok http 3000`.
* * *
## Receive additional event data {#receive-additional-event-data}
The adapter can trigger listeners with more data than only the event body. The listeners can receive additional arguments: the event envelope, and the request headers.
The envelope [contains data](/reference/objects/event-object) regarding how the event was triggered, in addition to the event itself. In order to receive this data in listeners, the adapter must be initialized with the `includeBody` option set to `true`. All listeners will now be triggered with an additional argument which contains the envelope.
The headers [contain data](https:///apis/events-api#error_handling) regarding whether the event is a retry of a previously failed delivery. In order to receive this data in listeners, the adapter must be initialized with the `includeHeaders` option set to `true`. All listeners will now be triggered with an additional argument which contains an key-value object describing the HTTP request headers.
```
const { createEventAdapter } = require('@slack/events-api');const slackSigningSecret = process.env.SLACK_SIGNING_SECRET;const port = process.env.PORT || 3000;// Initialize the adapter to trigger listeners with envelope data and headersconst slackEvents = createEventAdapter(slackSigningSecret, { includeBody: true, includeHeaders: true,});// Listeners now receive 3 argumentsslackEvents.on('message', (event, body, headers) => { console.log(`Received a message event: user ${event.user} in channel ${event.channel} says ${event.text}`); console.log(`The event ID is ${body.event_id} and time is ${body.event_time}`); if (headers['X-Slack-Retry-Num'] !== undefined) { console.log(`The delivery of this event was retried ${headers['X-Slack-Retry-Num']} times because ${headers['X-Slack-Retry-Reason']}`); }});(async () => { const server = await slackEvents.start(port); console.log(`Listening for events on ${server.address().port}`);})();
```
**Note**: If the `includeHeaders` option is set to `true`, but the `includeBody` argument is not, then listeners will receive only 2 arguments: `event` and `headers`.
* * *
## Custom responses {#custom-responses}
The adapter allows your listener to determine whether exactly how it should respond to the incoming HTTP request. This is an advanced feature, and should not be used unless you have a specific need such as: turning event delivery retries off, redirecting Slack to deliver the event to another URL, or changing the HTTP response body.
In order to customize responses, the adapter must be initialized with the `waitForResponse` option set to `true`. Once this option is set, listeners will be triggered with an additional `respond()` argument that every listener must call in under 3 seconds. When the event was handled normally, call `respond()` with no arguments. If there was an error, call `respond(error)` with an object that has a `status` property set to a valid HTTP status code. If you'd like to turn event deliveries off, call `respond(null, options)` with an object that has the `failWithNoRetry` property set to `true`. If you'd like to redirect, call `respond(null, options)` with an object that has the `redirectLocation` property set to the URL. Lastly, if you'd like to customize the respond body, call `respond(null, options)` with an object that has the `content` property set to a string you'd like to use as the body.
```
const { createEventAdapter } = require('@slack/events-api');const slackSigningSecret = process.env.SLACK_SIGNING_SECRET;const port = process.env.PORT || 3000;// Initialize the adapter to trigger listeners with the respond functionconst slackEvents = createEventAdapter(slackSigningSecret, { waitForResponse: true,});// Redirect events of 'message' type to another URLslackEvents.on('message', (_event, respond) => { respond(null, { redirectLocation: 'https://example.com/slack/events/message', });});// It's now required to call the respond function in every listenerslackEvents.on('reaction_added', (event, respond) => { console.log('Reaction event received'); // Normal success respond();});(async () => { const server = await slackEvents.start(port); console.log(`Listening for events on ${server.address().port}`);})();
```
---
Source: https://docs.slack.dev/tools/node-slack-sdk/legacy/interactive-messages
# Interactive messages
`@slack/interactive-messages` officially reached EOL on May 31st, 2021.
Development has fully stopped for this package and all remaining open issues and pull requests have been closed. The package was removed from the project in [PR #2517](https://github.com/slackapi/node-slack-sdk/pull/2517).
At this time, we recommend migrating to [Bolt for JavaScript](https://github.com/slackapi/bolt-js), a framework that offers all of the functionality available in those packages (and more). To help with that process, we've provided some [migration samples](/tools/node-slack-sdk/migration/migrating-to-v6) for those looking to convert their existing apps.
The `@slack/interactive-messages` helps your app respond to interactions from [interactive messages](/interactivity), [actions](/interactivity/implementing-shortcuts), and [modals](/interactivity/adding-interactive-modals-to-home-tab) in Slack. This package will help you start with convenient and secure defaults.
## Installation {#installation}
```
$ npm install @slack/interactive-messages
```
Before building an app, you'll need to [create a Slack app](https://api.slack.com/apps/new) and install it to your development workspace. You'll also need a public URL where the app can begin receiving actions. Finally, you'll need to find the request signing secret given to you by Slack under the **Basic Information** of your app configuration.
It may be helpful to read the tutorial on [developing Slack apps locally](/tools/node-slack-sdk/tutorials/local-development).
* * *
## Initialize the message adapter {#initialize-the-message-adapter}
The package exports a `createMessageAdapter()` function, which returns an instance of the `SlackMessageAdapter` class. The function requires one parameter, the request signing secret, which it uses to enforce that all events are coming from Slack to keep your app secure.
```
const { createMessageAdapter } = require('@slack/interactive-messages');// Read the signing secret from the environment variablesconst slackSigningSecret = process.env.SLACK_SIGNING_SECRET;// Initializeconst slackInteractions = createMessageAdapter(slackSigningSecret);
```
* * *
## Start a server {#start-a-server}
The message adapter transforms incoming HTTP requests into verified and parsed actions, and dispatches actions to the appropriate handler. That means, in order for it dispatch actions for your app, it needs an HTTP server. The adapter can receive requests from an existing server, or as a convenience, it can create and start the server for you.
In the following example, the message adapter starts an HTTP server using the `.start()` method. Starting the server requires a `port` for it to listen on. This method returns a `Promise` which resolves for an instance of an [HTTP server](https://nodejs.org/api/http.html#http_class_http_server) once it's ready to emit events. By default, the built-in server will be listening for events on the path `/slack/actions`, so make sure your Request URL ends with this path.
```
const { createMessageAdapter } = require('@slack/interactive-messages');const slackSigningSecret = process.env.SLACK_SIGNING_SECRET;const slackInteractions = createMessageAdapter(slackSigningSecret);// Read the port from the environment variables, fallback to 3000 default.const port = process.env.PORT || 3000;(async () => { // Start the built-in server const server = await slackInteractions.start(port); // Log a message when the server is ready console.log(`Listening for events on ${server.address().port}`);})();
```
To gracefully stop the server, there's also the `.stop()` method, which returns a `Promise` that resolves when the server is no longer listening.
Using an existing HTTP server
The message adapter can receive requests from an existing Node HTTP server. You still need to specify a port, but this time it's only given to the server. Starting a server in this manner means it is listening to requests on all paths; as long as the Request URL is routed to this port, the adapter will receive the requests.
```
const { createServer } = require('http');const { createMessageAdapter } = require('@slack/interactive-messages');const slackSigningSecret = process.env.SLACK_SIGNING_SECRET;const slackInteractions = createMessageAdapter(slackSigningSecret);// Read the port from the environment variables, fallback to 3000 default.const port = process.env.PORT || 3000;// Initialize a server using the message adapter's request listenerconst server = createServer(slackInteractions.requestListener());server.listen(port, () => { // Log a message when the server is ready console.log(`Listening for events on ${server.address().port}`);});
```
Using an Express app
The message adapter can receive requests from an [Express](http://expressjs.com/) application. Instead of plugging the adapter's request listener into a server, it's plugged into the Express `app`. With Express, `app.use()` can be used to set which path you'd like the adapter to receive requests from. You should be careful about one detail: if your Express app is using the `body-parser` middleware, then the adapter can only work if it comes _before_ the body parser in the middleware stack. If you accidentally allow the body to be parsed before the adapter receives it, the adapter will emit an error, and respond to requests with a status code of `500`.
```
const { createServer } = require('http');const express = require('express');const bodyParser = require('body-parser');const { createMessageAdapter } = require('@slack/interactive-messages');const slackSigningSecret = process.env.SLACK_SIGNING_SECRET;const port = process.env.PORT || 3000;const slackInteractions = createMessageAdapter(slackSigningSecret);// Create an express applicationconst app = express();// Plug the adapter in as a middlewareapp.use('/my/path', slackInteractions.requestListener());// Example: If you're using a body parser, always put it after the message adapter in the middleware stackapp.use(bodyParser());// Initialize a server for the express app - you can skip this and the rest if you prefer to use app.listen()const server = createServer(app);server.listen(port, () => { // Log a message when the server is ready console.log(`Listening for events on ${server.address().port}`);});
```
* * *
## Handle an action {#handle-an-action}
Actions are interactions in Slack that generate an HTTP request to your app. These are:
* **Block actions**: A user interacted with one of the interactive components in a message built with [block elements](/reference/block-kit/block-elements).
* **Message actions**: A user selected an [action in the overflow menu of a message](/interactivity/implementing-shortcuts).
* **Dialog submission**: A user submitted a form in a [modal dialog](/surfaces/modals)
* **Attachment actions**: A user clicked a button or selected an item in a menu in a message built with [legacy message attachments](/legacy/legacy-messaging/legacy-secondary-message-attachments).
You app will only handle actions that occur in messages or dialogs your app produced. [Block Kit Builder](https://api.slack.com/tools/block-kit-builder) is a playground where you can prototype your interactive components with block elements.
Apps register functions, called handlers, to be triggered when an action is received by the adapter using the `.action(constraints, handler)` method. When registering a handler, you describe which action(s) you'd like the handler to match using constraints. Constraints are [described in detail](#constraints) below. The adapter will call the handler whose constraints match the action best.
These handlers receive up to two arguments:
1. `payload`: An object whose contents describe the interaction that occurred. Use the links above as a guide for the shape of this object (depending on which kind of action you expect to be handling).
2. `respond(...)`: A function used to follow up on the action after the 3 second limit. This is used to send an additional message (`in_channel` or `ephemeral`, `replace_original` or not) after some deferred work. This can be used up to 5 times within 30 minutes.
Handlers can return an object, or a `Promise` for a object which must resolve within the `syncResponseTimeout` (default: 2500ms). The contents of the object depend on the kind of action that's being handled.
* **Attachment actions**: The object describes a message to replace the message where the interaction occurred. It's recommended to remove interactive elements when you only expect the action once, so that no other users might trigger a duplicate. If no value is returned, then the message remains the same.
* **Dialog submission**: The object describes [validation errors](/surfaces/modals#displaying_errors) to show the user and prevent the dialog from closing. If no value is returned, the submission is treated as successful.
* **Block actions** and **Message actions**: Avoid returning any value.
```
const { createMessageAdapter } = require('@slack/interactive-messages');const slackSigningSecret = process.env.SLACK_SIGNING_SECRET;const slackInteractions = createMessageAdapter(slackSigningSecret);const port = process.env.PORT || 3000;// Example of handling static select (a type of block action)slackInteractions.action({ type: 'static_select' }, (payload, respond) => { // Logs the contents of the action to the console console.log('payload', payload); // Send an additional message to the whole channel doWork() .then(() => { respond({ text: 'Thanks for your submission.' }); }) .catch((error) => { respond({ text: 'Sorry, there\'s been an error. Try again later.' }); }); // If you'd like to replace the original message, use `chat.update`. // Not returning any value.});// Example of handling all message actionsslackInteractions.action({ type: 'message_action' }, (payload, respond) => { // Logs the contents of the action to the console console.log('payload', payload); // Send an additional message only to the user who made interacted, as an ephemeral message doWork() .then(() => { respond({ text: 'Thanks for your submission.', response_type: 'ephemeral' }); }) .catch((error) => { respond({ text: 'Sorry, there\'s been an error. Try again later.', response_type: 'ephemeral' }); }); // If you'd like to replace the original message, use `chat.update`. // Not returning any value.});// Example of handling all dialog submissionsslackInteractions.action({ type: 'dialog_submission' }, (payload, respond) => { // Validate the submission (errors is of the shape in /surfaces/modals#displaying_errors) const errors = validate(payload.submission); // Only return a value if there were errors if (errors) { return errors; } // Send an additional message only to the use who made the submission, as an ephemeral message doWork() .then(() => { respond({ text: 'Thanks for your submission.', response_type: 'ephemeral' }); }) .catch((error) => { respond({ text: 'Sorry, there\'s been an error. Try again later.', response_type: 'ephemeral' }); });});// Example of handling attachment actions. This is for button click, but menu selection would use `type: 'select'`.slackInteractions.action({ type: 'button' }, (payload, respond) => { // Logs the contents of the action to the console console.log('payload', payload); // Replace the original message again after the deferred work completes. doWork() .then(() => { respond({ text: 'Processing complete.', replace_original: true }); }) .catch((error) => { respond({ text: 'Sorry, there\'s been an error. Try again later.', replace_original: true }); }); // Return a replacement message return { text: 'Processing...' };});(async () => { const server = await slackInteractions.start(port); console.log(`Listening for events on ${server.address().port}`);})();
```
* * *
## Handle an options request {#handle-an-options-request}
Options requests are generated when a user interacts with a menu that uses a dynamic data source. These menus can be inside a block element, an attachment, or a dialog. In order for an app to use a dynamic data source, you must save an **Options Load URL** in the app configuration.
Apps register functions, called handlers, to be triggered when an options request is received by the adapter using the `.options(constraints, handler)` method. When registering a handler, you describe which options request(s) you'd like the handler to match using constraints. Constraints are [described in detail](#constraints) below. The adapter will call the handler whose constraints match the action best.
These handlers receive a single `payload` argument. The `payload` describes the interaction with the menu that occurred. The exact shape depends on whether the interaction occurred within a [block element](/reference/block-kit/block-elements/multi-select-menu-element#external_multi_select), [attachment](/legacy/legacy-messaging/legacy-adding-menus-to-messages), or a [dialog](/legacy/legacy-dialogs).
Handlers can return an object, or a `Promise` for a object which must resolve within the `syncResponseTimeout` (default: 2500ms). The contents of the object depend on where the options request was generated (you can find the expected shapes in the preceding links).
```
const { createMessageAdapter } = require('@slack/interactive-messages');const slackSigningSecret = process.env.SLACK_SIGNING_SECRET;const slackInteractions = createMessageAdapter(slackSigningSecret);const port = process.env.PORT || 3000;// Example of handling options request within block elementsslackInteractions.options({ within: 'block_actions' }, (payload) => { // Return a list of options to be shown to the user return { options: [ { text: { type: 'plain_text', text: 'A good choice', }, value: 'good_choice', }, ], };});// Example of handling options request within attachmentsslackInteractions.options({ within: 'interactive_message' }, (payload) => { // Return a list of options to be shown to the user return { options: [ { text: 'A decent choice', value: 'decent_choice', }, ], };});// Example of handling options request within dialogsslackInteractions.options({ within: 'dialog' }, (payload) => { // Return a list of options to be shown to the user return { options: [ { label: 'A choice', value: 'choice', }, ], };});(async () => { const server = await slackInteractions.start(port); console.log(`Listening for events on ${server.address().port}`);})();
```
* * *
## Handling view submission and view closed interactions {#handling-view-submission-and-view-closed-interactions}
View submissions are generated when a user clicks on the submission button of a [Modal](/surfaces/modals). View closed interactions are generated when a user clicks on the cancel button of a Modal, or dismisses the modal using the `×` in the corner.
Apps register functions, called handlers, to be triggered when a submissions are received by the adapter using the `.viewSubmission(constraints, handler)` method or when closed interactions are received using the `.viewClosed(constraints, handler)` method. When registering a handler, you describe which submissions and closed interactions you'd like the handler to match using constraints. Constraints are [described in detail](#constraints) below. The adapter will call the handler whose constraints match the interaction best.
These handlers receive a single `payload` argument. The `payload` describes the [view submission](/reference/interaction-payloads/view-interactions-payload#view_submission) or [view closed](/reference/interaction-payloads/view-interactions-payload#view_closed) interaction that occurred.
For view submissions, handlers can return an object, or a `Promise` for a object which must resolve within the `syncResponseTimeout` (default: 2500ms). The contents of the object depend on what you'd like to happen to the view. Your app can update the view, push a new view into the stack, close the view, or display validation errors to the user. In the documentation, the shape of the objects for each of those possible outcomes, which the handler would return, are described as `response_action`s. If the handler returns no value, or a Promise that resolves to no value, the view will simply be dismissed on submission.
View closed interactions only occur if the view was opened with the `notify_on_close` property set to `true`. For these interactions the handler should not return a value.
```
const { createMessageAdapter } = require('@slack/interactive-messages');const slackSigningSecret = process.env.SLACK_SIGNING_SECRET;const slackInteractions = createMessageAdapter(slackSigningSecret);const port = process.env.PORT || 3000;// Example of handling a simple view submissionslackInteractions.viewSubmission('simple_modal_callback_id', (payload) => { // Log the input elements from the view submission. console.log(payload.view.state); // The previous value is an object keyed by block_id, which contains objects keyed by action_id, // which contains value properties that contain the input data. Let's log one specific value. console.log(payload.view.state.my_block_id.my_action_id.value); // Validate the inputs (errors is of the shape in /surfaces/modals#displaying_errors) const errors = validate(payload.view.state); // Return validation errors if there were errors in the inputs if (errors) { return errors; } // Process the submission doWork();});// Example of handling a view submission which pushes another view onto the stackslackInteractions.viewSubmission('first_step_callback_id', () => { const errors = validate(payload.view.state); if (errors) { return errors; } // Process the submission (needs to complete under 2.5 seconds) return doWork() .then(() => { return { response_action: 'push', view: { type: 'modal', callback_id: 'second_step_callback_id', title: { type: 'plain_text', text: 'Second step', }, blocks: [ { type: 'input', block_id: 'last_thing', element: { type: 'plain_text_input', action_id: 'text', }, label: { type: 'plain_text', text: 'One last thing...', }, }, ], }, }; }) .catch((error) => { // Log the error. In your app, inform the user of a failure using a DM or some other area in Slack. console.log(error); });});// Example of handling view closedslackInteractions.viewClosed('my_modal_callback_id', (payload) => { // If you accumulated partial state using block actions, now is a good time to clear it clearPartialState();});(async () => { const server = await slackInteractions.start(port); console.log(`Listening for events on ${server.address().port}`);})();
```
* * *
## Handling a global shortcut {#handling-a-global-shortcut}
Shortcuts are invokable UI elements within Slack clients. For [global shortcuts](/interactivity/implementing-shortcuts#global), they are available in the composer and search menus.
Apps register functions, called handlers, to be triggered when an shortcuts request is received by the adapter using the `.shortcut(constraints, handler)` method. When registering a handler, you describe which shortcut request(s) you'd like the handler to match using constraints. Constraints are [described in detail](#constraints) below. The adapter will call the handler whose constraints match the action best.
These handlers receive a single `payload` argument. The `payload` describes the interaction with the menu that occurred. If interested, checkout the shape of the [shortcuts payload](/reference/interaction-payloads/shortcuts-interaction-payload).
Handlers can return a `Promise` which must resolve within the `syncResponseTimeout` (default: 2500ms).
The `.shortcut()` handler currently supports [global shortcuts](/interactivity/implementing-shortcuts#global). [Message shortcuts](/interactivity/implementing-shortcuts#messages) (previously known as message actions) are still handled by the `.action()` handler.
```
const { createMessageAdapter } = require('@slack/interactive-messages');const slackSigningSecret = process.env.SLACK_SIGNING_SECRET;const slackInteractions = createMessageAdapter(slackSigningSecret);const { WebClient } = require('@slack/web-api');const token = process.env.SLACK_ACCESS_TOKEN;const web = new WebClient(token);// Read the port from the environment variables, fallback to 3000 default.const port = process.env.PORT || 3000;// Example of handling a global shortcutslackInteractions.shortcut({ callbackId: 'simple-modal', type: 'shortcut' }, (payload) => { // This example shortcut opens a view (needs to complete under 2.5 seconds) return web.views.open({ token: token, trigger_id: payload.trigger_id, view: { type: "modal", title: { type: "plain_text", text: "My App" }, close: { type: "plain_text", text: "Close" }, blocks: [ { type: "section", text: { type: "mrkdwn", text: "About the simplest modal you could conceive of :smile:\n\nMaybe or ." } }, { type: "context", elements: [ { type: "mrkdwn", text: "Psssst this modal was designed using " } ] } ] } })});(async () => { // Start the built-in server const server = await slackInteractions.start(port); // Log a message when the server is ready console.log(`Listening for events on ${server.address().port}`);})();
```
* * *
## Constraints {#constraints}
Constraints allow you to describe when a handler should be called. In simpler apps, you can use very simple constraints to divide up the structure of your app. In more complex apps, you can use specific constraints to target very specific conditions, and express a more nuanced structure of your app.
Constraints can be a simple string, a `RegExp`, or an object with a number of properties.
Property name
Type
Description
Used with `.action()`
Used with `.options()`
Used with `.viewSubmission()` and `.viewClosed()`
Used with `.shortcut()`
`callbackId`
`string` or `RegExp`
Match the `callback_id` for attachment or dialog
✅
✅
✅
✅
`blockId`
`string` or `RegExp`
Match the `block_id` for a block action
✅
✅
🚫
🚫
`actionId`
`string` or `RegExp`
Match the `action_id` for a block action
✅
✅
🚫
🚫
`type`
any block action element type or `message_actions` or `dialog_submission` or `button` or `select` or `shortcut`
Match the kind of interaction
✅
🚫
🚫
✅
`within`
`block_actions` or `interactive_message` or `dialog`
Match the source of options request
🚫
✅
🚫
🚫
`unfurl`
`boolean`
Whether or not the `button`, `select`, or `block_action` occurred in an App Unfurl
✅
🚫
🚫
🚫
`viewId`
`string`
Match the `view_id` for view submissions
🚫
🚫
✅
🚫
`externalId`
`string` or `RegExp`
Match the `external_id` for view submissions
🚫
🚫
✅
🚫
All of the properties are optional, it's just a matter of how specific you want to the handler's behavior to be. A `string` or `RegExp` is a shorthand for only specifying the `callbackId` constraint. Here are some examples:
```
const { createMessageAdapter } = require('@slack/interactive-messages');const slackSigningSecret = process.env.SLACK_SIGNING_SECRET;const slackInteractions = createMessageAdapter(slackSigningSecret);const port = process.env.PORT || 3000;// Example of constraints for an attachment action with a callback_idslackInteractions.action('new_order', (payload, respond) => { /* ... */ });// Example of constraints for a block action with an action_idslackInteractions.action({ actionId: 'new_order' }, (payload, respond) => { /* ... */ });// Example of constraints for an attachment action with a callback_id patternslackInteractions.action(/order_.*/, (payload, respond) => { /* ... */ });// Example of constraints for a block action with a callback_id patternslackInteractions.action({ actionId: /order_.*/ }, (payload, respond) => { /* ... */ });// Example of constraints for an options request with a callback_id and within a dialogslackInteractions.options({ within: 'dialog', callbackId: 'model_name' }, (payload) => { /* ... */ });// Example of constraints for all actions.slackInteractions.action({}, (payload, respond) => { /* ... */ });(async () => { const server = await slackInteractions.start(port); console.log(`Listening for events on ${server.address().port}`);})();
```
* * *
## Debugging {#debugging}
If you're having difficulty understanding why a certain request received a certain response, you can try debugging your program. A common cause is a request signature verification failing, sometimes because the wrong secret was used. The following example shows how you might figure this out using debugging.
Start your program with the `DEBUG` environment variable set to `@slack/interactive-messages:*`. This should only be used for development/debugging purposes, and should not be turned on in production. This tells the adapter to write messages about what it's doing to the console. The easiest way to set this environment variable is to prepend it to the `node` command when you start the program.
```
$ DEBUG=@slack/interactive-messages:* node app.js
```
`app.js`:
```
const { createMessageAdapter } = require('@slack/interactive-messages');const port = process.env.PORT || 3000;// Oops! Wrong signing secretconst slackInteractions = createMessageAdapter('not a real signing secret');slackInteractions.action({ action_id: 'welcome_agree_button' }, (payload) => { /* Not shown: Record user agreement to database... */ return { text: 'Thanks!', };});(async () => { const server = await slackInteractions.start(port); console.log(`Listening for events on ${server.address().port}`);})();
```
When the adapter receives a request, it will now output something like the following to the console:
```
@slack/interactive-messages:adapter instantiated@slack/interactive-messages:adapter server created - path: /slack/actions@slack/interactive-messages:adapter server started - port: 3000@slack/interactive-messages:http-handler request received - method: POST, path: /slack/actions@slack/interactive-messages:http-handler request signature is not valid@slack/interactive-messages:http-handler handling error - message: Slack request signing verification failed, code: SLACKHTTPHANDLER_REQUEST_SIGNATURE_VERIFICATION_FAILURE@slack/interactive-messages:http-handler sending response - error: Slack request signing verification failed, responseOptions: {}
```
This output tells the whole story of why the adapter responded to the request the way it did. Towards the end you can see that the signature verification failed.
If you believe the adapter is behaving incorrectly, before filing a bug please gather the output from debugging and include it in your bug report.
* * *
## Late response fallback {#late-response-fallback}
Handlers for actions and options requests can return `Promise`s. If those `Promise`s don't resolve within a certain time (2.5 seconds by default - see [`syncResponseTimeout`](#synchronous-response-timeout)), then the adapter will attempt to send the resolved value to the `response_url`, this is called late response fallback. This feature works well for attachment actions since there's no difference between what the `response_url` expects and what the synchronous response contains. However with dialog submission and options requests, the `response_url` expects a message while the return values should contain validation errors or options (respectively). In these cases, late response fallback can cause problems.
You can choose to turn late response fallback off for the entire adapter by setting the `lateResponseFallbackEnabled` option to `false`.
```
const { createMessageAdapter } = require('@slack/interactive-messages');const slackSigningSecret = process.env.SLACK_SIGNING_SECRET;const port = process.env.PORT || 3000;// Turn late response fallback offconst slackInteractions = createMessageAdapter(slackSigningSecret, { lateResponseFallbackEnabled: false,});(async () => { const server = await slackInteractions.start(port); console.log(`Listening for events on ${server.address().port}`);})();
```
When choosing to turn late response fallback off, it's important to stop relying on returning a `Promise` from the handler functions, and instead use the `respond()` argument in your handlers for all deferred (asynchronous) responses.
* * *
## Synchronous response timeout {#synchronous-response-timeout}
The amount of time that the adapter is willing to wait for a `Promise` returned from a handler to resolve, before attempting [late response fallback](#late-response-fallback) is known as the synchronous response timeout. This value is set to 2.5 seconds be default. That value was chosen because Slack will wait a maximum of 3 seconds for interactions to receive a response, and there should be some additional padding for Node's processing time and connection time. Leaving a half second for that overhead is relatively conservative.
You can choose to change the synchronous response timeout for the entire adapter by setting the `syncResponseTimeout` to the number of milliseconds desired.
```
const { createMessageAdapter } = require('@slack/interactive-messages');const slackSigningSecret = process.env.SLACK_SIGNING_SECRET;const port = process.env.PORT || 3000;// Adjust the timeout millis from 2500 (default) to 2800const slackInteractions = createMessageAdapter(slackSigningSecret, { syncResponseTimeout: 2800,});(async () => { const server = await slackInteractions.start(port); console.log(`Listening for events on ${server.address().port}`);})();
```
---
Source: https://docs.slack.dev/tools/node-slack-sdk/migration/migrating-socket-mode-package-to-v2
# Migrating the socket‐mode package to v2.x
This migration guide helps you transition an application written using the `v1.x` series of the `@slack/socket-mode` package to the `v2.x` series. This guide focuses specifically on the breaking changes to help get your existing projects up and running as quickly as possible.
## Installation {#installation}
```
npm i @slack/socket-mode
```
## Breaking Changes {#breaking-changes}
1. Two [Lifecycle Events](https://github.com/slackapi/node-slack-sdk/tree/main/packages/socket-mode#lifecycle-events) have been removed:
* `authenticated`. This event corresponded to the client retrieving a response from the [`apps.connections.open`](/reference/methods/apps.connections.open) Slack API method - but it didn't signal anything about the actual socket connection that matters! If you had been listening to this event, we recommend moving instead to one of these two events:
* `connected`. This signals that the client has established a connection with Slack and has received a `hello` message from the Slack backend. Events will start flowing to your app after this event.
* `connecting`. This signals that the client is about to establish a connection with Slack. If you were using `authenticated` to be notified _before_ the client establishes a connection, we recommend using this event instead.
* `unable_to_socket_mode_start`. This event corresponded to an error happening when attempting to hit the [`apps.connections.open`](/reference/methods/apps.connections.open) Slack API method. We recommend moving instead to `reconnecting` (if you have client reconnections enabled), or the `error` event.
2. Two public properties on the client have been removed: `connected` and `authenticated`. Instead, we recommend migrating to the `isActive()` method to determine whether the WebSocket connection powering the client is healthy.
---
Source: https://docs.slack.dev/tools/node-slack-sdk/migration/migrating-to-v4
# Migrating to v4.x
This migration guide helps you transition an application written using the `v3.x` series of this package, to the `v4.x` series. This guide focuses specifically on the breaking changes to help get your existing app up and running as quickly as possible. In some cases, there may be better techniques for accomplishing what your app already does by utilizing brand new features or new API methods. Learn about all the new features in our [`v4.0.0` release notes](https://github.com/slackapi/node-slack-sdk/releases/tag/v4.0.0) if you'd like to go beyond a simple port.
## WebClient {#webclient}
### Constructor {#constructor}
* The `slackAPIUrl` option has been renamed to `slackApiUrl` to improve readability.
* The `transport` option has been removed. If you used this option to implement proxy support, use the new `agent` option as described [below](#proxy-support-with-agent). If you used this option for setting custom TLS configuration, use the new `tls` option as described [below](#custom-tls-configuration). If you were using this for some other reason, please [open an issue](https://github.com/slackapi/node-slack-sdk/issues/new) and describe your use case so we can help you migrate.
### All methods {#all-methods}
All Web API methods no longer take positional arguments. They each take one argument, an object, in which some properties are required and others are optional (depending on the method). You no longer have to memorize or look up the order of the arguments. The method arguments are described in the [API method documentation](/reference/methods). If you are using an editor that understands TypeScript or JSDoc annotations, your editor may present you with useful information about these arguments as you type.
If any Web API method is called with a callback parameter, and the call results in an error from the platform, you will no longer get the platform's response as the second argument to the callback. Instead, that response will exist as the `.data` property on the first argument (the error). You can consolidate this logic by using Promises instead (or continue to use callbacks if you prefer).
**Before:**
```
const { WebClient } = require('@slack/client')const web = new WebClient(token);web.chat.postMessage(channelId, text, { as_user: true, parse: 'full' }, (error, resp) => { if (error) { if (resp) { // a platform error occurred, `resp.error` contains the error information } // some other error occurred return; } // success});
```
**After:**
```
// a new export, ErrorCode, is a dictionary of known error typesconst { WebClient, ErrorCode } = require('@slack/client')const web = new WebClient(token);web.chat.postMessage({ channel: channelId, text, as_user: true, parse: 'full' }) .then((resp) => { /* success */ }) .catch((error) => { if (error.code === ErrorCode.PlatformError) { // a platform error occurred, `error.message` contains error information, `error.data` contains the entire resp } else { // some other error occurred } });
```
### dm methods {#dm-methods}
This family of methods was always a duplicate of those under the `.im` family. These duplicates have been removed.
### mpdm methods {#mpdm-methods}
This family of methods was always a duplicate of those under the `.mpim` family. These duplicates have been removed.
## RTMClient {#rtmclient}
The top-level export name has changed from `RtmClient` to `RTMClient`.
### Constructor {#constructor-1}
* The `slackAPIUrl` option has been renamed to `slackApiUrl` to improve readability.
* The `dataStore` option has been removed.
* The `useRtmConnect` option now has a default value of `true`. We recommend querying for additional data using a `WebClient` after this client is connected. If that doesn't help, then you can set this option to `false`.
* The `socketFn` option has been removed. If you used this option to implement proxy support, use the new `agent` option as described [below](#proxy-support-with-agent). If you used this option for setting custom TLS configuration, use the new `tls` option as described [below](#custom-tls-configuration). If you were using this for some other reason, please [open an issue](https://github.com/slackapi/node-slack-sdk/issues/new) and describe your use case so we can help you migrate.
* The `wsPingInterval` and `maxPongInterval` options have been replaced with `clientPingTimeout` and `serverPongTimeout`. Most likely, you can replace these values respectively, or drop using them all together.
### dataStore {#datastore}
The v3.15.0 release of `@slack/client` has deprecated use of the `SlackDataStore` interface and its implementations (including `SlackMemoryDataStore`). In v4.0.0 ([release milestone](https://github.com/slackapi/node-slack-sdk/milestone/2)), these types and APIs have been removed.
The datastore APIs have helped apps keep track of team state since this feature was released. But as the Slack platform has evolved, the model has become out of date in tricky and unexpected ways. The data store was designed to behave like the Slack web and desktop applications, managing the type of state that a logged in human user would typically need. But bots and Slack apps have a whole new (and more powerful in many ways) perspective of the world!
At a high level, here are the design issues that could not be addressed in a backwards compatible way:
* **Synchronous calling convention** - In order to plug in storage destinations other than memory (`SlackMemoryDataStore`), the code to reach that destination would need to be asynchronous. This is important if you want to share state across many processes while horizontally scaling an app. As a result, the maintainers have never seen an implementation of the `SlackDataStore` interface other than the memory-based one provided.
* **Names versus IDs** - While we always thought it was a good idea to use IDs anywhere possible in programmatic use, the Slack platform wasn't overly strict about it. With the introduction of Shared Channels, we cannot preserve any guarantees of uniqueness for usernames, as we mentioned in this [changelog entry](/changelog/2017-09-the-one-about-usernames). In fact, channel names also lose these types of guarantees. The APIs in the `SlackDataStore` that operate on names instead of IDs start to break since the fundamental assumptions are not true anymore.
* **Missing Users** - We want the SDK to be clear and easy to use across many use cases, including applications developed for Enterprise Grid and Shared Channels. In this context, an application is likely to receive events from users it does not recognize and for whom it cannot get more information. `SlackDataStore` cannot deal with these scenarios. If your application has more than one RTM client connected to different workspaces, and those workspaces are joined by a shared channel, there is no general purpose way to deduplicate the messages and arrive at a consistent deterministic state. The Slack platform has solved for this issue using the Events API (which deduplicates events on your app's behalf).
For the full discussion, see [#330](https://github.com/slackapi/node-slack-sdk/issues/330).
When you initialize an `RtmClient` object, turn on the `useRtmConnect` option and turn off the `dataStore` option as below:
```
const { RtmClient } = require('@slack/client');const rtm = new RtmClient('your-token-here', { useRtmConnect: true, dataStore: false,});
```
Next look through your code for any places you might reference the `.dataStore` property of the `RtmClient`. In most cases, you'll be able to replace finding data in the dataStore with finding that data using a `WebClient`.
```
const { RtmClient, WebClient } = require('@slack/client');const web = new WebClient('your-token-here');// Before:// const channel = rtm.dataStore.getChannelById(channelId);// console.log(`channel info: ${JSON.stringify(channel)}`);// After:web.conversations.info(channelId) .then(resp => console.log(`channel info: ${JSON.stringify(resp.channel)}`) .catch(error => /* TODO: handle error */);
```
If you aren't sure how to translate a specific data store method into a Web API call, file a new `question` issue and we will help you figure it out.
You'll notice that this code has become asynchronous. This will likely be the largest challenge in migrating away from the data store, but for most developers it will be worth it.
For the majority of apps, you will be ready for v4 at this point. If your app is having performance related issues, there's room to make improvements by caching the data that is relevant to your app. This should only be taken on if you believe it's necessary, since cache invalidation is one of the [only two hard things in computer science](https://martinfowler.com/bliki/TwoHardThings.html).
The approach for caching data that we recommend is to pick out the data your app needs, store it at connection time, and update it according to a determined policy. You may want to disable the `useRtmConnect` option in order to get more data at connection time.
### reconnect() {#reconnect}
This method has been removed, but it can be substituted by using `disconnect()`, waiting for the `disconnected` event, and then calling `start(options)`. Reconnecting using the method was rarely used by developers, and its implementation increased the complexity of state management in the client.
**Before:**
```
rtm.reconnect();
```
**After:**
```
rtm.disconnect();// You will need to store the start options from the first time you connect and then reuse them here.rtm.once('disconnected', () => rtm.start(options));
```
### updateMessage() {#updatemessage}
This method has been removed from the `RTMClient`, but can be substituted by using the `WebClient`.
**Before:**
```
const message = { ts: '999999999.0000000', channel: 'C123456', text: 'updated message text' };rtm.updateMessage(message).then(console.log);
```
**After:**
```
// We recommend that you initialize this object at the same time you would have initialized the RTMClientconst web = new WebClient(token);const message = { ts: '999999999.0000000', channel: 'C123456', text: 'updated message text' };web.chat.update(message).then(console.log);
```
### send() {#send}
This method has be repurposed, and in most cases you will instead rely on `addOutgoingEvent(awaitReply, type, body)`.
The main difference is that if you want to know when the message is acknowledged by the server (you were using the optional callback parameter to `send()`), you'll only be able to do so using the returned Promise. If you prefer callbacks, you can translate the interface using a library like Bluebird (see: [http://bluebirdjs.com/docs/api/ascallback.html](http://bluebirdjs.com/docs/api/ascallback.html)) or the Node [`util.callbackify()`](https://nodejs.org/api/util.html#util_util_callbackify_original) since v8.2.0.
As an added benefit, you will be able to send the message without worrying whether the client is in a connected state or not.
**Before:**
```
const message = { type: 'message_type', key: 'value', foo: 'bar' };rtm.send(message, (error, resp) => { if (error) { // error handling return; } // success handling});
```
**After:**
```
const message = { type: 'message_type', key: 'value', foo: 'bar' };rtm.addOutgoingEvent(true, message.type, message) .then((resp) => { // success handling }) .catch((error) => { // error handling });
```
### Events {#events}
The `RTMClient` now has more well-defined states (and substates) that you may observe using the [`EventEmitter` API pattern](https://nodejs.org/api/events.html). The following table helps describe the relationship between events in the `v3.x` series and events in the `v4.x` series.
Event Name (`v4.x`)
Event Name (`v3.x`)
Description
`disconnected`
`disconnect`
The client is not connected to the platform. This is a steady state - no attempt to connect is occurring.
`connecting`
`connecting` / `attempting_reconnect`
The client is in the process of connecting to the platform.
`authenticated`
`authenticated`
The client has authenticated with the platform. The `rtm.connect` or `rtm.start` response is emitted as an argument. This is a sub-state of `connecting`.
`connected`
The client is connected to the platform and incoming events will start being emitted.
`ready`
`open`
The client is ready to send outgoing messages. This is a sub-state of `connected`
`disconnecting`
The client is no longer connected to the platform and cleaning up its resources. It will soon transition to `disconnected`.
`reconnecting`
The client is no longer connected to the platform and cleaning up its resources. It will soon transition to `connecting`.
`error`
`ws_error`
An error has occurred. The error is emitted as an argument. The `v4` event is a super set of the `v3` event. To test whether the event is a websocket error, check `error.code === ErrorCodes.RTMWebsocketError`
`unable_to_rtm_start`
`unable_to_rtm_start`
A problem occurred while connecting, a reconnect may or may not occur. Use of this event is discouraged since `disconnecting` and `reconnecting` are more meaningful.
`slack_event`
An incoming Slack event has been received. The event type and event body are emitted as the arguments.
`{type}`
`{type}`
An incoming Slack event of type `{type}` has been received. The event is emitted as an argument. An example is `message` for all message events
`{type}::{subtype}`
`{type}::{subtype}`
An incoming Slack event of type `{type}` and subtype `{subtype}` has been received. The event is emitted as an argument. An example is `message::bot_message` for all bot messages.
`raw_message`
`raw_message`
A websocket message arrived. The message (unparsed string) is emitted as an argument. Use of this event is discouraged since `slack_event` is more useful.
`ws_opening`
This event is no longer emitted, and the state of the underlying websocket is considered private.
`ws_opened`
This event is no longer emitted, and the state of the underlying websocket is considered private.
`ws_close`
This event is no longer emitted, and the state of the underlying websocket is considered private.
## Incoming webhooks {#incoming-webhooks}
* The following options have been renamed:
* `iconEmoji` => `icon_emoji`
* `iconUrl` => `icon_url`
* `linkNames` => `link_names`
* `unfurlLinks` => `unfurl_links`
* `unfurlMedia` => `unfurl_media`
## Removed constants {#removed-constants}
The `CLIENT_EVENTS`, `RTM_EVENTS` and `RTM_MESSAGE_SUBTYPES` constants have been removed. We recommend using simple strings for event names. The values that were in `CLIENT_EVENTS` have been migrated according to the [events table above](#events). The `RTM_EVENTS` dictionary isn't necessary, just directly subscribe to the event name as a string.
**Before:**
```
rtm.on(CLIENT_EVENTS.RTM.AUTHENTICATED, (connectionData) => { console.log('RTMClient authenticated');});rtm.on(RTM_EVENTS.MESSAGE, (event) => { console.log(`Incoming message: ${event.ts}`);})
```
**After:**
```
rtm.on('authenticated', (connectionData) => { console.log('RTMClient authenticated');});rtm.on('message', (event) => { console.log(`Incoming message: ${event.ts}`);})
```
## RETRY_POLICIES {#retry_policies}
The names of these policies have slightly changed for more consistency with our style guide. The dictionary of policies is now exported under the name `retryPolicies`. See `src/retry-policies.ts` for details.
## Proxy support with agent {#proxy-support-with-agent}
In order to pass outgoing requests from `WebClient` or `RTMClient` through an HTTP proxy, you'll first need to install an additional package in your application:
```
$ npm install --save https-proxy-agent
```
Next, use the `agent` option in the client constructor to configure with your proxy settings.
```
const HttpsProxyAgent = require('https-proxy-agent');const { WebClient, RTMClient } = require('@slack/client');// in this example, we read the token from an environment variable. It's best practice to keep sensitive data outside// your source code.const token = process.env.SLACK_TOKEN;// it's common to read the proxy URL from an environment variable, since it also may be sensitive.const proxyUrl = process.env.http_proxy || 'http://12.34.56.78:9999';// To use Slack's Web API:const web = new WebClient(token, { agent: new HttpsProxyAgent(proxyUrl) });// To use Slack's RTM API:const rtm = new RTMClient(token, { agent: new HttpsProxyAgent(proxyUrl) });// NOTE: for a more complex proxy configuration, see the https-proxy-agent documentation:// https://github.com/TooTallNate/node-https-proxy-agent#api
```
## Custom TLS configuration {#custom-tls-configuration}
You may want to use a custom TLS configuration if your application needs to send requests through a server with a self-signed certificate.
Example:
```
const { WebClient, RTMClient } = require('@slack/client');// in this example, we read the token from an environment variable. it's best practice to keep sensitive data outside// your source code.const token = process.env.SLACK_TOKEN;// Configure TLS optionsconst tls = { key: fs.readFileSync('/path/to/key'), cert: fs.readFileSync('/path/to/cert'), ca: fs.readFileSync('/path/to/cert'),};const web = new WebClient(token, { slackApiUrl: 'https://fake.slack.com/api', tls });const rtm = new RTMClient(token, { slackApiUrl: 'https://fake.slack.com/api', tls });
```
---
Source: https://docs.slack.dev/tools/node-slack-sdk/migration/migrating-to-v5
# Migrating to v5.x
This tutorial will guide you through the process of updating your app from using the `@slack/client` package (`v4.x`) to using the new, improved, and independent packages, starting with `v5.0.0`.
If you were not using any deprecated features, this should only take a couple minutes.
If you were using the `@slack/events-api` or `@slack/interactive-messages` packages, this migration doesn't affect your app
Those packages only moved repositories, but did not get updated in this process. You're done!
## Update to a supported version of Node {#update-to-a-supported-version-of-node}
These packages have dropped support for versions of Node that are no longer supported. We recommend updating to the latest LTS version of [Node](https://nodejs.org/en/), which at this time is v10.15.3. The minimum supported version is v8.9.0.
Learn more about our [support schedule](/tools/node-slack-sdk/support-schedule) so that you can prepare and plan for future updates.
## Choose the right packages {#choose-the-right-packages}
In `v4.x` versions, the package came with a few classes. If your app only needed one or two of these classes, then downloading the whole package needlessly increased the size of your dependencies. Your app no longer has to download or import the code it won't be using.
Identify which classes your app imported from `@slack/client`. The following table helps you choose and install the right package(s) for your app, depending on which classes the app used.
Class name
Command to install
Changes
`WebClient`
`npm install @slack/web-api`
[`WebClient` changes](#webclient)
`RTMClient`
`npm install @slack/rtm-api`
[`RTMClient` changes](#rtmclient)
`IncomingWebhook`
`npm install @slack/webhook`
[`IncomingWebhook` changes](#incomingwebhook)
After you've installed the right package(s), remove `@slack/client` with the following command:
```
$ npm uninstall @slack/client
```
Next, change all the `require()` or `import` statements from using the `@slack/client` name, to the name of the new package. For example:
```
// Before:const { WebClient } = require('@slack/client');// After:const { WebClient } = require('@slack/web-api');
```
Finally, apply the changes for the individual classes used in your app in the sections below.
**Shortcut**: While we recommend migrating to the individual packages as soon as possible, one way to ease into the process is to update the `@slack/client` dependency in your app to `v5.0.0`. This version just imports the `@slack/web-api`, `@slack/rtm-api`, and `@slack/webhook` packages, and re-exports the same classes as the `v4.x` versions. The breaking changes below would still need to be addressed, but this sames you the time of adjusting all your `require()` statements. If you were already avoiding deprecated features, your app will likely just run at that point! Once you've adjusted for any breaking changes, we still recommend that you follow up by migrating to the individual packages, as they are lighter and will save you time and disk space when you install your dependencies the next time.
## WebClient {#webclient}
### Callbacks to Promises {#callbacks-to-promises}
The `WebClient` no longer supports callback functions to receive results and errors of API method calls. We recommend that you migrate to using `Promise`s and `async` functions instead. Using `Promise`s can simplify your code by reducing nesting, generally referred to as "the pyramid of doom".
Before:
```
// Making a Web API call with a callbackweb.chat.postMessage({ text: 'Hello', channel: 'C123456' }, (error, result) => { // Error handling if (error) { console.log(error); return; } // Using the result console.log(result); // Making another Web API call web.users.list({}, (error, result) => { // More error handling if (error) { console.log(error); return; } // Using the second result console.log(result); });});
```
After:
```
// Wrap in an async function(async () => { try { // First API call const result = await web.chat.postMessage({ text: 'Hello', channel: 'C123456' }); // Use first result console.log(result); // Second API call const result2 = await web.users.list(); // Use second result console.log(result2); } catch (error) { // Only handle errors once }})();
```
If you prefer to still use callbacks, Node ships with a [`util.callbackify()`](https://nodejs.org/api/util.html#util_util_callbackify_original), which can be used to wrap method calls so that there's no need to deal with `Promise`s.
After:
```
const { callbackify } = require('util');// Wrap Promise returning function to make a callback accepting functionconst chatPostMessage = callbackify(web.chat.postMessage);chatPostMessage({ text: 'Hello', channel: 'C123456' }, (error, result) => { // Normal callback with error-first});
```
### Response metadata {#response-metadata}
If your app read the `scopes`, `acceptedScopes`, or `retryAfter` values from the result of an API call, those values have been moved, just slightly, to properties of the `response_metadata`.
Before:
```
(async () => { const result = await web.chat.postMessage({ text: 'Hello', channel: 'C123456' }); // These values were properties of the result console.log(result.scopes); console.log(result.acceptedScopes); console.log(result.retryAfter);})();
```
After:
```
(async () => { const result = await web.chat.postMessage({ text: 'Hello', channel: 'C123456' }); // Now they are properties of `response_metadata` console.log(result.response_metadata.scopes); console.log(result.response_metadata.acceptedScopes); console.log(result.response_metadata.retryAfter);})();
```
### Simplified agent option {#simplified-agent-option}
If your app is using the `agent` option and it's working, it's most likely going to continue to work.
Only if your app set the `agent` option to an object with an `http` or an `https` property, you should consolidate the value by only using the value of the `https` property. This is a simplified design, because only the `https` value would have been used when both were defined anyway.
Before:
```
const web = new WebClient(token, { // An agent with both the `http` and `https` property defined agent: { http: proxyAgent, https: proxyAgent, },});
```
After:
```
const web = new WebClient(token, { // Consolidated into one value agent: proxyAgent,});
```
### Removed methods {#removed-methods}
The `files.comments.add` and `files.comments.edit` named methods were removed. If you still need to use them, you can use the `.apiCall(methodName, options)` method instead, but we recommend that you instead use [threaded messages](/changelog/2018-05-file-threads-soon-tread) instead of file comments.
All named methods in the `apps.*` family of methods were removed. Again, you can use the the `.apiCall(methodName, options)` method instead, but [we recommend migrating your app](https://medium.com/slack-developer-blog/an-update-on-workspace-apps-aabc9e42a98b) to using bot tokens instead of building workspace apps.
### Token rotation {#token-rotation}
Workspace apps allowed for short-lived tokens that the `WebClient` could automatically refresh. This required initializing the `WebClient` with a `clientId`, `clientSecret`, and `refreshToken`. Since workspace apps are no longer supported, this functionality has been removed. We recommend [migrating your app](https://medium.com/slack-developer-blog/an-update-on-workspace-apps-aabc9e42a98b) to using bot tokens instead of building workspace apps.
### Error code changes {#error-code-changes}
The string values of error codes in `ErrorCode` export have changed. If your app compares the `error.code` with a string literal, you need to update that code. Instead, compare with a property of the export such as `ErrorCode.RequestError`.
If your app used the `ErrorCode.WebAPICallReadError` export to compare with `error.code`, you can remove this comparison. The `WebAPICallReadError` was never used by the `WebClient`.
### Logger objects {#logger-objects}
If your app set the `logger` option to a function, you need to update the code to instead use an object with methods for each log level. See details in [the logging documentation](/tools/node-slack-sdk/web-api#logging).
### New retry policies {#new-retry-policies}
If your app used the `retryPolicies` export from `@slack/client`, you need to adjust your code. The values have [been renamed](https://github.com/slackapi/node-slack-sdk/issues/734).
## RTMClient {#rtmclient}
### Callbacks to Promises {#callbacks-to-promises-1}
The `RTMClient` no longer supports callback functions to receive results and errors of `.sendMessage()`. We recommend that you migrate to using `Promise`s and `async` functions instead. Using `Promise`s can simplify your code by reducing nesting, generally referred to as "the pyramid of doom".
Before:
```
// Sending a message using a callbackrtm.sendMessage('Hello', 'C123456', (error, reply) => { // Handle error if (error) { console.log(error) return; } // Use result console.log(reply);});
```
After:
```
(async () => { try { const reply = await rtm.sendMessage('Hello', 'C123456'); // Use result console.log(reply); } catch (error) { // Handle error console.log(error); }})();
```
### Raw messages {#raw-messages}
If your app was listening for the `raw_message` event, you should update the code to instead use the `slack_event` event. The `raw_message` event emitted a string, which was encoded in JSON, so you typically needed to parse it. The `slack_event` event emits an object, which is already parsed, so you can skip calling `JSON.parse(event)`.
### Simplified agent option {#simplified-agent-option-1}
If your app is using the `agent` option and it's working, it's most likely going to continue to work.
Only if your app set the `agent` option to an object with an `http` or an `https` property, you should consolidate the value by only using the value of the `https` property. This is a simplified design, because only the `https` value would have been used when both were defined anyway.
Before:
```
const rtm = new RTMClient(token, { // An agent with both the `http` and `https` property defined agent: { http: proxyAgent, https: proxyAgent, },});
```
After:
```
const rtm = new RTMClient(token, { // Consolidated into one value agent: proxyAgent,});
```
### Error code changes {#error-code-changes-1}
The `RTM` prefix from the property names of `ErrorCode` have been removed. For example, `ErrorCode.RTMWebsocketError` is now `ErrorCode.WebsocketError`.
The string values of error codes in `ErrorCode` export have changed. If your app compares the `error.code` with a string literal, you need to update that code. Instead, compare with a property of the export such as `ErrorCode.WebsocketError`.
### Logger objects {#logger-objects-1}
If your app set the `logger` option to a function, you need to update the code to instead use an object with methods for each log level. See details in [the logging documentation](/tools/node-slack-sdk/rtm-api#logging).
## IncomingWebhook {#incomingwebhook}
### Callbacks to Promises {#callbacks-to-promises-2}
The `IncomingWebhook` no longer supports callback functions to receive results and errors of `.send()`. We recommend that you migrate to using `Promise`s and `async` functions instead. Using `Promise`s can simplify your code by reducing nesting, generally referred to as "the pyramid of doom".
Before:
```
// Sending a message using a callbackwebhook.send('Hello', (error, reply) => { // Handle error if (error) { console.log(error) return; } // Use result console.log(reply);});
```
After:
```
(async () => { try { const reply = await webhook.send('Hello'); // Use result console.log(reply); } catch (error) { // Handle error console.log(error); }})();
```
### Simplified agent option {#simplified-agent-option-2}
If your app is using the `agent` option and it's working, it's most likely going to continue to work.
Only if your app set the `agent` option to an object with an `http` or an `https` property, you should consolidate the value by only using the value of the `https` property. This is a simplified design, because only the `https` value would have been used when both were defined anyway.
Before:
```
const webhook = new IncomingWebhook(token, { // An agent with both the `http` and `https` property defined agent: { http: proxyAgent, https: proxyAgent, },});
```
After:
```
const webhook = new IncomingWebhook(token, { // Consolidated into one value agent: proxyAgent,});
```
### Error code changes {#error-code-changes-2}
The `IncomingWebhook` prefix from the property names of `ErrorCode` have been removed. For example, `ErrorCode.IncomingWebhookRequestError` is now `ErrorCode.RequestError`.
The string values of error codes in `ErrorCode` export have changed. If your app compares the `error.code` with a string literal, you need to update that code. Instead, compare with a property of the export such as `ErrorCode.RequestError`.
---
Source: https://docs.slack.dev/tools/node-slack-sdk/migration/migrating-to-v6
# Migrating to v6.x
The following packages have been updated in the release being dubbed as `v6`:
* `@slack/web-api@6.0.0`
* `@slack/rtm-api@6.0.0`
* `@slack/webhook@6.0.0`
* `@slack/oauth@2.0.0`
* `@slack/interactive-messages@2.0.0`
* `@slack/events-api@3.0.0`
* `@slack/types@2.0.0`
* `@slack/logger@3.0.0`
* `@slack/socket-mode@1.0.0`
To migrate to the latest packages, updating your minimum Node.js to `12.13.0` is all that is required, except for `@slack/oauth` which has one additional breaking change. This migration should take less than 15 minutes.
### Minimum Node Version {#minimum-node-version}
Our newly released major versions all require a minimum Node version of `12.13.0` and minimum npm version of `6.12.0`.
Learn more about our [support schedule](/tools/node-slack-sdk/support-schedule) so that you can prepare and plan for future updates.
### Minimum TypeScript Version {#minimum-typescript-version}
Our newly released major versions all require a minimum TypeScript version of `4.1`.
### Org Wide App Installation changes to InstallationStore in @slack/oauth {#org-wide-app-installation-changes-to-installationstore-in-slackoauth}
In [`@slack/oauth@1.4.0`](https://github.com/slackapi/node-slack-sdk/releases/tag/%40slack%2Foauth%401.4.0), we introduced support for [org wide app installations](/enterprise/organization-ready-apps). To add support to your applications, two new methods were introduced to the Installation Store used during OAuth, `fetchOrgInstallation` & `storeOrgInstallation`. With `@slack/oauth@2.0.0`, we have dropped support for these two new methods for a simpler interface. See the code samples below for the recommended changes to migrate.
Before:
```
installationStore: { storeInstallation: async (installation) => { // change the line below so it saves to your database return await database.set(installation.team.id, installation); }, fetchInstallation: async (installQuery) => { // change the line below so it fetches from your database return await database.get(installQuery.teamId); }, storeOrgInstallation: async (installation) => { // include this method if you want your app to support org wide installations // change the line below so it saves to your database return await database.set(installation.enterprise.id, installation); }, fetchOrgInstallation: async (installQuery) => { // include this method if you want your app to support org wide installations // change the line below so it fetches from your database return await database.get(installQuery.enterpriseId); }, },
```
After:
```
installationStore: { storeInstallation: async (installation) => { if (installation.isEnterpriseInstall) { // support for org wide app installation return await database.set(installation.enterprise.id, installation); } else { // single team app installation return await database.set(installation.team.id, installation); } throw new Error('Failed saving installation data to installationStore'); }, fetchInstallation: async (installQuery) => { // replace database.get so it fetches from your database if (installQuery.isEnterpriseInstall && installQuery.enterpriseId !== undefined) { // org wide app installation lookup return await database.get(installQuery.enterpriseId); } if (installQuery.teamId !== undefined) { // single team app installation lookup return await database.get(installQuery.teamId); } throw new Error('Failed fetching installation'); }, },
```
### Deprecating @slack/events-api & @slack/interactive-messages packages {#deprecating-slackevents-api--slackinteractive-messages-packages}
`@slack/events-api` and `@slack/interactive-messages`are now deprecated and have reached end of life. Development has fully stopped for these packages and all remaining open issues and pull requests have been closed. Bolt for JavaScript can now perform all the same functionality as these packages. We think you’ll love the more modern set of features you get in Bolt. Here are some migration examples:
Before:
```
// @slack/events-apislackEvents.on('app_home_opened', (event) -> {// fired when `app_home_opened` event is received// do work});// @slack/interactive-messagesslackInteractions.action({actionId: 'buttonActionId'}, (payload, respond) => {// fired when a clicked button's actionId matches// do workrespond();});
```
After:
```
// @slack/boltapp.event('app_home_opened', async ({ event }) -> {// fired when `app_home_opened` event is received// do work});// @slack/boltapp.action('buttonActionId', async ({ action, ack }) => {// fired when a clicked button's actionId matches// do workawait ack();});// @slack/bolt also has listeners for options, view, slash commands and shortcuts
```
---
Source: https://docs.slack.dev/tools/node-slack-sdk/migration/migrating-web-api-package-to-v7
# Migrating the web-api package to v7.x
This migration guide helps you transition an application written using the `v6.x` series of the `@slack/web-api` package to the `v7.x` series. This guide focuses specifically on the breaking changes to help get your existing app up and running as quickly as possible.
## Installation {#installation}
```
npm i @slack/web-api
```
## @slack/web-api v7 Changes {#slackweb-api-v7-changes}
**TL;DR**: this package now supports only node v18 and newer, and HTTP API arguments passed to methods in this project in the context of a TypeScript project are stricter.
This release focuses on the type safety of Slack HTTP API method arguments provided by `@slack/web-api`. If you use this package in a TypeScript project, many of the HTTP API methods now have stricter argument typing, which hopefully helps guide developers towards proper argument usage for Slack's HTTP API methods.
**If you use this package in a JavaScript project, no such guidance is provided and the breaking changes listed below do not apply to you.**
This release broadly is composed of five significant changes to the `web-api` codebase:
1. ⬆️ The minimum supported (and thus tested) version of node.js is now v18,
2. 🚨 Breaking changes to API method arguments for TypeScript users (_not_ for JavaScript users),
3. 🧹 We deprecated a few sets of methods that are on their way out,
4. 📝 Added a _ton_ of new hand-written JSDocs to provide useful method-specific context and descriptions directly in your IDE, and
5. 🧑🔬 Type tests for method arguments, formalizing some of the co-dependencies and constraints unique to specific API methods
Let's dive into these three sets of changes and begin with the 🚨 Breaking Changes 🚨 to make sure we set you all up for success and an easy migration to v7.
## Breaking Changes (TypeScript users only) {#breaking-changes-typescript-users-only}
### All Web API methods no longer allow arbitrary arguments {#all-web-api-methods-no-longer-allow-arbitrary-arguments}
Previously, the arguments provided to specific methods extended from a [`WebAPICallOptions` TypeScript interface](https://github.com/slackapi/node-slack-sdk/blob/main/packages/web-api/src/WebClient.ts#L68-L70). This interface made all API arguments effectively type un-safe: you could place whatever properties you wanted on arguments, and the TypeScript compiler would be fine with it.
In v7, in an attempt to improve type safety, we have removed this argument. As a result, if you were using unknown or publicly undocumented API arguments, you will now see a TypeScript compiler error. If you _really_ want to send unsupported arguments to our APIs, you will have to tell TypeScript "no, trust me, I really want to do this" using [the `// @ts-expect-error` directive](https://www.typescriptlang.org/docs/handbook/release-notes/typescript-3-9.html#-ts-expect-error-comments).
If you find an issue with any of our method arguments, please let us know by [filing an issue in this project](https://github.com/slackapi/node-slack-sdk/issues/new/choose)!
### Many Web API methods have new, sometimes quite-specific, type constraints {#many-web-api-methods-have-new-sometimes-quite-specific-type-constraints}
Another change that only affects TypeScript projects. A full and detailed list of changes is at the end of this document, with migration steps where applicable.
## Deprecating some methods {#deprecating-some-methods}
The following sets of methods have been deprecated and will be removed in a future major version of `@slack/web-api`:
* `channels.*`
* `groups.*`
* `im.*`
* `mpim.*`
Generally, all of the above methods have equivalents available under the `conversations.*` APIs.
## Adding JSDoc to methods and method arguments {#adding-jsdoc-to-methods-and-method-arguments}
This one benefits both TypeScript and JavaScript users! Both API methods and API arguments are exhaustively documented with JSDoc. It includes the API method descriptions, mimicking the hand-written docs we have on /reference/methods, as well as documenting each API argument and linking to relevant contextual documentation where applicable.
## Type tests for method arguments {#type-tests-for-method-arguments}
All of the above-mentioned new TypeScript API argument constraints are exhaustively tested under `test/types/methods`. When in doubt, read these tests to understand exactly what combination of arguments are expected to raise a TypeScript error, and which ones are not.
## TypeScript API argument changes {#typescript-api-argument-changes}
Many of the API argument changes follow a similar pattern. Previously, API arguments would be modeled as a 'bag of optional arguments.' While this was a decent approach to at least surface what arguments were available, they did not model certain arguments _well_. In particular, API arguments that had either/or-style constraints (e.g. `chat.postMessage` accepts _either_ `channel` and `blocks` _or_ `channel` and `attachments` - but never all three) could not be modeled with this approach. This could lead developers to a situation where, at runtime, they would get error responses from Slack APIs when using a combination of arguments that were unsupported.
Moving forward, all of our APIs were exhaustively tested and the arguments to them modeled in such a way that would prevent TypeScript developers from using the APIs with an unsupported combination of arguments - ideally preventing ever encountering these avoidable runtime errors.
Without further ado, let's dive in the changes for each API:
## admin.analytics.getFile {#adminanalyticsgetfile}
Previously, most arguments to this API were optional. Now, the specific combinations of `type`, `date` and `metadata_only` are [more strictly typed to ensure only valid combinations are possible](https://github.com/slackapi/node-slack-sdk/pull/1673/files?diff=unified&w=0#diff-49ab2c95a2115046c53fe532bcd82a4e52434c16fbf1a7fdab08a764321ac0cdR44).
## admin.apps.* {#adminapps}
You can no longer provide _both_ `request_id` and `app_id` - these APIs will only accept one of these arguments. Similarly for `enterprise_id` and `team_id` - only one can be provided, and one of them is required as well.
### admin.apps.activities.list {#adminappsactivitieslist}
* `component_type` is no longer any `string`, but rather it must be one of: `events_api`, `workflows`, `functions`, `tables`
* `min_log_level` is no longer any `string`, but rather it must be one of: `trace`, `debug`, `info`, `warn`, `error`, `fatal`
* `sort_direction` is no longer any `string`, but rather it must be one of: `asc`, `desc`
* `source` is no longer any `string`, but rather it must be one of: `slack`, `developer`
## admin.auth.* {#adminauth}
* `entity_type` is no longer any `string` and is now an enum that only accepts the only valid value: `USER`
* `policy_name` is no longer any `string` and is now an enum that only accepts the only valid value: `email_password`
## admin.barriers.* {#adminbarriers}
The `restricted_subjects` array is no longer a `string[]` but enforces an array with the exact values `['im', 'mpim', 'call']` - which these APIs demand (see e.g. [`admin.barriers.create` usage info](/reference/methods/admin.barriers.create)).
## admin.conversations.* {#adminconversations}
* The `channel_ids` parameter now must be passed at least one channel ID - no more empty arrays allowed!
* Similarly, `team_ids` must be passed at least one team ID. Empty arrays: no good.
* This might sound familiar, but `user_ids` must be passed at least one user ID. Keeping it consistent around here, folks.
* The `org_wide` and `team_id` parameters influence one another: if `org_wide` is true, `team_id` must not be provided. Conversely, if `team_id` is provided, `org_wide` should be omitted, or, if you really want to include it, it must be `false`. Previously, both properties were simply optional.
### admin.conversations.search {#adminconversationssearch}
The `search_channel_types` argument is [now an enumeration of specific values](https://github.com/slackapi/node-slack-sdk/pull/1673/files?diff=unified&w=0#diff-16abafd789456431bd84945a174544e42cf9d0ddda6077b4cfcdd85377a1971eR8), rather than just any old `string` you want.
## admin.functions.* {#adminfunctions}
* `function_ids` now requires at least one array element.
* `visibility` is no longer any `string` and instead an enumeration: `everyone`, `app_collaborators`, `named_entities`, `no_one`.
## admin.roles.* {#adminroles}
* `entity_ids` now requires at least one array element.
* `user_ids` must be passed at least one user ID.
* `sort_dir` will accept either `asc` or `desc`. Previously any `string` was, unfortunately, A-OK.
## admin.teams.* {#adminteams}
* `team_discoverability` and `discoverability` are now enumerations consisting of: `open`, `closed`, `invite_only`, `unlisted`, rather than any `string`.
* `channel_ids` must be passed at least one channel ID.
## admin.users.* {#adminusers}
* `channel_ids` must be passed at least one channel ID. Previously this parameter was a string, so you had to comma-separate your channel IDs manually, as if this was the 1800s.
* `user_ids` must be passed at least one user ID. Otherwise, what, you're going to invite 0 users? Who do you think you're kidding?
### admin.users.list {#adminuserslist}
The `team_id` and `include_deactivated_user_workspaces` parameters were previously both optional. However, they kind of depend on each other. You can either provide a `team_id` and no `include_deactivated_user_workspaces` (or set it to `false`), or set `include_deactivated_user_workspaces` to `true` and omit `team_id`. Otherwise providing both doesn't make any sense at all? We need to be logically consistent, people!
### admin.users.session.list {#adminuserssessionlist}
This API will now accept either _both_ `team_id` and `user_id`, or _neither_. Previously both properties were optional, which was not ideal.
## admin.workflows.* {#adminworkflows}
* `collaborator_ids` must be passed at least one collaborator ID. Collaborating with 0 other humans is not really collaborating, now is it?
* Similarly, `workflow_ids` must be passed at least one workflow ID.
### admin.workflows.search {#adminworkflowssearch}
* `sort_dir` will accept either `asc` or `desc`. Previously any `string` was, unfortunately, A-OK.
* `sort` now only accepts `premium_runs`, whereas previously you could pass it any `string`.
* `source` now only accepts either `code` or `workflow_builder`, whereas before you could feed it any `string`.
## apps.connections.open {#appsconnectionsopen}
Previously this method could be called without any arguments. Now, arguments are required. The migration path is to pass an empty object (`{}`) to `apps.connections.open`.
## apps.manifest.* {#appsmanifest}
Previously the `manifest` parameter was a `string`. In reality this is a very complex object, which we've done our best to model in excruciating detail.
## auth.test {#authtest}
Previously this method could be called without any arguments. Now, arguments are required. The migration path is to pass an empty object (`{}`) to `auth.test`.
## bookmarks.* {#bookmarks}
* `type` now accepts only one value: `link`.
* The `link` parameter (not to be confused with the `type: 'link'` value in the previous point!) was previously optional for the `bookmarks.add` API. That's just silly as a bookmark necessarily requires a link, so it is now a required property. It is, however, optional for the `bookmarks.edit` API.
## chat.* {#chat}
* Previously, we didn't model message contents very well. All of the various message-posting APIs (`postEphemeral`, `postMessage`, `scheduleMessage`) would accept `text`, `attachments`, and `blocks`, but all were optional arguments. That's not exactly correct, however. Now, you _must_ provide one of these three. Previously, you could avoid all three if you wished! Additionally, if you use `attachments` or `blocks`, `text` becomes an optional addition for you to specify and will be used as fallback text for notifications.
* The properties `as_user`, `username`, `icon_emoji` and `icon_url` interact with one another:
* If you set `as_user` to `true`, you cannot set `icon_emoji`, `icon_url` or `username`.
* You can provide either `icon_emoji` or `icon_url`, but never both.
* If you set `reply_broadcast` to `true`, then you must also provide a `thread_ts`. Previously, both were optional.
## conversations.* {#conversations}
* For APIs that accept either `channel_id` or `invite_id` (`conversations.acceptSharedInvite`), we now enforce specifying one or the other (but not both).
* For APIs that accept either `emails` or `user_ids` (`conversations.inviteShared`), we now enforce specifying one or the other (but not both).
* For APIs that accept either `channel` or `users` (`conversations.open`), we now enforce specifying one or the other (but not both).
## files.* {#files}
* You must provide either `content` or `file`. Previously these were both optional.
* If you provide the `thread_ts` argument, you now must also provide the `channels`, or `channel_id` argument (depending on the method).
* The `files` array parameter must now be provided at least one element.
* The `files.remote.*` APIs require one of `file` or `external_id`, but not both. Previously both were optional.
## reactions.* {#reactions}
* `channel` and `timestamp` are now required properties for `reactions.add`.
* `reactions.add` no longer supports the `file` and `file_comment` parameters, as per our [API docs for this method](/reference/methods/reactions.add).
* `reactions.get` and `reactions.remove` now require to supply one and only one of:
* both `channel` and `timestamp`, or
* a `file` encoded file ID, or
* a `file_comment` ID
## stars.* {#stars}
The `add` and `remove` APIs require one of:
* both `channel` and `timestamp`, or
* a `file` encoded file ID, or
* a `file_comment` ID
## team.* {#team}
* `change_type` is no longer any `string` but an enumeration of: `added`, `removed`, `enabled`, `disabled`, `updated`
## users.* {#users}
* The deprecated `presence` parameter for [`users.list`](/reference/methods/users.list) has been removed.
* The `profile` parameter for [`users.profile.set`](/reference/methods/users.profile.set) has been changed from a string to, basically, any object you wish.
## views.* {#views}
All `views.*` APIs now accept either a `trigger_id` or an `interactivity_pointer`, as they both effectively serve the same purpose.
In addition, `views.update` now accepts either a `external_id` or a `view_id` parameter - but not both.
---
Source: https://docs.slack.dev/tools/node-slack-sdk/oauth
# OAuth
The `@slack/oauth` package makes it straightforward to set up the OAuth flow for Slack apps. It supports [V2 OAuth](/authentication/installing-with-oauth) for Slack Apps as well as [V1 OAuth](/legacy/legacy-authentication) for [Classic Slack apps](/legacy/legacy-authentication). Slack apps that are installed in multiple workspaces, like those available in the Slack Marketplace or installed in an Enterprise Grid, will need to implement OAuth and store information about each of those installations (such as access tokens).
The package handles URL generation, state verification, and authorization code exchange for access tokens. It also provides an interface for easily plugging in your own database for saving and retrieving installation data.
## Limitations {#limitations}
At this time, the `@slack/oauth` package does not support [Sign in with Slack](/authentication/sign-in-with-slack). However, there are APIs available in the [`@slack/web-api`](/tools/node-slack-sdk/web-api) package to implement Sign in With Slack; for more information, have a look at the `@slack/web-api` [Sign in with Slack documentation](/tools/node-slack-sdk/web-api#sign-in-with-slack-via-openid-connect).
## Installation {#installation}
```
$ npm install @slack/oauth
```
Before building an app, you'll need to [create a Slack app](https://api.slack.com/apps/new) and install it to your development workspace. You'll also need to copy the **Client ID** and **Client Secret** given to you by Slack under the **Basic Information** of your [app configuration](https://api.slack.com/apps).
It may be helpful to read the tutorials on [getting started](/tools/node-slack-sdk/getting-started) and [getting a public URL that can be used for development](/tools/node-slack-sdk/tutorials/local-development).
* * *
## Initialize the installer {#initialize-the-installer}
This package exposes an `InstallProvider` class, which sets up the required configuration and exposes methods such as `handleInstallPath` (which calls `generateInstallUrl` internally), `handleCallback`, and `authorize` for use within your apps. At a minimum, `InstallProvider` takes a `clientId` and `clientSecret` (both which can be obtained under the **Basic Information** of your app configuration). `InstallProvider` also requires a `stateSecret`, which is used to encode the generated state, and later used to decode that same state to verify it wasn't tampered with during the OAuth flow. **Note**: This example is not ready for production because it only stores installations (tokens) in memory. Please go to the [storing installations in a database](#storing-installations-in-a-database) section to learn how to plug in your own database.
```
const { InstallProvider } = require('@slack/oauth');// initialize the installProviderconst installer = new InstallProvider({ clientId: process.env.SLACK_CLIENT_ID, clientSecret: process.env.SLACK_CLIENT_SECRET, stateSecret: process.env.SLACK_STATE_SECRET,});
```
Using a classic Slack app
```
const { InstallProvider } = require('@slack/oauth');// initialize the installProviderconst installer = new InstallProvider({ clientId: process.env.SLACK_CLIENT_ID, clientSecret: process.env.SLACK_CLIENT_SECRET, stateSecret: process.env.SLACK_STATE_SECRET, authVersion: 'v1' //required for classic Slack apps});
```
* * *
## Showing an Installation Page {#showing-an-installation-page}
You'll need an installation URL when you want to test your own installation in order to submit your app to the Slack Marketplace and in case you need additional authorizations (such as user tokens) from users inside a team where your app is already installed. These URLs are also commonly used on your own webpages as the link for an ["Add to Slack" button](/legacy/legacy-slack-button).
The recommended approach is for `InstallProvider` to render the installation page at a URL/path of your choosing [using the `handleInstallPath()` method](#using-handleinstallpath). It will automatically display an "Add to Slack" button and encode any desired user or bot scopes and metadata you specify. If you wish to further customize the installation page, you can do so by passing a `renderHtmlForInstallPath` function to the `InstallProvider` constructor. Also, if your app supports Direct Install URL in the Slack Marketplace page, you can pass `directInstall: true` when initializing `InstallProvider`.
### Using handleInstallPath {#using-handleinstallpath}
If you don't need to customize the installation page users will be shown, you can let this package render the installation page for you using the `handleInstallPath()` method.
```
// Assume the installation page is located at /slack/installapp.get('/slack/install', async (req, res) => { await installer.handleInstallPath(req, res, { scopes: ['chat:write'], userScopes: ['channels:read'], metadata: 'some_metadata', });});
```
The `handleInstallPath` method accepts an `options` object as its third argument which supports `scopes`, `metadata`, `userScopes`, `teamId` and `redirectUri` properties (check out the [source code for this interface](https://github.com/slackapi/node-slack-sdk/blob/main/packages/oauth/src/install-url-options.ts) for more details).
To have more control over the installation page contents, you can pass a `renderHtmlForInstallPath` function that takes a URL argument as a string and returns an HTML string that will be sent in the HTTP response body. This function will be invoked as part of `handleInstallPath` execution:
```
const { InstallProvider } = require('@slack/oauth');// initialize the installProviderconst installer = new InstallProvider({ clientId: process.env.SLACK_CLIENT_ID, clientSecret: process.env.SLACK_CLIENT_SECRET, stateSecret: process.env.SLACK_STATE_SECRET, renderHtmlForInstallPath: (url) => `Install my app!`});
```
Manually generating installation page URL and contents
If you want to customize the installation page users will be shown, you may generate an installation URL dynamically and use the generated URL as part of the installation page displayed to the user.
The `installProvider.generateInstallUrl()` method will create an installation URL for you. It takes in an `options` argument which at a minimum contains a `scopes` property. The `installProvider.generateInstallUrl()` method's `options` argument also supports `metadata`, `teamId`, `redirectUri` and `userScopes` properties (check [the source](https://github.com/slackapi/node-slack-sdk/blob/main/packages/oauth/src/install-url-options.ts) for details on these properties).
```
app.get('/slack/install', async (req, res, next) => { // feel free to modify the scopes const url = await installer.generateInstallUrl({ scopes: ['channels:read'], }) res.send(` `);});
```
Additionally, you might want to present an "Add to Slack" button while the user is in the middle of some other tasks (e.g. linking their Slack account to your service). In these situations, you want to bring the user back to where they left off after the app installation is complete. Custom metadata can be used to capture partial (incomplete) information about the task (like which page they were on or inputs to form elements the user began to fill out) in progress. Then when the installation is complete, that custom metadata will be available for your app to recreate exactly where they left off. You must also use a [custom success handler when handling the OAuth redirect](#handling-the-oauth-redirect) to read the custom metadata after the installation is complete.
```
installer.generateInstallUrl({ // Add the scopes your app needs scopes: ['channels:read'], metadata: JSON.stringify({some:'sessionState'})})
```
Custom metadata is visible to the user, so don't store any secret information in the metadata. The installation provider will ensure that none of the metadata has been tampered with when the user returns. To change how metadata is handled, including hiding it from users, read about [using a custom state store](#using-a-custom-state-store).
* * *
## Handling the OAuth redirect {#handling-the-oauth-redirect}
After the user approves the request to install your app (and grants access to the required permissions), Slack will redirect the user to your specified **Redirect URL**. You can either set the redirect URL in the app’s **OAuth and Permissions** page or pass a `redirectUri` when calling `installProvider.handleInstallPath`.
Your HTTP server should handle requests to this redirect URL by calling the `installProvider.handleCallback()` method. The first two arguments (`req`, `res`) to `installProvider.handleCallback` are required. By default, if the installation is successful the user will be redirected back to your App Home in Slack (or redirected back to the last open workspace in your Slack app for classic Slack apps). If the installation is not successful, the user will be shown an error page.
```
const { createServer } = require('http');const server = createServer((req, res) => { // our redirect_uri is /slack/oauth_redirect if (req.url === '/slack/oauth_redirect') { // call installer.handleCallback to wrap up the install flow installer.handleCallback(req, res); }})server.listen(3000);
```
Using an Express app
You can use `installer.handleCallback` within an Express app by setting up a route for the OAuth redirect.
```
app.get('/slack/oauth_redirect', (req, res) => { installer.handleCallback(req, res);});
```
## Persisting data during the OAuth flow {#persisting-data-during-the-oauth-flow}
There are many situations where you may want to persist some custom data relevant to your application across the entire OAuth flow. For example, you may want to map Slack resources (like users) to your own application's resources, or verify and gate eligibility for proceeding with installing your Slack application to a workspace based on your application's requirements. To this end, this package provides a series of hooks, or callbacks, that allow your application to integrate throughout key points of the OAuth flow.
These are all callbacks customizable via the [`CallbackOptions`](/tools/node-slack-sdk/reference/oauth/interfaces/CallbackOptions) and [`InstallPathOptions`](/tools/node-slack-sdk/reference/oauth/interfaces/InstallPathOptions) interfaces—check their [reference documentation](/tools/node-slack-sdk/reference/oauth) for more details.
For example, you may wish to store some information relevant to your application in a cookie before starting the OAuth flow and redirecting the user to the slack.com authorize URL. Once the user completes the authorization process on slack.com and is redirected back to your application, you can read this cookie and determine if the user has the appropriate permissions to proceed with installation of your application:
```
const { InstallProvider } = require('@slack/oauth');const { createServer } = require('http');// initialize the installProviderconst installer = new InstallProvider({ clientId: process.env.SLACK_CLIENT_ID, clientSecret: process.env.SLACK_CLIENT_SECRET, stateSecret: process.env.SLACK_STATE_SECRET,});const server = createServer(async (req, res) => { // our installation path is /slack/install if (req.url === '/slack/install') { // call installer.handleInstallPath and write a cookie using beforeRedirection await installer.handleInstallPath(req, res, { beforeRedirection: async (req, res) => { res.setHeader('Set-Cookie', 'mycookie=something'); return true; // return true to continue with the OAuth flow } }); } // our redirect_uri is /slack/oauth_redirect if (req.url === '/slack/oauth_redirect') { // call installer.handleCallback but check our custom cookie before // wrapping up the install flow await installer.handleCallback(req, res, { beforeInstallation: async (opts, req, res) => { if (checkCookieForInstallElibility(req)) { // the user is allowed to install the app return true; } else { // user is not allowed to install! end the http response and return false // to stop the installation res.end(); return false; } } }); }})server.listen(3000);
```
Using custom success or failure handlers
If you decide you need custom success or failure behaviors (ex: wanting to show a page on your site with instructions on how to use the app), you can pass in your own success/failure functions.
```
const callbackOptions = { success: (installation, installOptions, req, res) => { // Do custom success logic here // Tips: // - Inspect the metadata with `installOptions.metadata` // - Add javascript and css in the htmlResponse using the
`);});
```
Additionally, you might want to present an "Add to Slack" button while the user is in the middle of some other tasks (e.g. linking their Slack account to your service). In these situations, you want to bring the user back to where they left off after the app installation is complete. Custom metadata can be used to capture partial (incomplete) information about the task (like which page they were on or inputs to form elements the user began to fill out) in progress. Then when the installation is complete, that custom metadata will be available for your app to recreate exactly where they left off. You must also use a [custom success handler when handling the OAuth redirect](#handling-the-oauth-redirect) to read the custom metadata after the installation is complete.
```
installer.generateInstallUrl({ // Add the scopes your app needs scopes: ['channels:read'], metadata: JSON.stringify({some:'sessionState'})})
```
Custom metadata is visible to the user, so don't store any secret information in the metadata. The installation provider will ensure that none of the metadata has been tampered with when the user returns. To change how metadata is handled, including hiding it from users, read about [using a custom state store](#using-a-custom-state-store).
* * *
## Handling the OAuth redirect {#handling-the-oauth-redirect}
After the user approves the request to install your app (and grants access to the required permissions), Slack will redirect the user to your specified **Redirect URL**. You can either set the redirect URL in the app’s **OAuth and Permissions** page or pass a `redirectUri` when calling `installProvider.handleInstallPath`.
Your HTTP server should handle requests to this redirect URL by calling the `installProvider.handleCallback()` method. The first two arguments (`req`, `res`) to `installProvider.handleCallback` are required. By default, if the installation is successful the user will be redirected back to your App Home in Slack (or redirected back to the last open workspace in your Slack app for classic Slack apps). If the installation is not successful, the user will be shown an error page.
```
const { createServer } = require('http');const server = createServer((req, res) => { // our redirect_uri is /slack/oauth_redirect if (req.url === '/slack/oauth_redirect') { // call installer.handleCallback to wrap up the install flow installer.handleCallback(req, res); }})server.listen(3000);
```
Using an Express app
You can use `installer.handleCallback` within an Express app by setting up a route for the OAuth redirect.
```
app.get('/slack/oauth_redirect', (req, res) => { installer.handleCallback(req, res);});
```
## Persisting data during the OAuth flow {#persisting-data-during-the-oauth-flow}
There are many situations where you may want to persist some custom data relevant to your application across the entire OAuth flow. For example, you may want to map Slack resources (like users) to your own application's resources, or verify and gate eligibility for proceeding with installing your Slack application to a workspace based on your application's requirements. To this end, this package provides a series of hooks, or callbacks, that allow your application to integrate throughout key points of the OAuth flow.
These are all callbacks customizable via the [`CallbackOptions`](/tools/node-slack-sdk/reference/oauth/interfaces/CallbackOptions) and [`InstallPathOptions`](/tools/node-slack-sdk/reference/oauth/interfaces/InstallPathOptions) interfaces—check their [reference documentation](/tools/node-slack-sdk/reference/oauth) for more details.
For example, you may wish to store some information relevant to your application in a cookie before starting the OAuth flow and redirecting the user to the slack.com authorize URL. Once the user completes the authorization process on slack.com and is redirected back to your application, you can read this cookie and determine if the user has the appropriate permissions to proceed with installation of your application:
```
const { InstallProvider } = require('@slack/oauth');const { createServer } = require('http');// initialize the installProviderconst installer = new InstallProvider({ clientId: process.env.SLACK_CLIENT_ID, clientSecret: process.env.SLACK_CLIENT_SECRET, stateSecret: process.env.SLACK_STATE_SECRET,});const server = createServer(async (req, res) => { // our installation path is /slack/install if (req.url === '/slack/install') { // call installer.handleInstallPath and write a cookie using beforeRedirection await installer.handleInstallPath(req, res, { beforeRedirection: async (req, res) => { res.setHeader('Set-Cookie', 'mycookie=something'); return true; // return true to continue with the OAuth flow } }); } // our redirect_uri is /slack/oauth_redirect if (req.url === '/slack/oauth_redirect') { // call installer.handleCallback but check our custom cookie before // wrapping up the install flow await installer.handleCallback(req, res, { beforeInstallation: async (opts, req, res) => { if (checkCookieForInstallElibility(req)) { // the user is allowed to install the app return true; } else { // user is not allowed to install! end the http response and return false // to stop the installation res.end(); return false; } } }); }})server.listen(3000);
```
Using custom success or failure handlers
If you decide you need custom success or failure behaviors (ex: wanting to show a page on your site with instructions on how to use the app), you can pass in your own success/failure functions.
```
const callbackOptions = { success: (installation, installOptions, req, res) => { // Do custom success logic here // Tips: // - Inspect the metadata with `installOptions.metadata` // - Add javascript and css in the htmlResponse using the