Modals
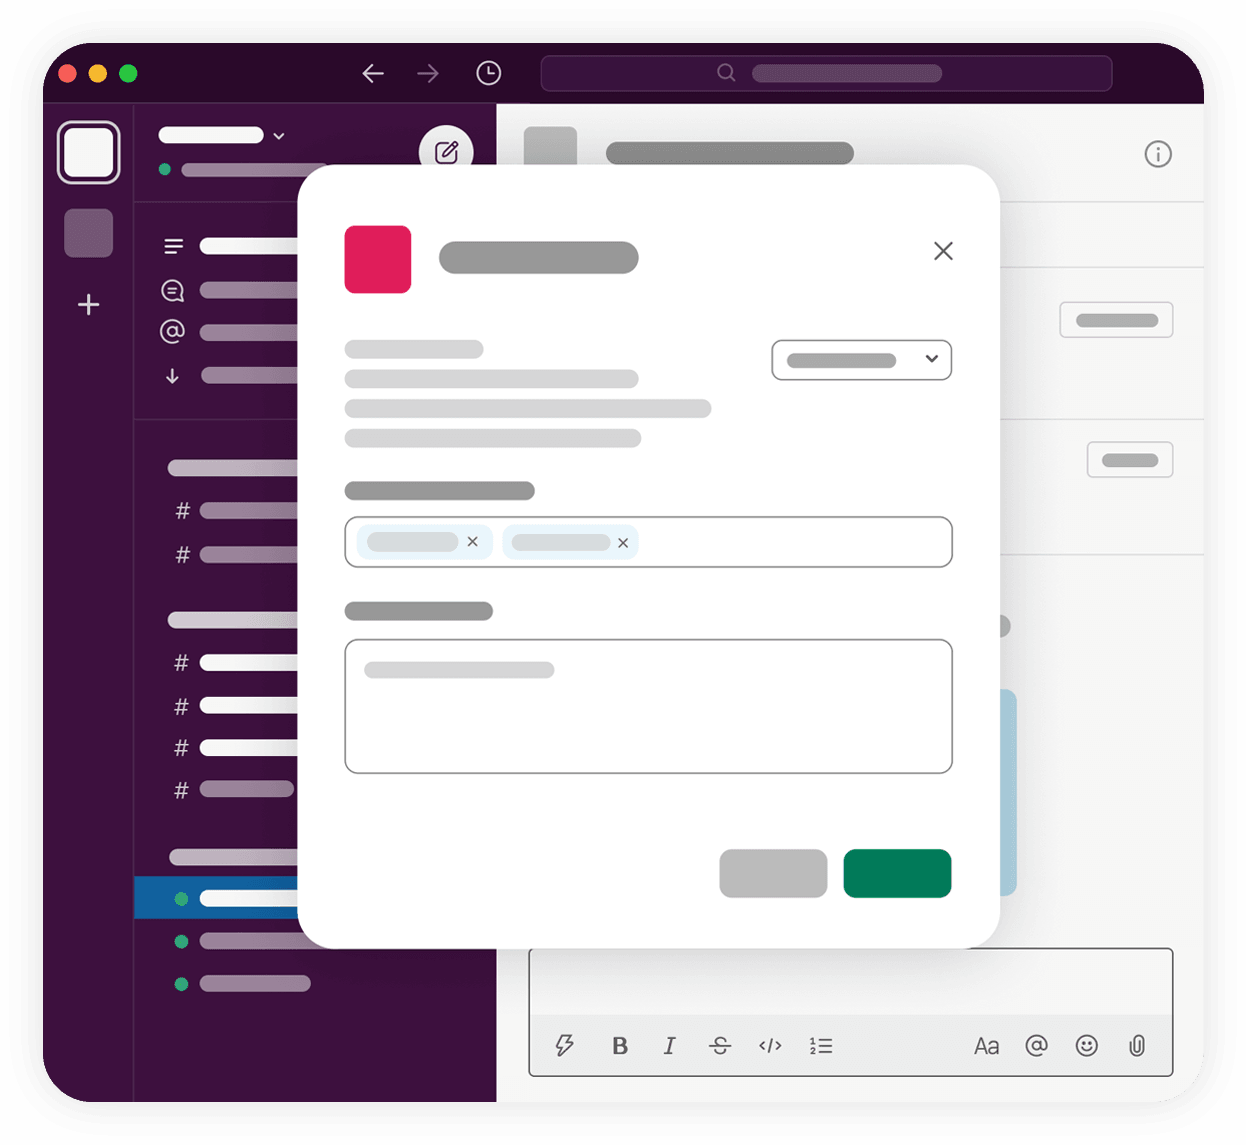
A modal is an alert box, pop-up, or dialog box. Modals capture and maintain focus within Slack until the user submits or dismisses the modal. This makes them a powerful piece of app functionality for engaging with users. Modals are available for both Bolt apps and Deno Slack SDK apps.
You can use modals with other app surfaces such as messages and Home tabs.
For example, you could have an app present a task dashboard that resides in the app's Home tab. A user clicks a button to add a task, and is presented with a modal to input some plain text and select from a list of categories. Upon submitting, a message is sent to a triage channel in the Slack workspace, where another user can click a button to claim the task.
Understanding the lifecycle of a modal
Each modal consists of some standardized UI elements, including a title, an x button to dismiss the modal, and a cancel button, that wrap around a focused space, known as the modal's view.
To generate a modal, an app composes an initial view. Apps can compose view layouts and add interactivity to views using Block Kit.
A modal can hold up to 3 views at a time in a view stack. There is only ever a single view visible at a given moment, but the view stack can retain previous views, returning to them with their prior state still intact. An app can push new views onto a modal's view stack or update an existing view within that stack, including the currently visible view.
But first, there is a user interaction.
Interactions happen with one of an app's entry points. As a result, the app is sent an interaction payload containing a special trigger_id. The app then composes an initial view (view A in the diagram below).
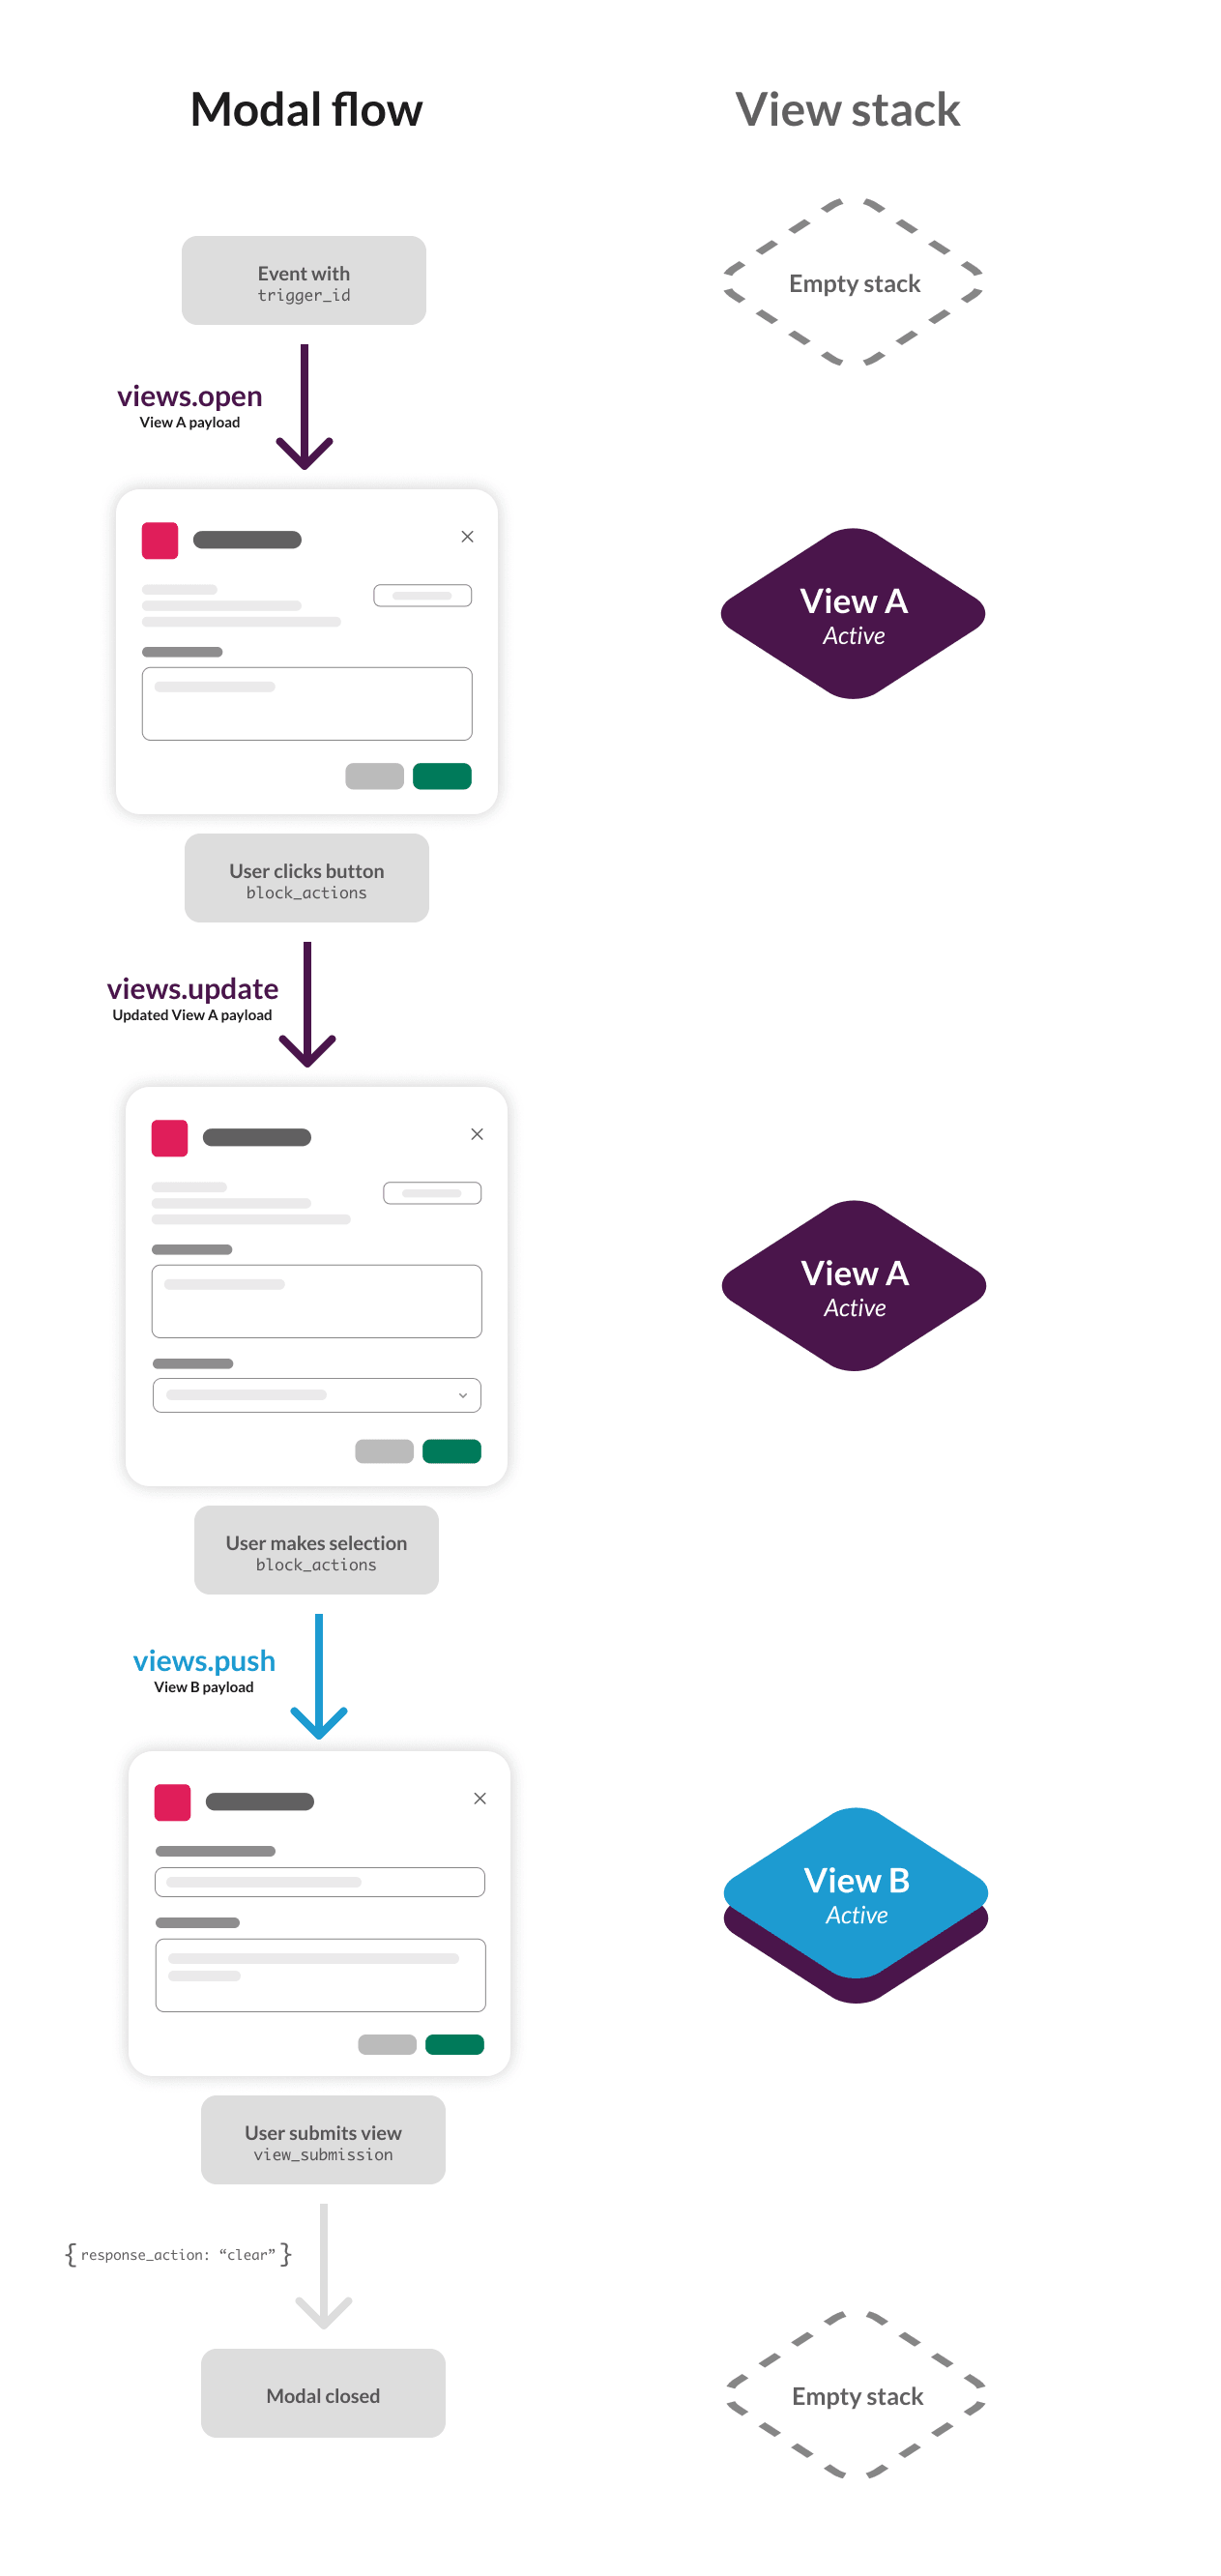
The user interacts with an interactive component in view A. This sends another interaction payload to the app. The app uses the context from this new payload to update the currently visible view A with additional content.
The user interacts with another interactive component in view A, and another interaction payload is sent to the app. The app uses the context from the new payload to push a new view (view B) on to the modal's view stack, causing it to appear to the user immediately. View A remains in the view stack, but is no longer visible or active. The user enters some values into input blocks in view B, and clicks the view's submit button. This sends a different type of interaction payload to the app.
The app handles the view submission and responds by clearing the view stack.
As described, the view stack can be manipulated in a few ways over the course of a modal's lifetime:
- Updating a view. This can happen at any time while the modal is open. Updates can change the contents and layout of the view. A view update should normally only happen in response to the use of interactive components or inputs gathered in the view.
- Adding a new view. Apps can push a new view onto the modal's view stack. This causes the new view to immediately become visible. Three views can exist in the view stack at any one time. Again, pushing a new view should normally only happen in response to the use of interactive components or inputs gathered in one of the previous views.
- Closing a view. When a view contains inputs, users can submit the modal when that view is visible. The app can then either close that specific view or all views in the view stack. Closing a single view removes it from the view stack and causes the next view in the stack to appear again. Closing all views will close the modal entirely.
Preparing your app
First things first: follow the Quickstart guide to create an app. Once completed, open the app settings, find the Install App tab in the sidebar, and copy the Bot User OAuth Token; we'll use that in a bit.
Composing modal views
Before opening a modal, you'll need to define a view object to structure the layout of the initial view. The view object is a JSON object that defines the content populating this initial view and some version of metadata about the modal itself.
Defining modal view objects
Modal view objects are used within the following Web API methods:
Each of these methods requires a modal view object argument, which contains the fields outlined in the Modal views reference doc.
The layout of a view is composed using Block Kit's visual and interactive components, including special input blocks to gather user input. These visual components are all contained within the blocks field of the view object. Read our comprehensive guide to composing layouts with Block Kit to see how the blocks array should be formed.
When creating a view, set a unique block_id for each block and a unique action_id for each block element. This will make it much easier to track the possible values of those block elements when they are returned in view_submission payloads.
Gathering user input
In order to capture user input, a special type of Block Kit component is available called an input block. An input block can hold a plain-text input, a select menu, or a multi-select menu. Plain-text inputs can be set to accept single or multi-line text. Input blocks require that you include the submit field when defining your view. See the full input block definition in the input block reference.
Pre-filling a modal with the approximate information will allow the user to review the information rather than needing to fill it out manually before submitting. Use the initial_value / initial_options property to prefill the modal. For example, if an app is used for gathering information for submitting an issue, the app could send a message with a button that, when clicked, opens a modal for data collection. In that modal, you can use the plain-text input for fields and pre-populate them with user-provided data using the initial_value field.
Once you've created your blocks layout, add it to your view object payload. Here's an example view that we'll use:
{
  "type": "modal",
  "callback_id": "modal-identifier",
  "title": {
    "type": "plain_text",
    "text": "Just a modal"
  },
  "blocks": [
    {
      "type": "section",
      "block_id": "section-identifier",
      "text": {
        "type": "mrkdwn",
        "text": "*Welcome* to ~my~ Block Kit _modal_!"
      },
      "accessory": {
        "type": "button",
        "text": {
          "type": "plain_text",
          "text": "Just a button",
        },
        "action_id": "button-identifier",
      }
    }
  ],
}
Opening modals
To open a new modal, your app must possess a valid, unexpired trigger_id, obtained from an interaction payload. Your app will receive one of these payloads, and therefore a trigger_id, after a user invokes one of the app's entry points. If your app doesn't have one of these entry point features enabled, the app will not be able to open a modal. The trigger_id requirement ensures that modals only appear when apps have the express permission of a user.
trigger_id will expire 3 seconds after it's sent to your app, so you’ll want to use it quickly.Once in possession of a trigger_id, your app can call the views.open API method with the view payload you created above and the access token you saved from the app settings:
- HTTP
- JavaScript
- Python
POST https://slack.com/api/views.open
Content-type: application/json
Authorization: Bearer YOUR_ACCESS_TOKEN_HERE
{
  "trigger_id": "156772938.1827394",
  "view": {
    "type": "modal",
    "callback_id": "modal-identifier",
    "title": {
      "type": "plain_text",
      "text": "Just a modal"
    },
    "blocks": [
      {
        "type": "section",
        "block_id": "section-identifier",
        "text": {
          "type": "mrkdwn",
          "text": "*Welcome* to ~my~ Block Kit _modal_!"
        },
        "accessory": {
          "type": "button",
          "text": {
            "type": "plain_text",
            "text": "Just a button"
          },
          "action_id": "button-identifier"
        }
      }
    ]
  }
}
// Open a modal in response to a user interaction, such as a slash command
app.command('/open-modal', async ({ ack, body, client, logger }) => {
  // Acknowledge the command request
  await ack();

  try {
    const result = await client.views.open({
      // Pass a valid trigger_id within 3 seconds of receiving it
      trigger_id: body.trigger_id,
      view: {
        type: 'modal',
        callback_id: 'modal-identifier',
        title: {
          type: 'plain_text',
          text: 'Just a modal'
        },
        blocks: [
          {
            type: 'section',
            block_id: 'section-identifier',
            text: {
              type: 'mrkdwn',
              text: '*Welcome* to ~my~ Block Kit _modal_!'
            },
            accessory: {
              type: 'button',
              text: {
                type: 'plain_text',
                text: 'Just a button'
              },
              action_id: 'button-identifier'
            }
          }
        ]
      }
    });
    logger.info(result);
  } catch (error) {
    logger.error(error);
  }
});
You can then handle the modal submission by listening for the view's callback_id:
// Handle the view submission when the user clicks the modal's submit button
app.view('modal-identifier', async ({ ack, body, view, client, logger }) => {
  // Acknowledge the view submission
  await ack();

  try {
    // The values entered by the user are available in view.state.values
    logger.info(view.state.values);
  } catch (error) {
    logger.error(error);
  }
});
# Open a modal in response to a user interaction, such as a slash command
@app.command("/open-modal")
def handle_open_modal(ack, body, client, logger):
    # Acknowledge the command request
    ack()

    try:
        result = client.views_open(
            # Pass a valid trigger_id within 3 seconds of receiving it
            trigger_id=body["trigger_id"],
            view={
                "type": "modal",
                "callback_id": "modal-identifier",
                "title": {
                    "type": "plain_text",
                    "text": "Just a modal"
                },
                "blocks": [
                    {
                        "type": "section",
                        "block_id": "section-identifier",
                        "text": {
                            "type": "mrkdwn",
                            "text": "*Welcome* to ~my~ Block Kit _modal_!"
                        },
                        "accessory": {
                            "type": "button",
                            "text": {
                                "type": "plain_text",
                                "text": "Just a button"
                            },
                            "action_id": "button-identifier"
                        }
                    }
                ]
            }
        )
        logger.info(result)
    except Exception as e:
        logger.error(f"Error opening modal: {e}")
You can then handle the modal submission by listening for the view's callback_id:
# Handle the view submission when the user clicks the modal's submit button
@app.view("modal-identifier")
def handle_view_submission(ack, body, view, client, logger):
    # Acknowledge the view submission
    ack()

    try:
        # The values entered by the user are available in view["state"]["values"]
        logger.info(view["state"]["values"])
    except Exception as e:
        logger.error(f"Error handling view submission: {e}")
This will open a new modal, and display the view you composed within it. If the view was opened successfully, your app will receive a response containing an ok value set to true, along with the view object that was displayed to the user. There's an example response in the views.open API method reference.
When you receive this success response, you'll want to store the view.id from it for safekeeping. This will allow you to update the contents of that view later on.
Handling and responding to interactions
Depending on how your modal's initial view was composed, there are a few different interactions that could happen:
block_actionspayloads. When someone uses an interactive component in your app's views, the app receives ablock_actionspayload. This does not apply to components included in aninputblock. Once processed, the information in theblock_actionspayload can be used to respond to the interaction.view_submissionpayloads. When a view is submitted, you'll receive aview_submissionpayload. This payload will contain astateobject with the values and contents of any stateful blocks that were in the submitted view. Refer to the info onview.state.valuesof theview_submissionpayload to understand the structure of thisstateobject. As withblock_actionspayloads, the information inview_submissionpayloads can be used to respond.view_closedpayloads. Your app can optionally receiveview_closedpayloads whenever a user clicks on the Cancel or x buttons. These buttons are standard in all app modals. To receive theview_closedpayload when this happens, setnotify_on_closetotruewhen creating a view withviews.open, pushing a new view withviews.push, or in your response to the action.
view_closed event with the corresponding view's id.If the user exits the modal with the x button in the top-right corner, you'll receive a view_closed event with the initial modal view's id and the is_cleared flag set to true.
Upon receiving either of the interaction payloads described above, your app can choose from a multitude of responses. In every case, apps must return a required acknowledgment response back to the HTTP request that sent the payload.
Updating modal views
It's likely you'll want your app to modify the modal itself in some way. If so, you have two options depending on the type of interaction that occurred:
- If you want to modify a modal in response to a
view_submissioninteraction, your app can include a validresponse_actionwith the acknowledgment response. - If you want to modify a modal in response to a
block_actionsinteraction, your app must send the acknowledgment response. Then the app can use theview.*API endpoints to make desired modifications.
Update a view via response_action
If your app just received a view_submission payload, you have 3 seconds to respond and update the source view. Respond to the HTTP request app with a response_action field of value update, along with a newly composed view as in the following example:
{
  "response_action": "update",
  "view": {
    "type": "modal",
    "title": {
      "type": "plain_text",
      "text": "Updated view"
    },
    "blocks": [
      {
        "type": "section",
        "text": {
          "type": "plain_text",
          "text": "I've changed and I'll never be the same. You must believe me."
        }
      }
    ]
  }
}
This method only works in response to a user clicking the submit button in a view; therefore it can only be used to update the currently visible view.
Update a view via API
You may update a modal view by calling views.update. Include a newly-composed view and the id of the view that should be updated. This is the view_id that was included in the initial success response. This new view will replace the contents of the existing view.
input entryData entered or selected in input blocks can be preserved while updating views. The new view object that you use with views.update should contain the same input blocks and elements with identical block_id and action_id values.
Here's an example of a views.update API method:
- HTTP
- JavaScript
- Python
POST https://slack.com/api/views.update
Content-type: application/json
Authorization: Bearer YOUR_TOKEN_HERE
{
  "view_id": "VIEW ID FROM VIEWS.OPEN RESPONSE",
  "hash": "156772938.1827394",
  "view": {
    "type": "modal",
    "callback_id": "view-helpdesk",
    "title": {
      "type": "plain_text",
      "text": "Submit an issue"
    },
    "submit": {
        "type": "plain_text",
         "text": "Submit"
    },
    "blocks": [
      {
        "type": "input",
        "block_id": "ticket-title",
        "label": {
          "type": "plain_text",
          "text": "Ticket title"
        },
        "element": {
          "type": "plain_text_input",
          "action_id": "ticket-title-value"
        }
      },
      {
        "type": "input",
        "block_id": "ticket-desc",
        "label": {
          "type": "plain_text",
          "text": "Ticket description"
        },
        "element": {
          "type": "plain_text_input",
          "multiline": true,
          "action_id": "ticket-desc-value"
        }
      }
    ]
  }
}
// Update a view via API in response to a block_actions interaction
app.action('some-action-id', async ({ ack, body, client, logger }) => {
  // Acknowledge the action
  await ack();

  try {
    const result = await client.views.update({
      // Use the view_id and hash from the block_actions payload
      view_id: body.view.id,
      hash: body.view.hash,
      view: {
        type: 'modal',
        callback_id: 'view-helpdesk',
        title: {
          type: 'plain_text',
          text: 'Submit an issue'
        },
        submit: {
          type: 'plain_text',
          text: 'Submit'
        },
        blocks: [
          {
            type: 'input',
            block_id: 'ticket-title',
            label: {
              type: 'plain_text',
              text: 'Ticket title'
            },
            element: {
              type: 'plain_text_input',
              action_id: 'ticket-title-value'
            }
          },
          {
            type: 'input',
            block_id: 'ticket-desc',
            label: {
              type: 'plain_text',
              text: 'Ticket description'
            },
            element: {
              type: 'plain_text_input',
              multiline: true,
              action_id: 'ticket-desc-value'
            }
          }
        ]
      }
    });
    logger.info(result);
  } catch (error) {
    logger.error(error);
  }
});
# Update a view via API in response to a block_actions interaction
@app.action("some-action-id")
def handle_update_view(ack, body, client, logger):
    # Acknowledge the action
    ack()

    try:
        result = client.views_update(
            # Use the view_id and hash from the block_actions payload
            view_id=body["view"]["id"],
            hash=body["view"]["hash"],
            view={
                "type": "modal",
                "callback_id": "view-helpdesk",
                "title": {
                    "type": "plain_text",
                    "text": "Submit an issue"
                },
                "submit": {
                    "type": "plain_text",
                    "text": "Submit"
                },
                "blocks": [
                    {
                        "type": "input",
                        "block_id": "ticket-title",
                        "label": {
                            "type": "plain_text",
                            "text": "Ticket title"
                        },
                        "element": {
                            "type": "plain_text_input",
                            "action_id": "ticket-title-value"
                        }
                    },
                    {
                        "type": "input",
                        "block_id": "ticket-desc",
                        "label": {
                            "type": "plain_text",
                            "text": "Ticket description"
                        },
                        "element": {
                            "type": "plain_text_input",
                            "multiline": True,
                            "action_id": "ticket-desc-value"
                        }
                    }
                ]
            }
        )
        logger.info(result)
    except Exception as e:
        logger.error(f"Error updating view: {e}")
Avoiding race conditions when using the views.update method
Race conditions can potentially occur when updating views using the views.update API method, but there is a solution built-in.
For example:
- Suppose there is a view with a list of tasks that can be marked as complete using a button. When the task is completed, the UI shows the timestamp when the task was completed.
- If the user clicks the complete button for task A, the app will mark the task as completed in the app's database, query the same database for an up-to-date list of tasks, then make a call to the
views.updatemethod with a newviewobject. In this case, the modal will correctly display task A as complete and task B as incomplete. - If, while the above processing is happening, the user clicks the complete button for task B, the app will go through the same process as above. All being well, the view will correctly display both task A and task B as complete.
- However, it's possible that the
views.updatecall from completing task A could take longer to complete than the same API call from completing task B. Perhaps it took longer to query for the list of tasks after marking task A as complete, or perhaps temporary network conditions slowed down the API call toviews.updatefor task A. - In this case, the user would initially see the correct task list display after the
views.updatecall from task B. - The modal would then update again after the
views.updatecall from task A, and the user would see task A as complete, but task B as incomplete. - The outdated
views.updatecall from after completing task A has overwritten the up-to-dateviews.updatecall from after completing task B.
To prevent these kinds of conditions, there is a hash value included in all block_actions payloads. You can pass hash when calling views.update. If the hash is outdated, the API call will be rejected. This provides an automated assurance that you will never accidentally update a view with outdated data. We highly recommend your apps take advantage of this hash value.
Adding a new view
Within a modal's view stack, 3 views can exist at any one time. If there is still space remaining, you can push a new view onto the view stack. The newly-pushed view will immediately become visible to the user. When the user closes or submits this new view, they'll return to the next one down in the stack.
There are two ways to add a view to a modal's view stack:
Add a new view via response_action
If your app has received a view_submission payload, you have 3 seconds to respond and push a new view. Respond to the HTTP request app with a response_action field of value push, along with a newly composed view as in the following example:
{
  "response_action": "push",
  "view": {
    "type": "modal",
    "title": {
      "type": "plain_text",
      "text": "Updated view"
    },
    "blocks": [
      {
        "type": "image",
        "image_url": "https://api.slack.com/img/blocks/bkb_template_images/plants.png",
        "alt_text": "Plants"
      },
      {
        "type": "context",
        "elements": [
          {
            "type": "mrkdwn",
            "text": "_Two of the author's cats sit aloof from the austere challenges of modern society_"
          }
        ]
      }
    ]
  }
}
The view immediately becomes visible on top of the submitted view, adding it to the top of the modal's view stack. When a user submits or cancels the current view, they’ll return to the previous view on the stack.
If you need to get the id of the newly-pushed view (rather than the id of the submitted view, which is what view.id will return) in response to a view_submission payload, you can pass an external_id to update the modal after the new view is pushed.
You can then use the external_id to track your new view and update it using views.update.
Add a new view via API
The views.push method will add a new view to the top of the current stack of views in a modal, requires a trigger_id (similar to views.open), and can only be called when a modal is already open. Therefore, the only possible way to acquire a trigger_id to use here is from the use of an interactive component in the modal.
- HTTP
- JavaScript
- Python
POST https://slack.com/api/views.push
Content-type: application/json
Authorization: Bearer YOUR_TOKEN_HERE
{
  "trigger_id": "YOUR TRIGGER ID",
  "view": {
    "type": "modal",
    "callback_id": "edit-task",
    "title": {
      "type": "plain_text",
      "text": "Edit task details"
    },
    "submit": {
    	"type": "plain_text",
        "text": "Create"
    },
    "blocks": [
      {
        "type": "input",
        "block_id": "edit-task-title",
        "label": {
          "type": "plain_text",
          "text": "Task title"
        },
        "element": {
          "type": "plain_text_input",
          "action_id": "task-title-value",
          "initial_value": "Block Kit documentation"
        },
      },
      {
        "type": "input",
        "block_id": "edit-ticket-desc",
        "label": {
          "type": "plain_text",
          "text": "Ticket description"
        },
        "element": {
          "type": "plain_text_input",
          "multiline": true,
          "action_id": "ticket-desc-value",
          "initial_value": "Update Block Kit documentation to include Block Kit in new surface areas (like modals)."
        }
      }
    ]
  }
}
// Push a new view onto the stack in response to a block_actions interaction
app.action('edit-task-action', async ({ ack, body, client, logger }) => {
  // Acknowledge the action
  await ack();

  try {
    const result = await client.views.push({
      // The trigger_id comes from the interactive component in the open modal
      trigger_id: body.trigger_id,
      view: {
        type: 'modal',
        callback_id: 'edit-task',
        title: {
          type: 'plain_text',
          text: 'Edit task details'
        },
        submit: {
          type: 'plain_text',
          text: 'Create'
        },
        blocks: [
          {
            type: 'input',
            block_id: 'edit-task-title',
            label: {
              type: 'plain_text',
              text: 'Task title'
            },
            element: {
              type: 'plain_text_input',
              action_id: 'task-title-value',
              initial_value: 'Block Kit documentation'
            }
          },
          {
            type: 'input',
            block_id: 'edit-ticket-desc',
            label: {
              type: 'plain_text',
              text: 'Ticket description'
            },
            element: {
              type: 'plain_text_input',
              multiline: true,
              action_id: 'ticket-desc-value',
              initial_value: 'Update Block Kit documentation to include Block Kit in new surface areas (like modals).'
            }
          }
        ]
      }
    });
    logger.info(result);
  } catch (error) {
    logger.error(error);
  }
});
You can then handle the pushed view's submission by listening for its callback_id:
// Handle the submission of the pushed view
app.view('edit-task', async ({ ack, body, view, client, logger }) => {
  // Acknowledge the view submission
  await ack();

  try {
    // The values entered by the user are available in view.state.values
    logger.info(view.state.values);
  } catch (error) {
    logger.error(error);
  }
});
# Push a new view onto the stack in response to a block_actions interaction
@app.action("edit-task-action")
def handle_push_view(ack, body, client, logger):
    # Acknowledge the action
    ack()

    try:
        result = client.views_push(
            # The trigger_id comes from the interactive component in the open modal
            trigger_id=body["trigger_id"],
            view={
                "type": "modal",
                "callback_id": "edit-task",
                "title": {
                    "type": "plain_text",
                    "text": "Edit task details"
                },
                "submit": {
                    "type": "plain_text",
                    "text": "Create"
                },
                "blocks": [
                    {
                        "type": "input",
                        "block_id": "edit-task-title",
                        "label": {
                            "type": "plain_text",
                            "text": "Task title"
                        },
                        "element": {
                            "type": "plain_text_input",
                            "action_id": "task-title-value",
                            "initial_value": "Block Kit documentation"
                        }
                    },
                    {
                        "type": "input",
                        "block_id": "edit-ticket-desc",
                        "label": {
                            "type": "plain_text",
                            "text": "Ticket description"
                        },
                        "element": {
                            "type": "plain_text_input",
                            "multiline": True,
                            "action_id": "ticket-desc-value",
                            "initial_value": "Update Block Kit documentation to include Block Kit in new surface areas (like modals)."
                        }
                    }
                ]
            }
        )
        logger.info(result)
    except Exception as e:
        logger.error(f"Error pushing view: {e}")
You can then handle the pushed view's submission by listening for its callback_id:
# Handle the submission of the pushed view
@app.view("edit-task")
def handle_edit_task_submission(ack, body, view, client, logger):
    # Acknowledge the view submission
    ack()

    try:
        # The values entered by the user are available in view["state"]["values"]
        logger.info(view["state"]["values"])
    except Exception as e:
        logger.error(f"Error handling view submission: {e}")
The view immediately becomes visible on top of the submitted view, adding it to the top of the modal's view stack. When a user submits or cancels the current view, they’ll return to the previous view on the stack.
A successful response from views.push will include an id for the newly pushed view. This id is useful if you need to update the view using views.update.
Closing views
Apps have the ability to close views within a modal. This can happen only in response to the user clicking a submit button in the modal, sending the view_submission payload. After receiving this payload, your app has 3 seconds to respond and close the submitted view, or close all views.
Your app cannot use any other method to close views. A user may choose to cancel a view, or close the entire modal by clicking on the cancel or x buttons, and your app can optionally receive a notification if that happens.
Close the current view
If your app responds to a view_submission event with a basic acknowledgment response — an HTTP 200 response — this will immediately close the submitted view and remove it from the view stack. Your HTTP 200 response must be empty for this step to complete successfully.
If there are no more views left in the stack, the modal will close. Otherwise, the modal will display the next view down in the stack.
Close all views
To close all views, set the response_action to clear. Regardless of the number of views in the stack, it will be emptied, and the modal will close:
{
  "response_action": "clear"
}
Display errors in views
Upon receiving a view_submission event, your app may want to validate any inputs from the submitted view.
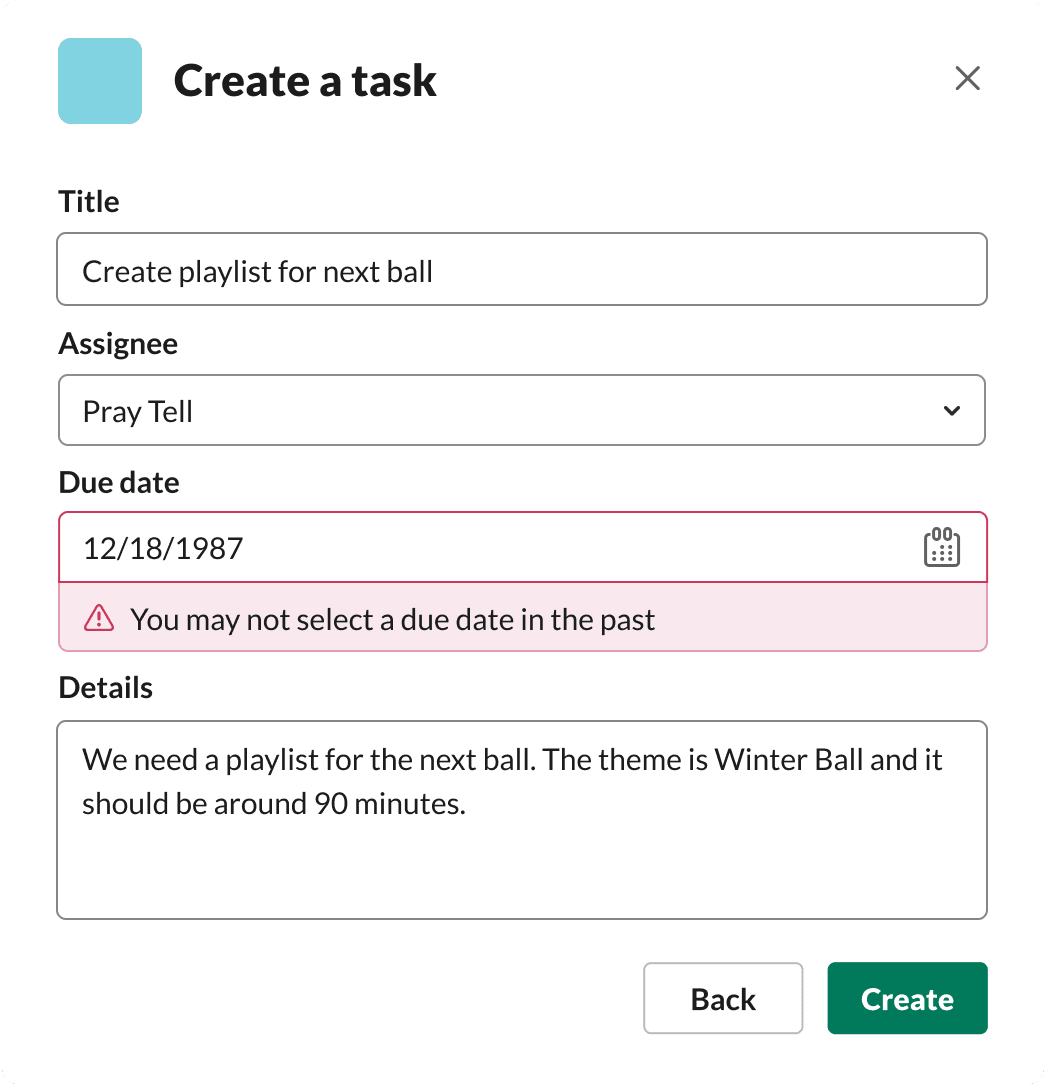
If your app detects any validation errors, say an invalid email or an empty required field, the app can respond to the payload with a response_action of errors and an errors object providing error messages:
{
  "response_action": "errors",
  "errors": {
    "ticket-due-date": "You may not select a due date in the past"
  }
}
Within the errors object, you supply a key that is the block_id of the erroneous input block, and a value - the plain text error message to be displayed to the user.
The above JSON object would highlight the error within the modal around the ticket-due-date block, displaying the chosen error message. The user can then edit their input and resubmit the view.
Your app is responsible for setting and tracking block_ids when composing views.
Carry data between views
Because views within a modal are usually connected in purpose, your app may want a way to send data from one view into the other, and then back again once a view is submitted.
To do this, we provide an optional private_metadata parameter that can be supplied in a view payload when your app opens a modal with an initial view, or updates an existing view.
This private_metadata string is not shown to users, but is returned to your app in view_submission and block_actions events. Refer to private_metadata in view payloads for more detail.
Modals are a great way to collect structured data, especially when you're looking for AI to complete a task with that given data, and your app expects the same data every time. Cut out the conversation and send all necessary inputs to an LLM by collecting it in a modal. Consider the following example of a slash command invoking a modal, then sending the collected data to an LLM and posting the answer to the user after. These examples use Bolt for JavaScript and Bolt for Python.Click to expand code
Publishing messages after modals are submitted
You may want to publish a message to a Slack channel after your modal is submitted by doing one of the following:
- Request necessary permissions and use the Web API
- Generate and use a webhook
- Include specific blocks and a special parameter in your modal
Unless your app is already configured to do one of the first two things, you'll want to include specific blocks and a special parameter in your modal. This method provides a route to message publishing for certain apps that use modals, such as those also using shortcuts. Here's how:
- Compose a modal view with a
blocksarray that contains either aconversations_selectorchannels_selectelement. - Set the
response_url_enabledparameter in the select menu totrue. This field only works with menus in input blocks in modals. - Open and handle your modal as described in the guide above.
Here's an example view object containing this special configuration:
{
    "type": "modal",
    ...
    "blocks": [
      ...
      {
        "block_id": "my_block_id",
        "type": "input",
        "optional": true,
        "label": {
          "type": "plain_text",
          "text": "Select a channel to post the result on",
        },
        "element": {
          "action_id": "my_action_id",
          "type": "conversations_select",
          "response_url_enabled": true,
        },
      },
    ],
  };
}
When a user opens the modal, they can choose a conversation to which they'd like a message posted. If you supply the default_to_current_conversation parameter for the conversation_select element, you can even pre-populate the conversation they're currently viewing.
Once they submit the view, you'll receive a view_submission payload that will now include response_urls. You can use the values in response_urls to publish message responses. Refer to our guide to handling interactions.
We recommend keeping these best practices in mind while using this technique:
- Ensure you provide clear instruction to the user that a message will be posted to the conversation they choose.
- Consider setting
optionaltotrueto allow the user to decline selecting a conversation. - If the user declines to select a conversation, or if they cancel the modal, handle this as appropriate.
Best practices for designing modals
Modals are intended for short-term interaction. Their pop-up, attention-grabbing nature makes them a mighty weapon that should be wielded only at truly appropriate moments.
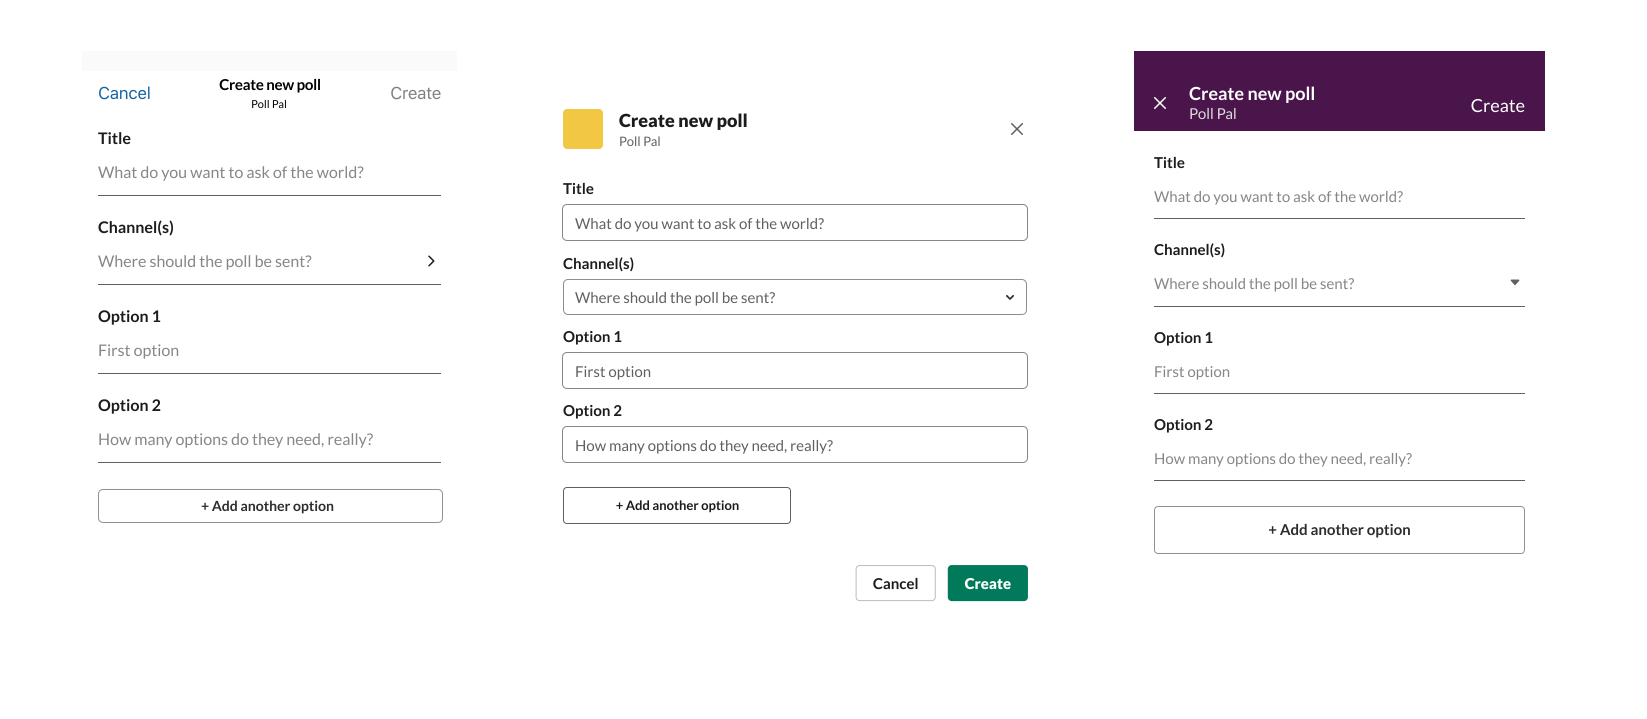
Your app can't invoke a modal without a trigger_id from a user interaction, which creates a certain amount of intentional usage. That being said, make sure to not surprise your users; they should understand that a modal will open based on their action.
Once invoked, a user can cancel a modal at any time. Handle these cancellations with grace. Don't try to force the user to proceed through the same process again.
Keep modals glanceable
Whatever the modal's content, the end-user shouldn’t need to spend excessive time on a single view within a modal. Rather than overloading a view, your app should use inputs sparingly, and implement pagination as necessary — generally when there are upwards of six inputs or blocks of information.
Indicate outcome
Your app should indicate what happens upon a modal submission. For example, if a message will be posted into a channel on the users behalf, it should be evident.
Show progress
If your app needs to perform resource-intensive data fetching, you should implement a temporary loading screen so the user better understands what's happening. This is especially important to consider as your app is installed on workspaces for larger teams with even larger collections of data.
Don’t prompt for login information
Users should not be prompted for confidential information like passwords within modals (or any app surface area, for that matter). When your app needs access to a user’s credentials, you should direct them to your login and store any necessary information on your app’s backend.
Use cases
Consider using modals for:
- Collecting input from users
- Displaying lists or results
- Confirming a user’s action
- Onboarding a user to your app