Build a mobile request workflow
In this tutorial, we'll design a workflow that streamlines the process for employees to request an upgrade to their mobile device. The workflow will automate checking a database for each employee’s device and upgrade eligibility, then send the request to their manager for approval.
Here's how it works:
- This workflow uses a link trigger to kickstart the process. Running the trigger opens a form for the user to fill out with details about their request.
- Once the form is submitted, the app will query a datastore to retrieve the user’s current device details, respond with the information in a thread, and send the request to the approving manager.
- The manager will receive a summary with options to approve or deny the request. Once they take action, the app will update the original thread with the result.
Create a workflow in Workflow Builder
To create a new workflow, you will need to open Workflow Builder in Slack. You can open Workflow Builder using one of the following methods.
- Use the message box: In any channel, type
/workflowand select Create a workflow. - Use the sidebar: Navigate to the left sidebar in Slack and click More, then Tools, then Workflows. Click +New then Build Workflow to create a new workflow.
- Under Start the workflow..., click Choose an event, then select From a link in Slack.
Next, we need to create a form in which we will collect data from the requester.
- Click the button to continue, then select Add steps to Collect info in a form.
- Give the form a name, like
Mobile Request Form, and click + Add question. EnterWhich mobile device would you like?as the question and use Short answer for the Question type. Click Done. - Repeat the process for adding the following question:
What is the urgency of this request?. Use a dropdown for the Question type and enter a few options for Urgent, Normal, and Low. - Add one more question to the form for
Who is your manager?. For this question, use the Slack user option as the Question type. Save the form.
Next, add a step to the workflow and select Send a message to a channel. Select Channel where the workflow was used in the Select a channel box. Draft a message to send to the channel, and use the Insert a variable link at the bottom of the message composer to insert variables collected from the form. Save the step.
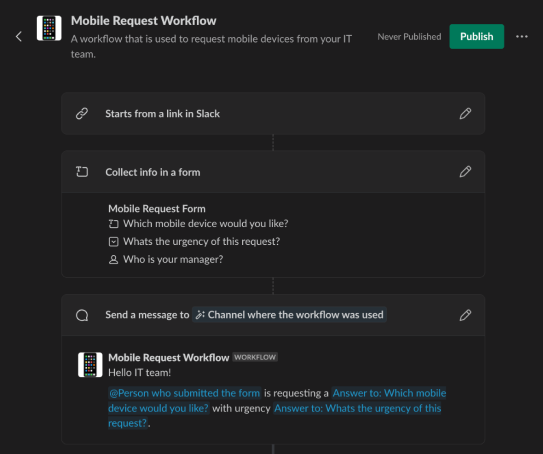
Publish the workflow
Once the form and message steps are created, it’s time to publish your workflow. Give it a name—Mobile Request Workflow—and click Finish Up to publish it. Verify everything looks correct in the modal, then click Publish. After publishing, a link trigger will appear. This trigger is what users will click to initiate the workflow. You can copy this link and share it as a bookmark in a Slack channel, post it as a message, or even add it to the channel canvas.
Set up a new project
In order to add the custom steps needed to look up the requesting user and their mobile device from a datastore, we need to create a new Deno Slack SDK project.
Install the tools
We are using the Slack CLI and Deno Slack SDK to create an app where the custom functions exist and can be pulled into Workflow Builder to be used as steps. You should be familiar with the Slack CLI and how it works before going further. If this is new for you, we recommend starting with the Hello world app first.
Create the project
Navigate to a directory where you have permission to create new files. Using the Slack CLI, run the following command to create a new project from a template:
slack create mobile-request-app --template slack-samples/deno-blank-template
This create your project from a blank template. After that, navigate to your project folder.
cd mobile-request-app
Open the project in VSCode.
code .
Code the app
Manifest
The manifest.ts file holds important metadata about your app, like the app name, description, and scopes it requires. Any functions you define in the project will show up in Slack’s Workflow Builder once the app is running. Edit this file by replacing the template code with what is shown here, using an image of your choice for the icon:
import { Manifest } from "deno-slack-sdk/mod.ts";
import MobileDatastore from "./datastores/mobile_datastore.ts";
import { ReviewRequestDefinition } from "./functions/review_request_function.ts";
import { GetMobileDeviceDefinition } from "./functions/check_datastore_function.ts";

export default Manifest({
  name: "mobile-request-functions",
  description:
    "A set of functions to interact with an internal datastore of mobile devices.",
  icon: "icon.png",
  workflows: [],
  outgoingDomains: [],
  datastores: [MobileDatastore],
  functions: [GetMobileDeviceDefinition, ReviewRequestDefinition],
  botScopes: [
    "commands",
    "chat:write",
    "chat:write.public",
    "datastore:read",
  ],
});
You will likely have lots of red underlines in VSCode at this point. Not to worry, we will fix those with the next steps. We have declared two functions and a datastore in this manifest, so let's write those now.
Functions
Create a new folder in your project named functions, then create a new file within the folder named check_datastore_function.ts. In it, copy and paste this code, then save the file:
import { DefineFunction, Schema, SlackFunction } from "deno-slack-sdk/mod.ts";
import MobileDatastore from "../datastores/mobile_datastore.ts";

export const GetMobileDeviceDefinition = DefineFunction({
  callback_id: "check_datastore_function",
  title: "Check mobile database",
  description: "Check internal database for a user's mobile information.",
  source_file: "functions/check_datastore_function.ts",
  input_parameters: {
    properties: {
      user: {
        type: Schema.types.string,
        description: "User id of requestor.",
      },
    },
    required: ["user"],
  },
  output_parameters: {
    properties: {
      last_upgrade: {
        type: Schema.types.string,
        description: "The last time the user had a device upgrade.",
      },
      mobile_device: {
        type: Schema.types.string,
        description: "The user's current mobile device",
      },
    },
    required: ["mobile_device", "last_upgrade"],
  },
});

export default SlackFunction(
  GetMobileDeviceDefinition,
  async ({ inputs, client }) => {
    const queryResp = await client.apps.datastore.query<
      typeof MobileDatastore.definition
    >(
      {
        datastore: MobileDatastore.name,
        expression: "#user = :user",
        expression_attributes: { "#user": "user" },
        expression_values: { ":user": inputs.user },
      },
    );

    console.log("Datastore response", queryResp);

    if (!queryResp.ok) {
      console.error("Error pulling from database!", queryResp.error);
    }

    let mobile_device;
    let last_upgrade;

    // For demonstration purposes, you'll need to seed the database manually through the CLI.
    // This step displays "N/A" so that the workflow doesn't break.
    if (queryResp.items.length === 0) {
      mobile_device = "N/A";
      last_upgrade = "N/A";
    } else {
      const item = queryResp.items[0];

      mobile_device = item.mobile_device;
      last_upgrade = item.last_upgrade;
    }

    return {
      outputs: {
        mobile_device: mobile_device,
        last_upgrade: last_upgrade,
      },
    };
  },
);
This function checks the user’s current device and whether it’s eligible for an upgrade. It fetches this information from a datastore.
Create another file in the functions folder and name it review_request_function.ts. Copy and paste the following code into the file, then save it:
import { DefineFunction, Schema, SlackFunction } from "deno-slack-sdk/mod.ts";
const APPROVE_ID = "approve_request";
const DENY_ID = "deny_request";

export const ReviewRequestDefinition = DefineFunction({
  callback_id: "review_request_function",
  title: "Review a mobile request",
  description:
    "Sends a message to the admin within a thread to approve or deny a request",
  source_file: "functions/review_request_function.ts",
  input_parameters: {
    properties: {
      manager: {
        type: Schema.slack.types.user_id,
        description: "The user's manager",
      },
      requester: {
        type: Schema.slack.types.user_id,
        description: "The requesting user",
      },
      last_upgrade: {
        type: Schema.types.string,
        description: "The date of the last upgrade of a user's mobile device",
      },
      mobile_device: {
        type: Schema.types.string,
        description: "The mobile device of the user",
      },
    },
    required: ["manager", "requester", "mobile_device", "last_upgrade"],
  },
  output_parameters: {
    properties: {
      approval_message: {
        type: Schema.types.string,
        description: "Approval message",
      },
    },
    required: ["approval_message"],
  },
});

export default SlackFunction(
  ReviewRequestDefinition,
  async ({ inputs, client }) => {
    const blocks = [{
      "type": "section",
      "text": {
        "type": "mrkdwn",
        "text":
          `<@${inputs.requester}> is requesting a new ${inputs.mobile_device}, their last upgrade was ${inputs.last_upgrade}`,
      },
    }, {
      "type": "actions",
      "block_id": "approve-deny-buttons",
      "elements": [
        {
          type: "button",
          text: {
            type: "plain_text",
            text: "Approve",
          },
          action_id: APPROVE_ID,
          style: "primary",
        },
        {
          type: "button",
          text: {
            type: "plain_text",
            text: "Deny",
          },
          action_id: DENY_ID,
          style: "danger",
        },
      ],
    }];

    const postResponse = await client.chat.postMessage({
      blocks: blocks,
      channel: inputs.manager,
    });

    if (!postResponse.ok) {
      console.error("Error pulling from database!", postResponse.error);
    }

    return { completed: false };
  },
).addBlockActionsHandler(
  [APPROVE_ID, DENY_ID],
  async function ({ action, body, client }) {
    console.log("Incoming action handler invocation", action);

    const approved: boolean = action.action_id === APPROVE_ID;

    let approval_message = approved
      ? ":white_check_mark: Your request was approved! You'll be sent a new device soon."
      : ":x: I'm afraid that your request was denied.";

    // (OPTIONAL) Update the manager's message to remove the buttons and reflect the approval state.
    const msgUpdate = await client.chat.update({
      channel: body.container.channel_id,
      ts: body.container.message_ts,
      blocks: [
        {
          "type": "section",
          "text": {
            "type": "mrkdwn",
            "text":
              `<@${body.function_data.inputs.requester}> is requesting a new ${body.function_data.inputs.mobile_device}, their last upgrade was ${body.function_data.inputs.last_upgrade}`,
          },
        },
        {
          type: "context",
          elements: [
            {
              type: "mrkdwn",
              text: `${
                approved
                  ? " :white_check_mark: You approved the request."
                  : ":x: You denied the request."
              }`,
            },
          ],
        },
      ],
    });

    if (!msgUpdate.ok) {
      console.error("Error during manager chat.update!", msgUpdate.error);
    }

    await client.functions.completeSuccess({
      function_execution_id: body.function_data.execution_id,
      outputs: { approval_message: approval_message },
    });
  },
);
This function sends the retrieved info and the user’s request to the specified manager for approval. It also includes interactive elements: the approve/deny buttons.
Each of these custom functions has two key components:
- DefineFunction: This defines the function’s structure, including the callback ID, inputs, and outputs.
- SlackFunction: This contains the logic that will run when the function is triggered. For instance, the
GetMobileDeviceDefinitionwill check a datastore to fetch device details.
Datastore
Create a new folder in the project called datastores, then create a new file in the folder named mobile_datastore.ts. Copy and paste the following code into this file, then save it:
import { DefineDatastore, Schema } from "deno-slack-sdk/mod.ts";

/**
 * Datastores are a Slack-hosted location to store
 * and retrieve data for your app.
 * https://api.slack.com/automation/datastores
 */
const MobileDatastore = DefineDatastore({
  name: "MobileDevices",
  primary_key: "id",
  attributes: {
    id: {
      type: Schema.types.string,
    },
    user: {
      type: Schema.types.string,
    },
    mobile_device: {
      type: Schema.types.string,
    },
    last_upgrade: {
      type: Schema.types.string,
    },
  },
});

export default MobileDatastore;
The argument passed into the DefineDatastore() constructor function includes all of the information about your datastore, including the name and primary key of each record. In addition, attributes allow you to determine the properties of each record.
When we interact with a datastore, we use the client.apps.datastore.* methods. Just like with any other datastore, you can perform the usual CRUD operations, specifying in the argument the datastore you’d like to interact with, along with the operation details. You also can perform operations directly from the terminal with the Slack CLI using the slack datastore command.
For a full-fledged test of the app, you will need to populate your datastore with test data. This can be done using the apps.datastore.put or apps.datastore.bulkPut API methods and using this guide.
Next, we need to run the app.
Run the app
Redirect your attention to your terminal and run:
slack run
This allows you to enter development mode and see changes to your code live. During the first run, you’ll be prompted to select a workspace where the app will be installed.
Customize workflow in Workflow Builder
Add custom functions to Workflow Builder
With the app running, it's time to add your custom functions into the workflow:
- Open Workflow Builder and find the workflow you previously created. Click the pencil icon to edit the workflow.
- Click + Add Step, then search for your app by name (
mobile-request-functions) in the step sidebar. - Add the
Check Mobile Databasecustom function. - When prompted for User, click the variable icon to the right of the field, then select
Person who used this workflow, then save.
Add reply in thread step
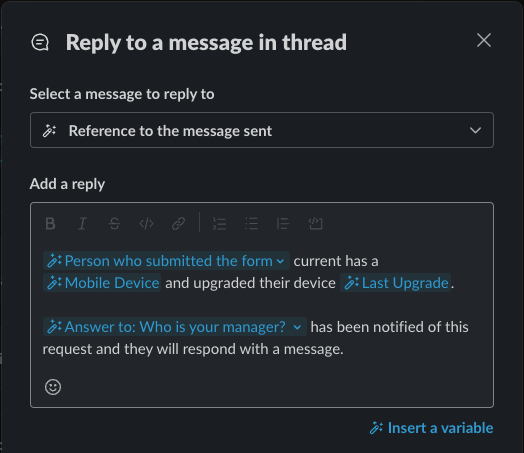
Now that we’ve queried the datastore for the user’s information, it’s time to display that info back in Slack:
- Click + Add Step to add another step to the workflow. Select Messages, then Reply to a message in thread.
- Choose
Reference to the message sentin the Select a message to reply to field. - Add a reply message using the variables from the form and the previous step, then save your changes.
Add approval interactivity
To handle approval from the manager, we’ll need interactive buttons for them to approve or deny the request.
We can't use a regular Workflow Builder message for this because messages that contain interactive elements require logic to handle the button clicks. The buttons we’ll be using are considered interactive components.
Block Kit interactive components are a subset of Block Kit elements, which include buttons, multi-select fields, input fields, etc. In addition to interactive components, there is also the ability to introduce and handle custom modals and their associated submissions.
In this case, we’ll to add the two buttons for our manager to approve or deny our request. There are two ways of adding interactive elements to an app: through message blocks or with the dedicated interactive_blocks property for certain built-ins.
In either case, the action_id property is used to uniquely identify each element to be interacted with and connect it with handler logic. We can see this in the ReviewRequestDefinition function defined above.
{
      "type": "actions",
      "block_id": "approve-deny-buttons",
      "elements": [
        {
          type: "button",
          text: {
            type: "plain_text",
            text: "Approve",
          },
          action_id: APPROVE_ID,
          style: "primary",
        },
        {
          type: "button",
          text: {
            type: "plain_text",
            text: "Deny",
          },
          action_id: DENY_ID,
          style: "danger",
        },
      ],
}
The action_id's value of APPROVE_ID is used in the addBlockActionsHandler function just below that.
...
).addBlockActionsHandler(
  [APPROVE_ID, DENY_ID],
  ...
Within each function there is access to a client object. This can be used to make calls directly to the Slack Web API. We see that in the GetMobileDevice function. Behind the scenes, the Deno Slack SDK passes along the required token used to make such calls possible.
    const queryResp = await client.apps.datastore.query<
      typeof MobileDatastore.definition
    >(
      {
        datastore: MobileDatastore.name,
        expression: "#user = :user",
        expression_attributes: { "#user": "user" },
        expression_values: { ":user": inputs.user },
      },
    );
Just as we did with our first custom function, we'll now add the function we just created as a step in our workflow.
Direct your attention back to Workflow Builder; the project should still be running in the Slack CLI.
- Within the edit screen of your workflow, again click + Add step.
- Find your app by name in the step sidebar.
- Add the
Review a mobile requestcustom function as a step in your workflow. - For Manager, use the variable Answer to: Who is your manager?. For Requester, use the variable Person who used this workflow. For Last upgrade, use the variable Last Upgrade. For Mobile Device, use the variable Mobile Device.
Save your changes.
Respond in thread with approval
Once our manager acts on the request from the DM they’ve received, we want to communicate this response back to the employee in our original thread.
At this step, we have a new variable available (Approval Message) that we obtained from the previous step as an output of our custom function.
Add another step to the workflow. This time, the Reply to a message in thread step found in the Messages collection. Choose Reference to the message sent in the Select a message to reply to field, then add a reply message using the variables from the form and the previous step.
With this last step, save the changes by clicking on the publish button on the workflow. We don’t need to update the workflow link, since it’s still the same workflow.
Let’s test our complete workflow. Head back to the channel where you bookmarked the workflow, and run it!
Deploy your app
With everything working locally, it’s time to deploy your app to Slack’s infrastructure. This means that the functions will be available without you needing to run it from your local machine, and you can access it any time you’d like!
In your terminal window, run slack deploy. This will package your app, initialize the datastore, and make your functions available in Slack.
After deploying, you’ll need to replace the custom functions in Workflow Builder with the new ones from the deployed app because the app now lives on Slack’s servers, not on your local machine.
Uninstall the local app
Once your app is deployed, you can remove the local version. To uninstall, run slack delete in your project’s root directory. You’ll be prompted to choose whether you want to remove the local version or the deployed version.
An action with potential consequences to end users, the Slack CLI will ask you if you’re certain you’d like to proceed.